Lotus Jar Skirt

This was a special pattern test as this is the inaugural pattern release from Linen Lab which is a family-owned fabric company based Korea. Another thing that makes this special is that they have based it on traditional Korean Hanbok. Just reading the history and background of the design was so interesting.

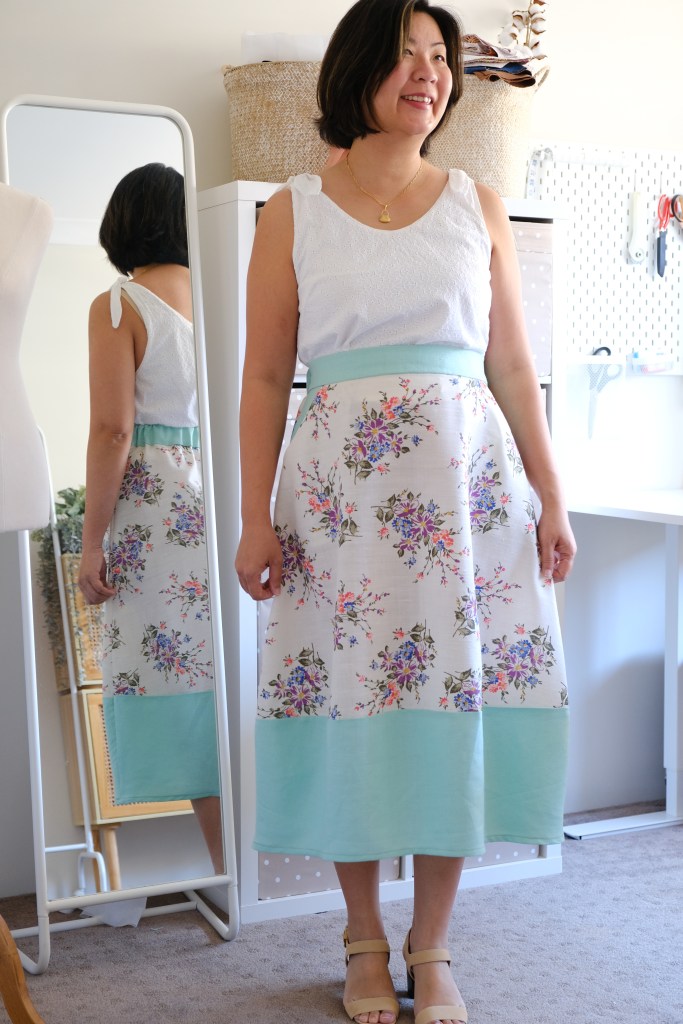
The Lotus Jar Skirt has a unique shape where the skirt billows out then taper back at the bottom of the skirt. The shape and how it’s held is determined by the type of fabric you use. Of course, the more structured fabrics show the shape more obviously. I’ve used two contrasting linen fabric with medium weight and drape. I’m thrilled that it’s holding that beautiful shape of the lotus jar which is so elegant. The skirt has a half elasticated waistband which is so easy to fit and wear. 

The instructions are accompanied by photographs so it’s probably going to limit the use to those who work off a computer. I think you could print the instructions, but it might not be as clear. Generally, if you have some basic knowledge in sewing, it’s not hard to follow. It’s an enjoyable sew to bring together and doesn’t take too long either. 

Sizing was pretty spot on for me. My waist being 33 inches and hips measuring 40 inches, I made the size 12 without any modifications. My height is 167cm and the skirt is a midi length as intended by the pattern. Conveniently, the skirt has been drafted with shortening and lengthening lines. My second favourite feature apart from the fabulous shape of the skirt are the big pockets!

I loved testing for Jo-Anna @sewingwithlinen who the designer of the skirt is. It was easy to give feedback and any questions were quickly answered. It’s a fun pattern to sew with potential for it to look different according to the fabric that you choose. There’s even the potential to hack it into an A-Line skirt! I think that Linen Lab might be making this a free pattern for their customers!

Thanks for reading and happy sewing!

X Em

Avola Top

Another great pattern from Cashmerette! I love this wide strapped version of this camisole top from Cashmerette. I wanted a plain white camisole top, and this is such a well-fitting top. I’m also very happy with the length as I prefer to wear my tops untucked so this lands at just the right spot for me.

I’ve used the Cashmerette sizing calculator, and it has been so accurate that I have been confidently skipping the toile. Not that it’s recommended but I’m sewing for an upcoming trip and this sizing calculator has not let me down yet! For my measurements of 35HB: 38FB: 33W, it was recommended that I sew a C Cup, size 10 bodice grading to a size 14 waist. I think it’s very comfortable and the only adjustment needed was to trim 1.5 inches off the straps.

The fabric is from my stash. It’s a beautiful white linen/cotton blend with subtle texture created by the weave.  For the lining, I’ve used a white muslin. I tend to use muslin for lining because it’s very light and the weave is loose, so it’s works very comfortably as lining. Sometimes, if the lining is made from stiff cotton, it can pull the shell of the top or dress out of shape. Whatever, you use for lining must be loose and have some give.

This pattern also comes as a dress. I have some fabric earmarked for the dress. This pattern is lovely as a slip dress. I want to use the other strap option which is a narrow strap and uses rings and sliders to make it adjustable. That would be something new to try as I’ve never sewn that before.

A future Avola Dress?

This top will be a great core item in my closet. It’s fun to make colourful dresses but it’s items like this which are the workhorse of a closet! Happy to be adding to my basics collection.

Thanks for reading and happy sewing!

X Em

Sorrento Shorts

When Eloh Patterns released the Sorrento Shorts pattern, I was quick to jump on and buy it because I love the look of that flat front and I find semi elasticated trousers and shorts to be quite comfortable. Anything that doesn’t squeeze me in the middle! These shorts come with the bonus of extra big pockets, and I love the little flare facilitated by the pleats in the front.

It’s a straightforward pattern to sew and fit. I made a size 12 with my waist measurement of 33 inches and hip measurement of 40 inches. I did receive an email after my purchase with updated instructions about choosing the right size as the waistband is narrower than the hips. I usually look at both hip and waist measurements before deciding on a size. Sometimes I grade between sizes. I was unsure why that instruction had to be updated in the pattern? I did my usual try on before attaching my waistband and everything worked out fine in the sizing.

The pattern suggests medium weight fabric, so I chose to use some leftover poplin from my stash. Feeling very pleased that I’m working through my stash this year. If I’m honest, the motivation to get through the stash is so I can justify buying some great fabric that I’ve bookmarked. Just waiting for sales! The poplin has worked very well for the pattern.

Seam allowances. This pattern has 2cm as the seam allowance due to French seams. I must be honest and say that I overlocked my seams as I only tend to use French seams with thin, lightweight, or delicate fabrics. I know it’s the choice of the seamstress and the pattern maker but I was wondering if the French seams would be bulky in this category of fabric? I ended up trimming all my seam allowances down to 1cm to reduce bulk. I guess you can argue that 2cm is not that far from a 5/8-inch seam allowance which is quite standard for woven fabric patterns so I didn’t necessarily have to trim the seams down. 

Generally, my one little criticism is a storm in a teacup because overall, Eloh patterns has impressed me. The fit, design and instructions that included illustrations are an excellent standard. I won’t hesitate to purchase more of her patterns. It was a really relaxing sew which is much needed after a stressful week. I love how sewing focusses my mind on something completely different for a while. Also, straight after sewing, I put them on, and they are superbly comfortable to wear! Great for the heatwave we are experiencing.

Thanks for reading and happy sewing!

X Em 

Holyoke Dress featuring Melco Fabrics

This is not a sponsored post. Melco fabrics gifted me the fabric and reached out for a review without any obligations to post. When Melco fabrics reached out to me, I hadn’t really heard about print on demand fabrics. Basically, the concept is that you can order from a variety of featured artists, in this case, Deer Fiorella, and you can order the substrate and fabric amount needed which is what will be supplied. Less waste, more sustainable and environmentally responsible. I love that this is happening in the sewing arena. 

I chose the Gypsy Girl Sundance for my Holyoke Dress in a poplin. The Holyoke is a Cashmerette Club pattern which is a maxi dress featuring princess seams, button placket, a partially elasticised waistband and most importantly, pockets. I had used the skirt of this pattern to pair with the Hamden dress bodice in a previous make, but I really wanted to make the Holyoke dress in its original form.

Poplin is not the usual type of fabric that I reach for, but I wanted to try a more structured look for the dress. Poplin was a popularised in the 1950s with those beautiful full skirt dresses. It’s really durable and wrinkle resistant but still lightweight enough to wear comfortably in warmer weather. I’m really impressed by the quality of the dye and the cotton from Melco. There was no loss of colour when I gave the fabric a hot wash and iron when preparing the fabric for sewing. It’s normal to expect a bit of shrinkage from cotton which is why it’s important to prepare the fabric before sewing. The amount wasn’t noticeable for my pattern.

The poplin is 110 grams per square meter (GSM) with medium drape, so I used a universal needle size 90/14 on my machine. This worked very well but I had a bit of a hairy moment when I was trying to sew through several layers of fabric at the waistband. I think there were a few skipped stitches, but I wasn’t going to redo that area as I was just grateful not to break any needles. I guess I could have sewn up to the waistband and then swapped the needle to a heavier size, but the button does close over the waistband anyway.

Sizing a Cashmerette dress is so easy because of the unique sizing calculator for their patterns. It’s as easy as punching your numbers in and getting your sizing recommendation. Mine was 35-inch high bust, 38-inch full bust, 33-inch waist and 40-inch hips which recommended a size 10 bodice, size 14 waist and size 8 hip. I still made a toile as poplin does not have any stretch, so the sizing needs to be spot on. I followed the “Sew a quick and dirty muslin” tutorial for the toile. It is greatly detailed for anyone who isn’t familiar with the toiling process. I ended up making a slight adjustment to the side seams of the bodice.

Melco have really impressed me with the quality of their product. I love the designers featured and the fabric is a beautiful quality. I’m thrilled that they’re not just producing beautiful fabric, but they are passionate about ethical and sustainable fashion. Making and wearing something that has had a light touch on the environment makes me feel good about being someone who sews because sewing supports slow fashion for some of those same reasons.

Thanks for reading and happy sewing!

xEm

Joni Blouse

Pattern Scout has released a new pattern! I was lucky enough to get on the testing team. I love testing for Pattern Scout, the patterns are always well set out and comprehensive. It makes sewing so straight forward. Another reason I wanted to do this test was that the pattern included shirring which is a skill that I have been curious about for a while now. 

The style of the Joni Blouse is very feminine and has the cottage core look with the puff sleeves, gathers around the square neckline and shirring to add shape. I’ve made the blouse version for the test, but I can’t wait to go back to sew the dress version. Now that I’ve figured out shirring, I’m hooked and can’t wait to do more of it. In the dress version, there’s multiple rows of shirring on the back bodice.

The Joni Blouse is made for lightweight woven fabric. I’ve used a beautiful crepe which I found at my local Spotlight Store. I would have also used a lightweight linen, rayon, or cotton lawn. The crepe is very light weight and easy to wear. The blouse only required about 1 ½ meters of this fabric. I also had to get shirring thread which is a very fine elastic thread that must be transferred to a bobbin. 

Some tips that I would recommend for shirring is to test out a piece of your fabric before starting. I played around with the tension because when I first started, I couldn’t see much gathering. I increased the stitch length to the longest length, and I also moved my tension dial up to a 7. I hand wound my elastic thread onto the bobbin and was firm but did not pull on the elastic thread. The instructions also gave some tips how to sew multiple rows of shirring which I’ll test out when I make the dress version. I did a back stitch at the beginning and end of the row, but I wasn’t sure if this is something that everyone does?

My sizing was in the size 12 range and with the generous amount of ease, I did not have to make any fit alterations. My measurements are 35HB:37B:33W. This pattern has a range of sizes from 0 to 30. The best thing about Pattern Scout patterns is the cup size option. So good that I don’t have to do an SBA! I used the B Cup option.

The construction came together quite quickly. I love the construction of the square neckline. The drawstring is threaded through a channel that you make around the neckline which makes it easy to shape to the size you want and sits so comfortably. Also, the sleeves come in three options and its summer here, so I made the short-sleeved version. It was easy to install with the raglan sleeves.

First pattern test of the year! So excited to discover a new pattern. Hope that there’s more to come. 

Thanks for reading and happy sewing!

X Em

Launching into 2024

Setting down some goals for the new year like everyone else! Creatively, I don’t think the way I’ve sewn in the past year, has advanced my sewing. It’s been a bit random, and I’ve just listed a bunch of patterns that I wanted to sew. When I first started, my sewing was more targeted like when I wanted to learn how to install zips, I chose a lot of patterns that had zip installation in the pattern. Returning to those learning based goals, I’m going to slow the process down and really think about each detail of the process which will also mean that I document the process a bit differently. Don’t get me wrong, I’m still quite spontaneous in my sewing endeavours and when inspiration hits, I will probably still want to have a speedy sew or two but generally, I think it will be useful to record some of the work in progress in more detail.

Back to thinking about documentation, I find documenting my makes helps my learning process so I will continue to do it. I’m mainly focussing on skills but I want to expand my knowledge on fabric. I’ve built up quite a collection over the few years so this year I’m combining my Make Nine with a new prompt called Sew What I Have. The idea is to sew what fabric you currently have in your stash. I’m not promising not to get more but I’m going to be better at reaching for what I have before I go shopping.

What will this mean for my Blog? I’ve been recording my makes according to the items made. I’m thinking of expanding this to highlight some of the skills that are featured in each pattern which might make the blogs more useful and more of a discussion platform. I’m mainly interested in learning so I’m always grateful when other makers tell me how they might do something. I’m happy with constructive feedback. Afterall, I’m only self-taught and have only been sewing for three and a bit years. I fully respect the industry experts and the makers that have been sewing since they were able to reach the sewing machine.

Here are some completed makes from 2023 that were from my Make Nine list. I deviated from it which meant that I ran out of time and motivation so I did not sew everything on the list.

Thanks for reading and happy sewing!

X Em