Fiske Pajama Set

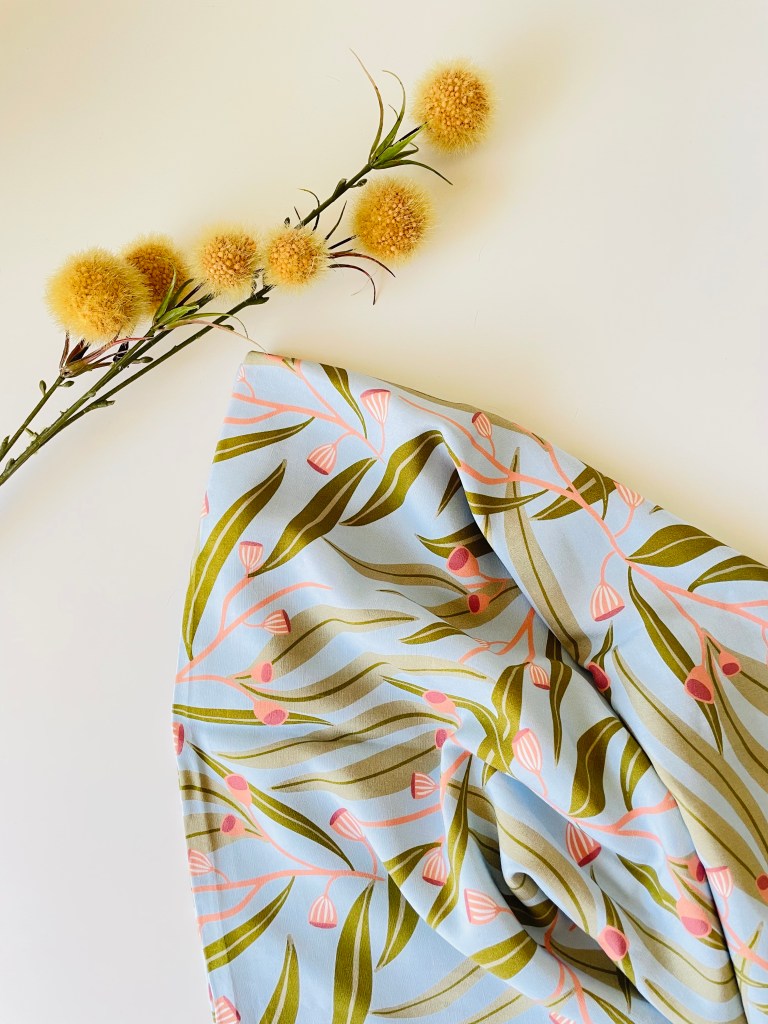
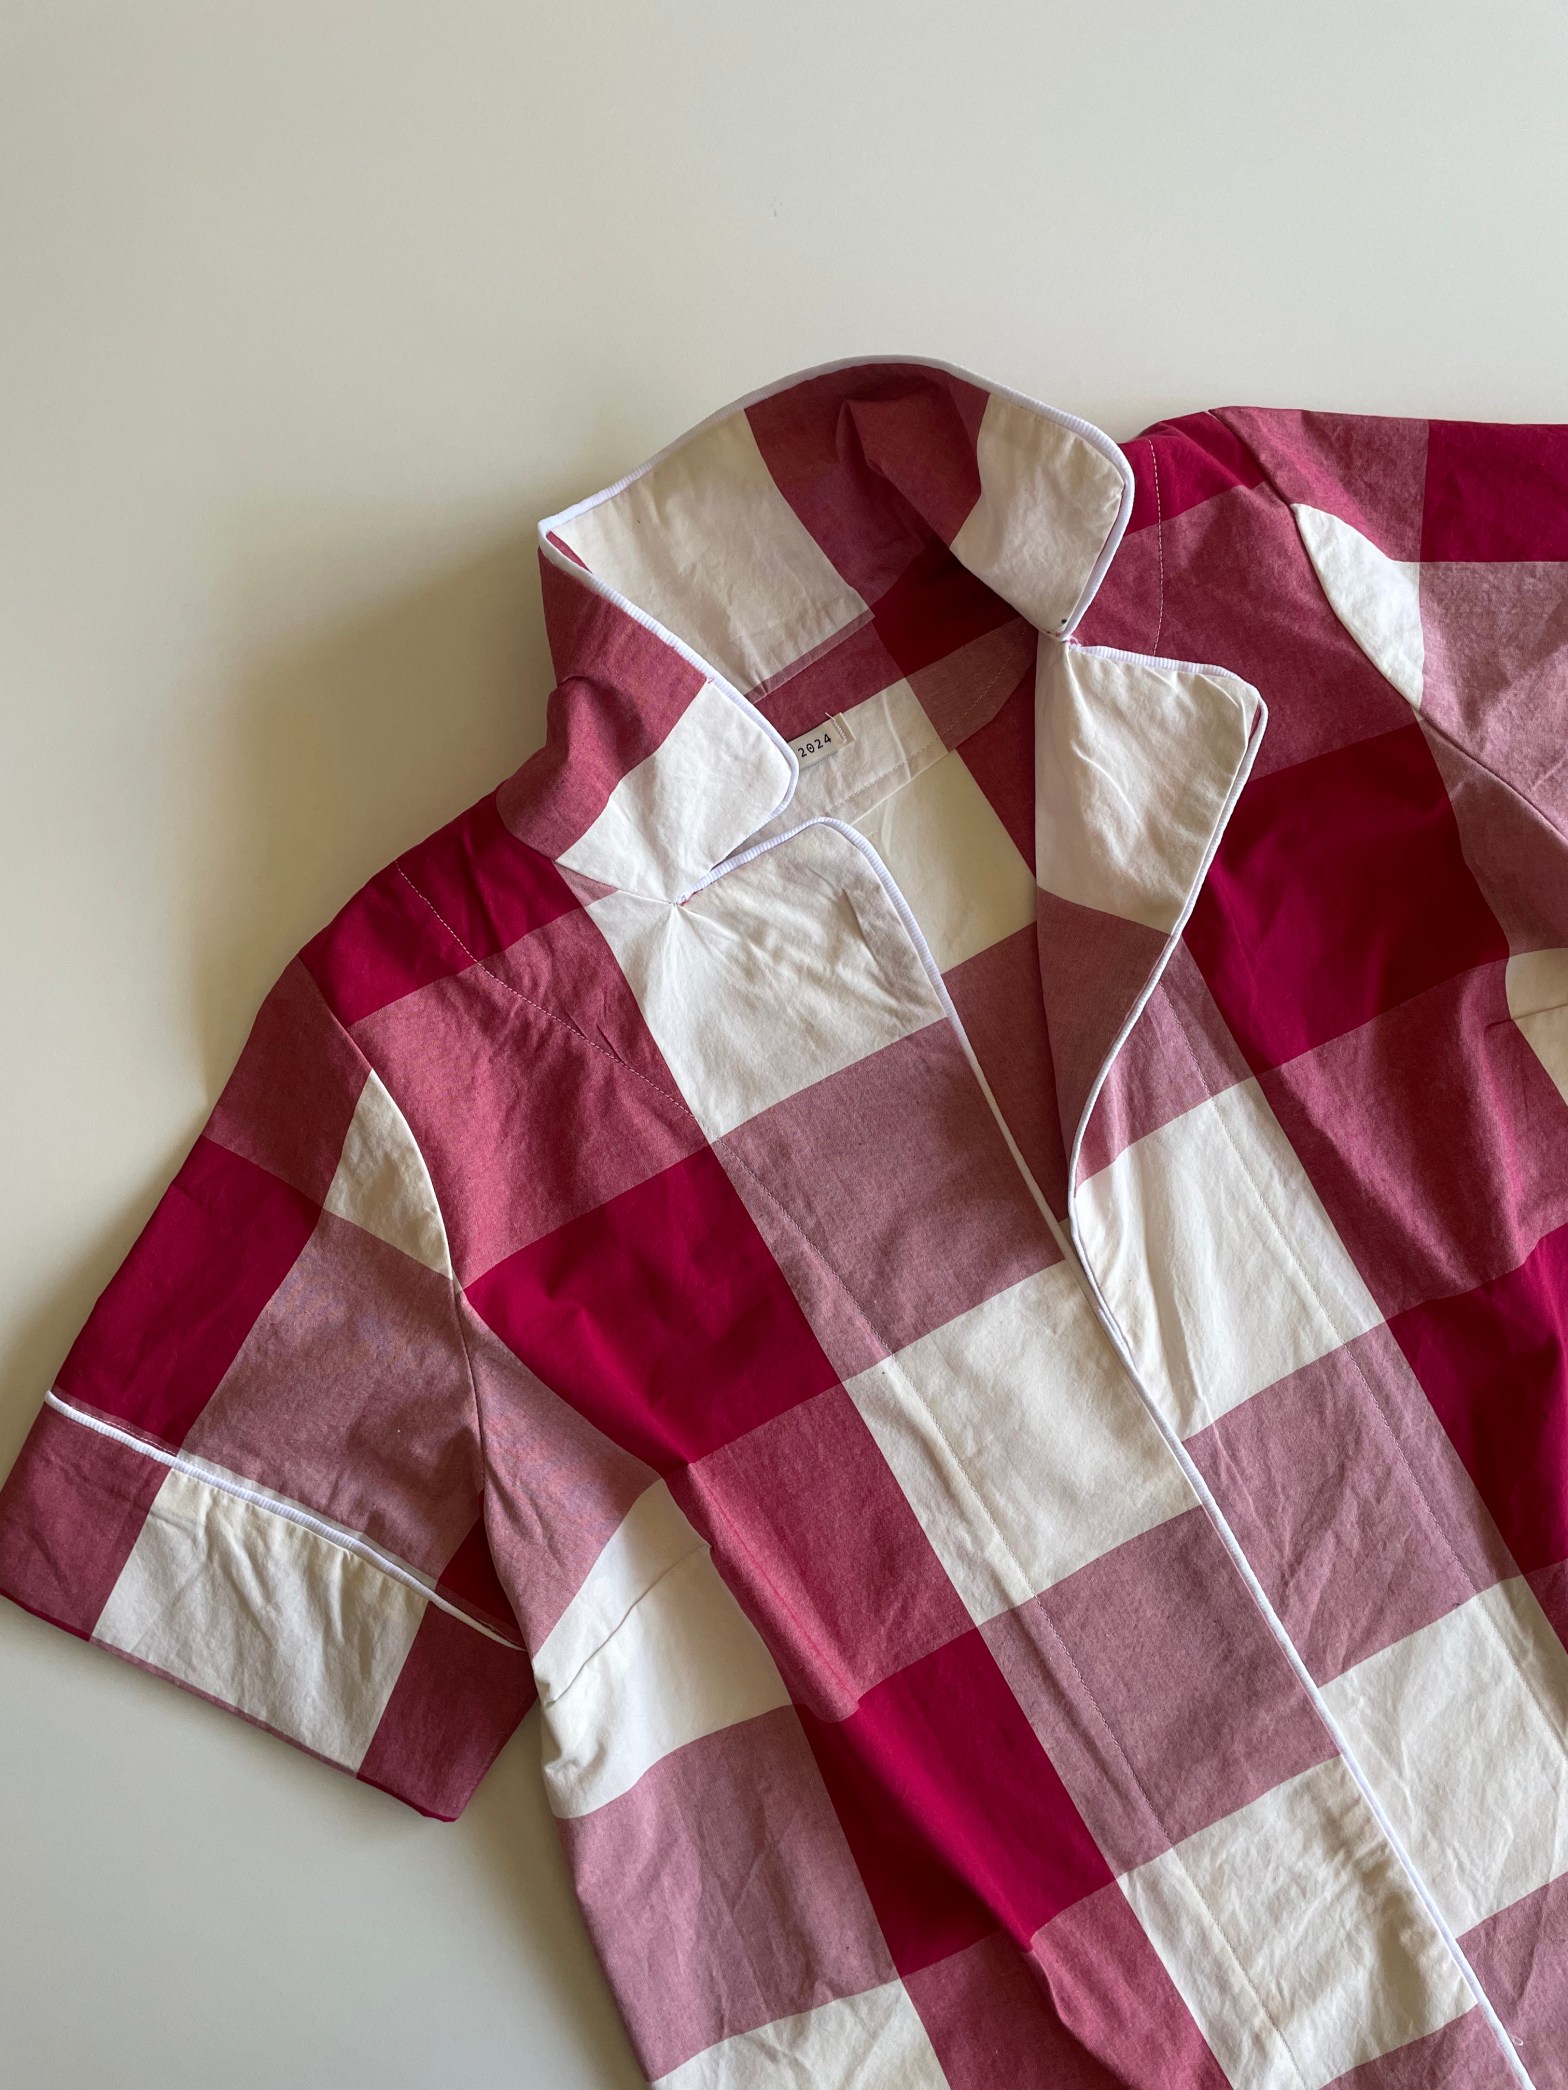
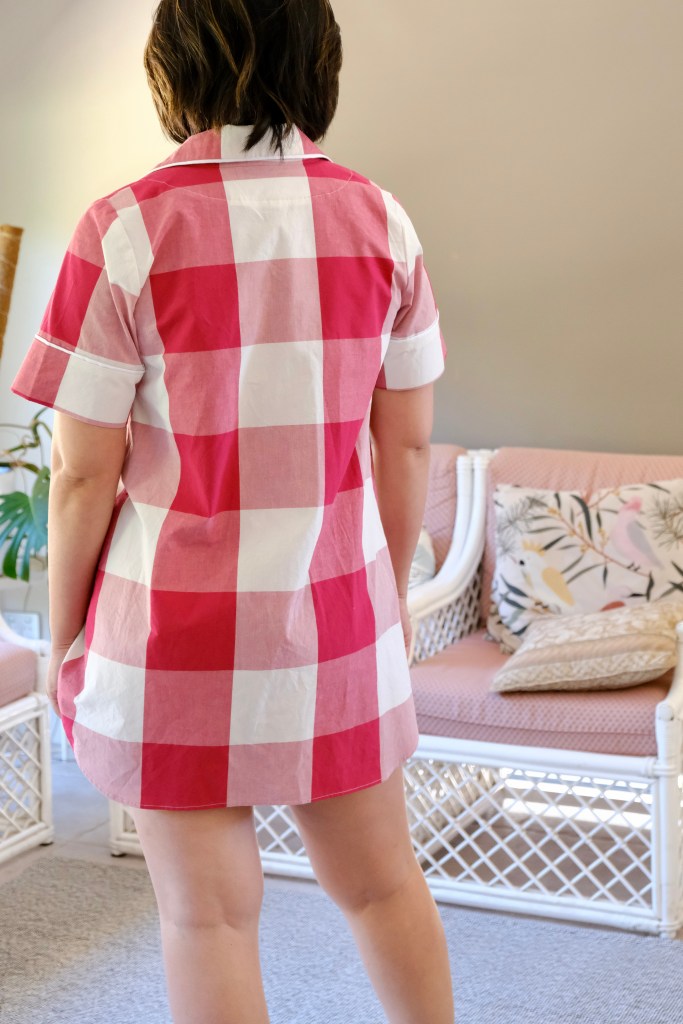
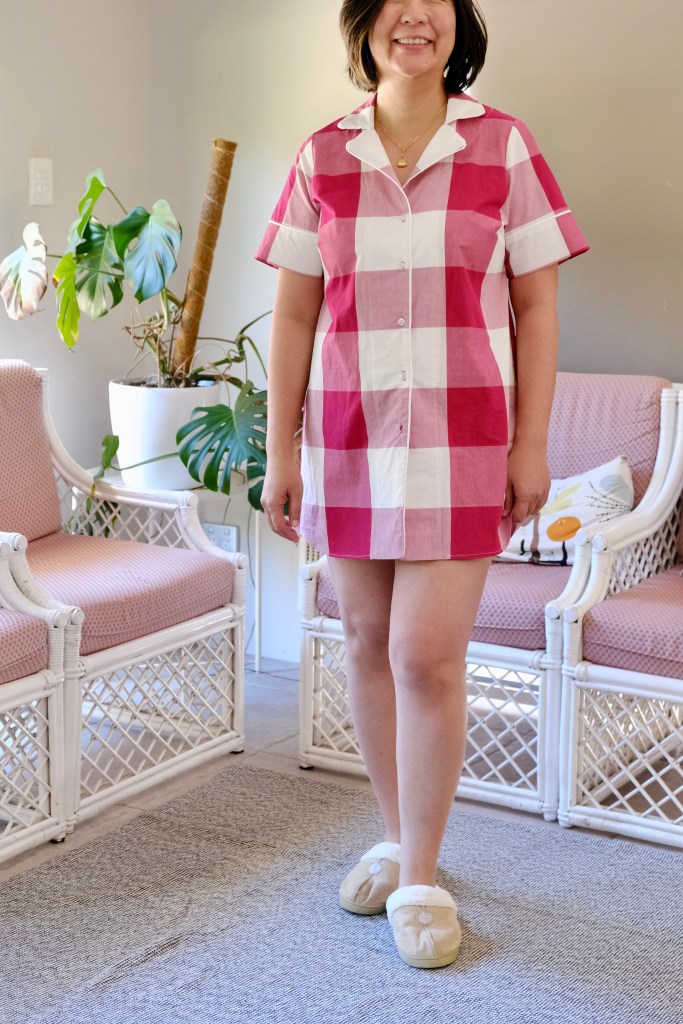
Cashmerette released the Fiske Sleepwear Set which was packed full of options. There is a camisole and nightgown, there is also the classic pajama set with nightshirt option and to top it all, a gown as well. This time, I chose to sew the Fiske nightshirt with pajama shorts. Even within the set, it came with a lot of options. The detail I was most interested trying was the piping.

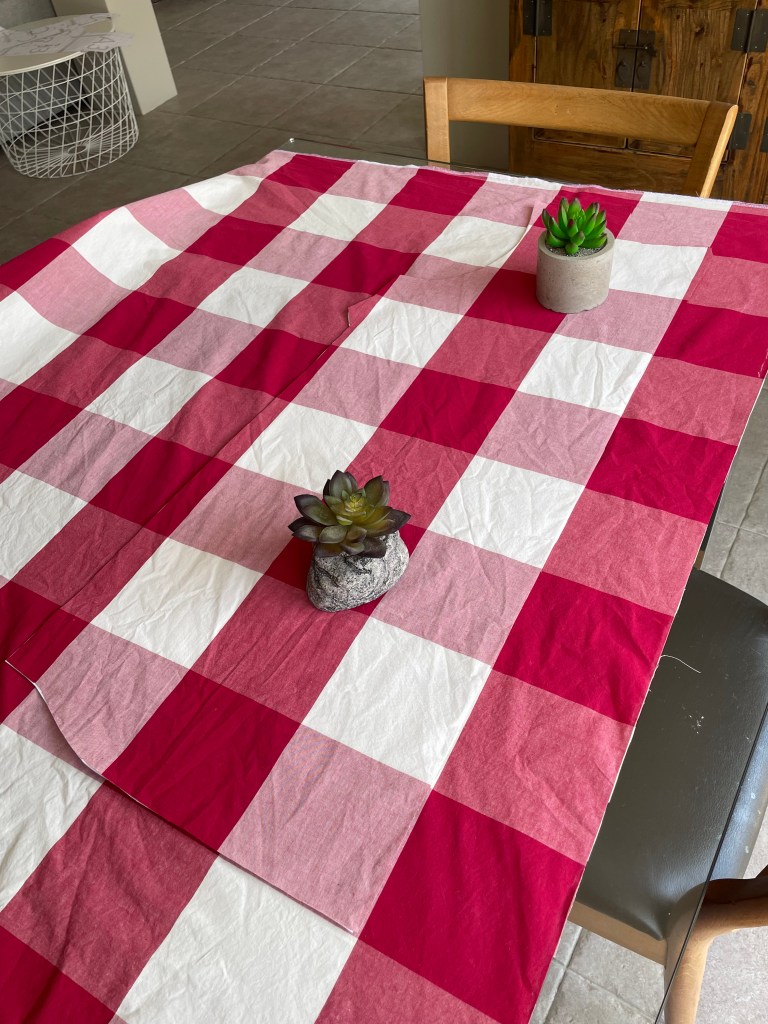
The pajama set is made for woven fabric, so I was looking for something comfortable for sleepwear. I was drawn to this XL gingham from Spotlight Stores. It’s 100 percent cotton and softly lightweight. It did add a degree of challenge with the pattern matching but I really enjoyed taking the time cutting and thinking about pattern placement. Sewing mindfully is something I try to do so even though it added to the difficulty, it also adds to the enjoyment of the project. My tip with pattern matching is to make sure you buy a little bit more fabric than suggested. My fabric width was 114cm and I bought 3 meters. I think I ended up using 2.5m for the nightshirt and used the rest to sew up the pajama shorts without cuffs.

I’ve sewn quite a few Cashmerette Patterns now so I can judge my sizing quite easily. There is a Cashmerette Sizing Tool available, and I used this consistently when I first started sewing their patterns. For my nightshirt, I chose to make the size 10 for my measurements of 38-inch bust, 33-inch waist and I made the size 12 for the pyjama shorts (33-inch waist and 40-inch hips). Both fit very comfortably and I find them both true to size.

The instructions were easy to follow and were both written and illustrated. There was only one point of confusion which was when I got to sewing the shorts. My waistband did not fit and was too long, so I ended up removing about 5cm from both waistbands which worked. I haven’t had a chance to check on the chat forums in Cashmerette Club. I have a feeling that the waistbands might have been made to fit the shorts with the stripe which I did not attach. On occasions like this, I really appreciate the club chat forum! 

Fiske Nightshirt with Pyjama Shorts

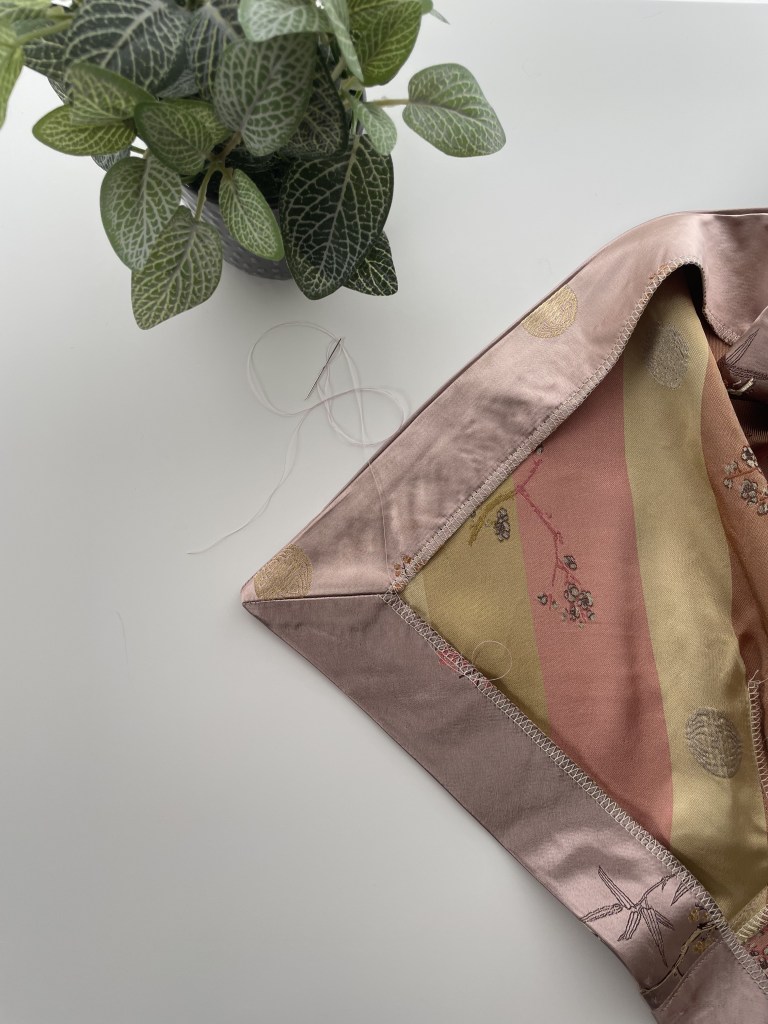
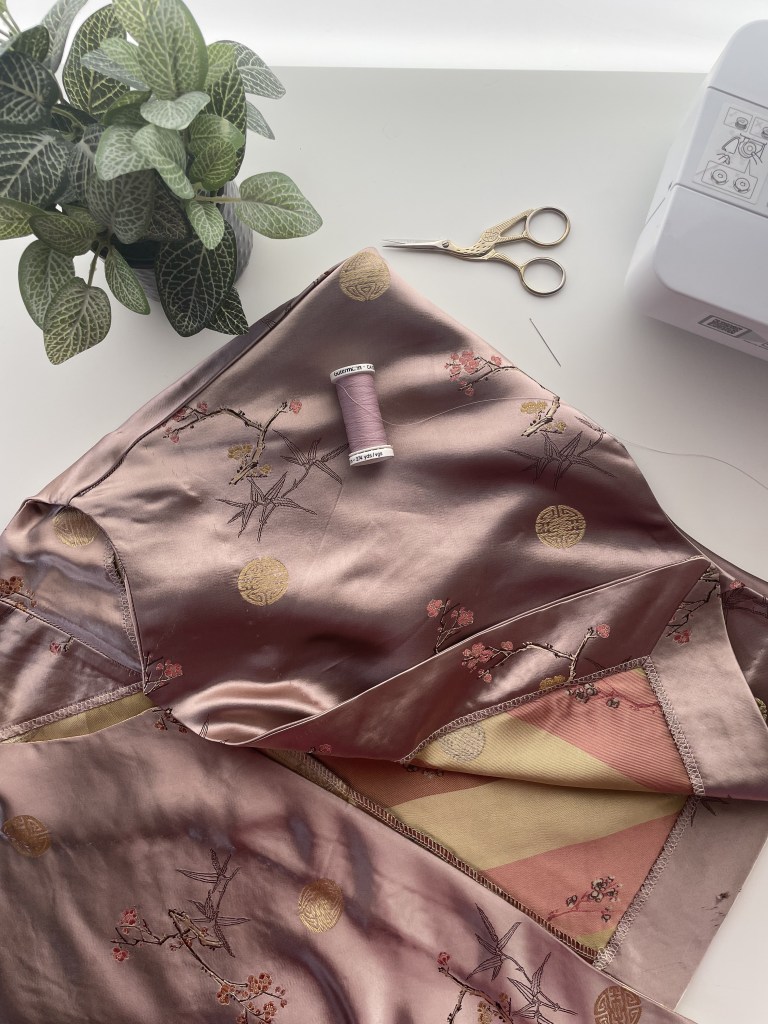
The piping was surprisingly easy to attach. The instructions were very detailed, and everything was outlined step by step, so I think this went a long way in making it easy for a beginner. I had a moment around the collar and lapel because I hadn’t run the piping far enough around the dot marked on the pattern piece. It’s all in the instructions so I just had to follow more carefully.

So happy to be adding this to my Cashmerette makes. I’ll be trying out the other options included in this pattern bundle soon. I’ve been making Cashmerette patterns for a while now and Cashmerette have generously provided their collaborators a discount link. If you’ve been planning to try out a sewing club, you can use my link to get a discount for yourself! Please see below for all the details.

The All Access level of Cashmerette Club is 25% off through November 30th. And if you sign up my special link, you can get 25% off All Access AND an extra special gift: a bonus free Cashmerette PDF pattern of your choice! Here’s how it works:

  1. Go to  cashmerette.com/emsewhappy and add the free gift to your cart. (This is an affiliate link. If you choose to make a purchase after clicking this link, I may receive a commission at no additional cost to you.)
  2. Then go to cashmerette.com/club and add All Access to your cart
  3. Complete the checkout and within a few minutes, you’ll receive an email with a coupon code that you can use for a free PDF pattern.

Thanks for reading and happy sewing!

X Em

Avola Top

Another great pattern from Cashmerette! I love this wide strapped version of this camisole top from Cashmerette. I wanted a plain white camisole top, and this is such a well-fitting top. I’m also very happy with the length as I prefer to wear my tops untucked so this lands at just the right spot for me.

I’ve used the Cashmerette sizing calculator, and it has been so accurate that I have been confidently skipping the toile. Not that it’s recommended but I’m sewing for an upcoming trip and this sizing calculator has not let me down yet! For my measurements of 35HB: 38FB: 33W, it was recommended that I sew a C Cup, size 10 bodice grading to a size 14 waist. I think it’s very comfortable and the only adjustment needed was to trim 1.5 inches off the straps.

The fabric is from my stash. It’s a beautiful white linen/cotton blend with subtle texture created by the weave.  For the lining, I’ve used a white muslin. I tend to use muslin for lining because it’s very light and the weave is loose, so it’s works very comfortably as lining. Sometimes, if the lining is made from stiff cotton, it can pull the shell of the top or dress out of shape. Whatever, you use for lining must be loose and have some give.

This pattern also comes as a dress. I have some fabric earmarked for the dress. This pattern is lovely as a slip dress. I want to use the other strap option which is a narrow strap and uses rings and sliders to make it adjustable. That would be something new to try as I’ve never sewn that before.

A future Avola Dress?

This top will be a great core item in my closet. It’s fun to make colourful dresses but it’s items like this which are the workhorse of a closet! Happy to be adding to my basics collection.

Thanks for reading and happy sewing!

X Em

Holyoke Dress featuring Melco Fabrics

This is not a sponsored post. Melco fabrics gifted me the fabric and reached out for a review without any obligations to post. When Melco fabrics reached out to me, I hadn’t really heard about print on demand fabrics. Basically, the concept is that you can order from a variety of featured artists, in this case, Deer Fiorella, and you can order the substrate and fabric amount needed which is what will be supplied. Less waste, more sustainable and environmentally responsible. I love that this is happening in the sewing arena. 

I chose the Gypsy Girl Sundance for my Holyoke Dress in a poplin. The Holyoke is a Cashmerette Club pattern which is a maxi dress featuring princess seams, button placket, a partially elasticised waistband and most importantly, pockets. I had used the skirt of this pattern to pair with the Hamden dress bodice in a previous make, but I really wanted to make the Holyoke dress in its original form.

Poplin is not the usual type of fabric that I reach for, but I wanted to try a more structured look for the dress. Poplin was a popularised in the 1950s with those beautiful full skirt dresses. It’s really durable and wrinkle resistant but still lightweight enough to wear comfortably in warmer weather. I’m really impressed by the quality of the dye and the cotton from Melco. There was no loss of colour when I gave the fabric a hot wash and iron when preparing the fabric for sewing. It’s normal to expect a bit of shrinkage from cotton which is why it’s important to prepare the fabric before sewing. The amount wasn’t noticeable for my pattern.

The poplin is 110 grams per square meter (GSM) with medium drape, so I used a universal needle size 90/14 on my machine. This worked very well but I had a bit of a hairy moment when I was trying to sew through several layers of fabric at the waistband. I think there were a few skipped stitches, but I wasn’t going to redo that area as I was just grateful not to break any needles. I guess I could have sewn up to the waistband and then swapped the needle to a heavier size, but the button does close over the waistband anyway.

Sizing a Cashmerette dress is so easy because of the unique sizing calculator for their patterns. It’s as easy as punching your numbers in and getting your sizing recommendation. Mine was 35-inch high bust, 38-inch full bust, 33-inch waist and 40-inch hips which recommended a size 10 bodice, size 14 waist and size 8 hip. I still made a toile as poplin does not have any stretch, so the sizing needs to be spot on. I followed the “Sew a quick and dirty muslin” tutorial for the toile. It is greatly detailed for anyone who isn’t familiar with the toiling process. I ended up making a slight adjustment to the side seams of the bodice.

Melco have really impressed me with the quality of their product. I love the designers featured and the fabric is a beautiful quality. I’m thrilled that they’re not just producing beautiful fabric, but they are passionate about ethical and sustainable fashion. Making and wearing something that has had a light touch on the environment makes me feel good about being someone who sews because sewing supports slow fashion for some of those same reasons.

Thanks for reading and happy sewing!

xEm

Dewey Dress

The Dewey Dress is the pattern of the month December for Cashmerette Club. I’ve received my membership due to a previous collaboration, but all opinions remain my own and there was no obligation to sew this. I feel very lucky to have been gifted this Club Membership as it feels like I’ve really learnt a lot and have been able to develop my skills. I’m self-taught so I really do rely on good instructions and tutorials when I sew.

With the holiday season in full swing, I was on the lookout for a dress and when the Dewey Dress popped up, it fit the bill perfectly. It’s a knit fabric dress with a unique asymmetrical neckline which is carried through to the pleating on one shoulder and pleating the opposite overlay. The tulip skirt is fully enclosed with the overlay creating a faux wrap look. It’s sleeveless but I’ve seen a few other makers combining the Dewey pattern with elements from the Grafton, which is a mix and match pack, to add sleeves to their dresses.

I don’t have a great amount of experience sewing with knit fabric but I’m feeling more confident as I practise. My knit fabric was bought two years back in the Christmas sales. It’s a stable cotton jersey (like t-shirt material). One day, I’d love to try it in a fabulously glamourous metallic lamé. I had about 5 meters available, so I used the same fabric for lining the bodice. I had a little freak out when I cut the fabric because I had cut from the right side facing up like I usually would but reading the instructions more carefully, it did say to cut from the wrong side facing up. I thought that I would have to restart with another fabric but because I was consistent with cutting from the right side, it was fine. The only visible consequence is the reversal of which side the pleats sit on and my pleats face the wrong way. 

For sizing, I made the size 10 without any modifications for my measurements of 35HB:38FB:33W:40H (inches). I used the C Cup bodice. I think the fit was great. There is a great sizing calculator that is available for all Cashmerette patterns, so I often refer to it to check. I decided not to grade as this is a knit fabric garment. 

The process I enjoyed the most with this pattern was using the burrito method to finish the armholes. There’s no visible stitching from the outside. The whole construction process went smoothly because the instructions are always very comprehensive and there are great illustrations accompanying the instructions. I did also appreciate the YouTube tutorial by @SewSewLive. It’s always great to see someone else’s process when they sew.

There will be a few more items I hope to finish before the end of the year but I’m doubtful about accomplishing anything as I have a lot of spring cleaning that I’ve neglected. Sewing is always more fun right? I have also discovered Diary of a Vampire. It’s a teen drama but I have been binge watching as the last day to watch it is 31 December on Netflix and there are 8 seasons! Oh and of course, getting everything ready for Christmas. I’m sorry if I haven’t been able to get back to everyone’s messages but I really appreciate your readership.

Thanks for reading and happy sewing!

X Em

Catskills Jacket

My latest make is the Cashmerette Catskills Jacket. They collaborated with Julie Eilber to design this lovely bias-cut jacket. The inspiration came from the designs of Claire McCardell who was famous for her ready to wear outfits in post war America. She is credited with creating American Sportswear and was famous for her matching sets.

The Catskills Jacket is the perfect cropped jacket with grown-on sleeves. The bias cut makes it drape beautifully and I love the roomy feeling under the arms. I can throw this on over a dress and it will be perfect as a layering piece in the warmer months. I don’t deal with the cold well and that includes the air-conditioning that everyone ramps up in the summer!

This beautiful fabric was given to me by a lady who was gifted it about thirty years ago. She heard that I did some sewing and she wanted me to have it. We think it might be silk satin but can’t be a hundred percent sure. Unfortunately, there had been some damage to the fabric due to its time in storage. Some of the threads had pulled on something so there were patches which I had to cut around. It was also very narrow at 90cm. She thought that perhaps the fabric might have been good for cushion covers but I felt I could use it for the Catskills Jacket. Due to the bounciness and thickness of the fabric, I couldn’t use the French seam instructions but instead finished the seams with an overlocker. I also had to do a fair bit of hand sewing to finish the facing.

Sizing of the jacket was very accurate. I made the size 10 for my measurements of 37-inch bust and 33-inch waist. I’ve chosen to sew the ¾ sleeves as it will be used in the warmer months. The pattern allows for a choice between five buttons with thread loops or eight hooks and eyes. I had some red frog fastenings but after some discussion on my Instagram, I decided the colour was a mismatch for the fabric. I’ve decided to leave off any closures as I’m not likely to need to do up the jacket when worn. I choose to reserve judgement but with the fabric it’s easier to attach buttons later than remove them.

I can’t wait to share my make with the lady who gifted me this beautiful fabric. I am blown away that it could turn into something so gorgeous. It has also made me more determined to sew up my fabric stash and make the most of them while they are in good condition as I’m in the habit of storing my “special” fabrics rather than sewing them up.

Thanks for reading and happy sewing!

X Em

Selwyn Top

[This blog post contains an affiliate link, but all opinions remain my own.]

When I first started sewing, I searched for simple lines with few details and avoided zips and buttons when possible. Now as I rack up a few more hours of sewing, I find myself seeking those exact features in a pattern. The Selwyn Top which is the latest pattern from Cashmerette Club is full of beautiful details like pintucks, ruffles and a banded collar as well as the gape free button placket. 

This top is made for lightweight woven fabrics. I’ve used a textured white cotton voile. This is an addition to my tropical getaway capsule which I’m counting down to with the cold weather now setting in! The fabric is slightly sheer and very breathable so it’s great for humid weather. 

The sizing was easy. I didn’t use the sizing calculator this time, but it is a very handy tool to know where to start in the toiling process. Talking about toiling, I must confess that I did not toile this blouse. I’ve been sewing Cashmerette Club patterns now since February, so I felt confident about the sizing. I guess that is one of the many advantages of joining a club. Because all your patterns come from the same source, there is consistency in the fit and also there is familiarity in the pattern sizing. I sewed the blouse in a size 10 without any alterations, there is a good amount of ease in the pattern otherwise my usual alterations would have been to grade the size 10 bodice to a size 14 waist with a 1-inch small bust adjustment. I’m happy with the size 10 and I’ll be making it in the same size in the future.

Cashmerette instructions for construction are of a very high standard. I have truly found that my fitting skills have improved since joining the club. There are a lot of handy resources that I’ve accessed on the club as well as the lovely tips from other members. I have been given a discount link to share with my sewing community which I will share below if you’re considering joining. 

Overall, this is a make I’ve relished from start to finish. Even better, it’s a comfortable wear. The one detail I varied was that I left off the button in the collar band. Only because I know that I would never use it and I might even wear it with the first button undone. I also wanted to talk about button installation. I’m not sure if it’s just my machine but I always find the top buttonhole a pain to sew. I think my machine is extremely sensitive to a change in fabric thickness and it tends to get stuck. If you’ve had the same issue, my solution was to turn the blouse around so that the collar is facing you and this gets it out of the way and evens up the presser foot. My first buttonhole is not the best so don’t look too closely!

As I have disclosed in previous posts, Cashmerette Club membership was kindly gifted to me in exchange for photography of three previous club monthly patterns. I’ve been a very happy club member so I was happy that Cashmerette has set up this discount link for my readers. Feel free to use it if you are considering joining. This is an affiliate link which means that I will make a small amount from a purchase which helps support my blog. See information below from Cashmerette regarding the offer.

Thanks for reading and happy sewing!

X Em

The All Access level of Cashmerette Club is 25% off during Cashmerette’s June sale, which runs June 12th through June 19th. The discount is applied automatically, so no coupon code is needed for that.

And if you sign up during the June sale with my special link, you can get 25% off All Access AND a free regular Cashmerette PDF pattern of your choice. Here’s how it works:

  1. Go to cashmerette.com/emsewhappy and add the free gift to your cart
  2. Then go to cashmerette.com/club and add All Access to your cart
  3. Complete the checkout and within a few minutes, you’ll receive an email with a coupon code that you can use for a free PDF pattern

This offer is only available for new All Access members and only through June 19, 2023.

Brattle Top

A beginner’s guide to sewing with knit fabric (from a beginner).

Sewing knit fabric has been something I’ve avoided in the past but since joining Cashmerette Club* and having access to their wonderful resources, I’ve gained a lot of confidence in this area. In fact, I’ve been looking for more to sew! The Brattle Top is the April pattern of the month for Cashmerette Club. It’s a tee with a twist front. It’s such a comfortable top to wear and the twist just gives it a little bit of interest. 

For those that are just venturing into sewing knit fabrics, here are a few tips that I wish I had known before starting out.

Needle

You’ll need a ballpoint sewing machine needle. The ballpoint needle will slip between the fibres of the fabric and will not snag the fabric. In my first attempt, I had tried sewing with a universal needle and it was snagging that fabric so badly that I just could not continue until a lovely person on Instagram informed me about ballpoint needles. 

Stitches

Another problem I had encountered with my first attempt at knit fabric sewing was that my stitches kept breaking off. This is because there’s elasticity in the fabric and a straight stitch just doesn’t accommodate for this stretch. I use a lightning stitch or a zig-zag stitch. I tend to use the lightning stitch for seams because it has a narrow width with longer stitch length, but the zig-zag stitch looks better for top stitching. For hemming, I use the twin needle. 

Don’t pull on the fabric

Another challenge with the elasticity of the fabric is the temptation to pull the fabric as you sew which warps the fabric. I’m just very mindful not to put tension on the fabric unless I’m attaching something like a neckband which is often a requirement of the pattern. Otherwise, I try to keep the fabric flat.

Get yourself an overlocker

Ok, this is technically not a tip! It’s not a requirement at all for sewing with knit fabric but it does make it easy if you have one. In fact, some people sew almost the entire project on their overlockers. I bought mine second hand off Facebook marketplace. It’s a very old and heavy Bernina which has not missed a beat. 

Brattle Top

The Brattle top is a great beginner’s pattern. Luckily, I had no problems sewing it. The construction is easy to follow, and it comes together quickly. I’ve made the short sleeve version, but the sleeves are also interchangeable with the Carlyle Tee. I might try a three-quarter sleeve version for the cooler months. I’ve sewn the size 10 for my measurements of 35-inch high bust, 37-inch full bust and 33-inch waist. I find this to be a great fit and did not make any adjustments.

I’m glad that I’ve been challenged to sew with knit fabric. It’s such a comfortable and versatile fabric to wear and style. I’ll be trying a few more patterns for knit fabric in the future. 

Thanks for reading and happy sewing!

X Em

*Cashmerette Club membership has been kindly gifted to me as part of a collaboration with Cashmerette.

Elmwood Skirt

The Elmwood is the Pattern of the Month for Cashmerette Club*. I’ve always loved the classic look of the 1950s. The pencil skirt was such a staple in that era with the narrow, hip hugging silhouette with the hem just skimming the bottom of the knees. This version also has chic pockets which stay flat when sitting. 

I was lucky enough to receive a preview of this pattern as part of a collaboration with Cashmerette Patterns. I always start by making a toile of the pattern. This skirt is fully lined so it was easy to make a toile with lining fabric. Looking at the fitting chart, my waist measurement of 33 inches sits between the size 12 and size 14. My hip measurement of 38 inches sits more towards the size 10. So, I put my measurements into the Cashmerette size calculator which advised me that I could sew a size 12 waist and grade to a size 10 hip. My first toile with the graded hip felt too snug for me which I soon resolved when I re-read the instructions.

When I re-read the instructions, it tells you to measure your hip and waist in sitting. I’ve never considered this before, but I have been using some of the wonderful resources available to Cashmerette Club members regarding fitting. It seemed like a good idea as the skirt is so fitted and there isn’t much ease. I’m glad I remade these measurements in sitting because my hips were now at 40 inches. I found that sewing the straight size 12 was the best fit. So, in the future where there is only a small amount of ease in the fabric, I will continue to use this tip of measuring when sitting as well as the usual standing measurements.

The Elmwood skirt is for woven fabrics. I’ve used a wool/linen blend from Potter and Co. It’s beautifully soft in a grey/brown tone. It feels quite luxurious to wear as it’s fully lined. There’s the usual split in the back of the pencil skirt which makes it easy to move in. I’ve needed something a bit dressier for meetings and this skirt really fills a gap. I’m thinking of making a denim version for casual wear.

The instructions and illustrations are very comprehensive in Cashmerette Patterns. I found it easy to follow. One of the skills I’ve gained in sewing this pattern is learning how to do blind hems on my machine. I have hand sewn blind hems before especially with my kids’ school uniforms. Sewing the blind hem by machine works out easier and is a lot more even than my hand sewing!

Thanks for reading and happy sewing!

X Em

*Full Disclaimer: This pattern was sent to me for collaboration with Cashmerette. All opinions expressed are my own.