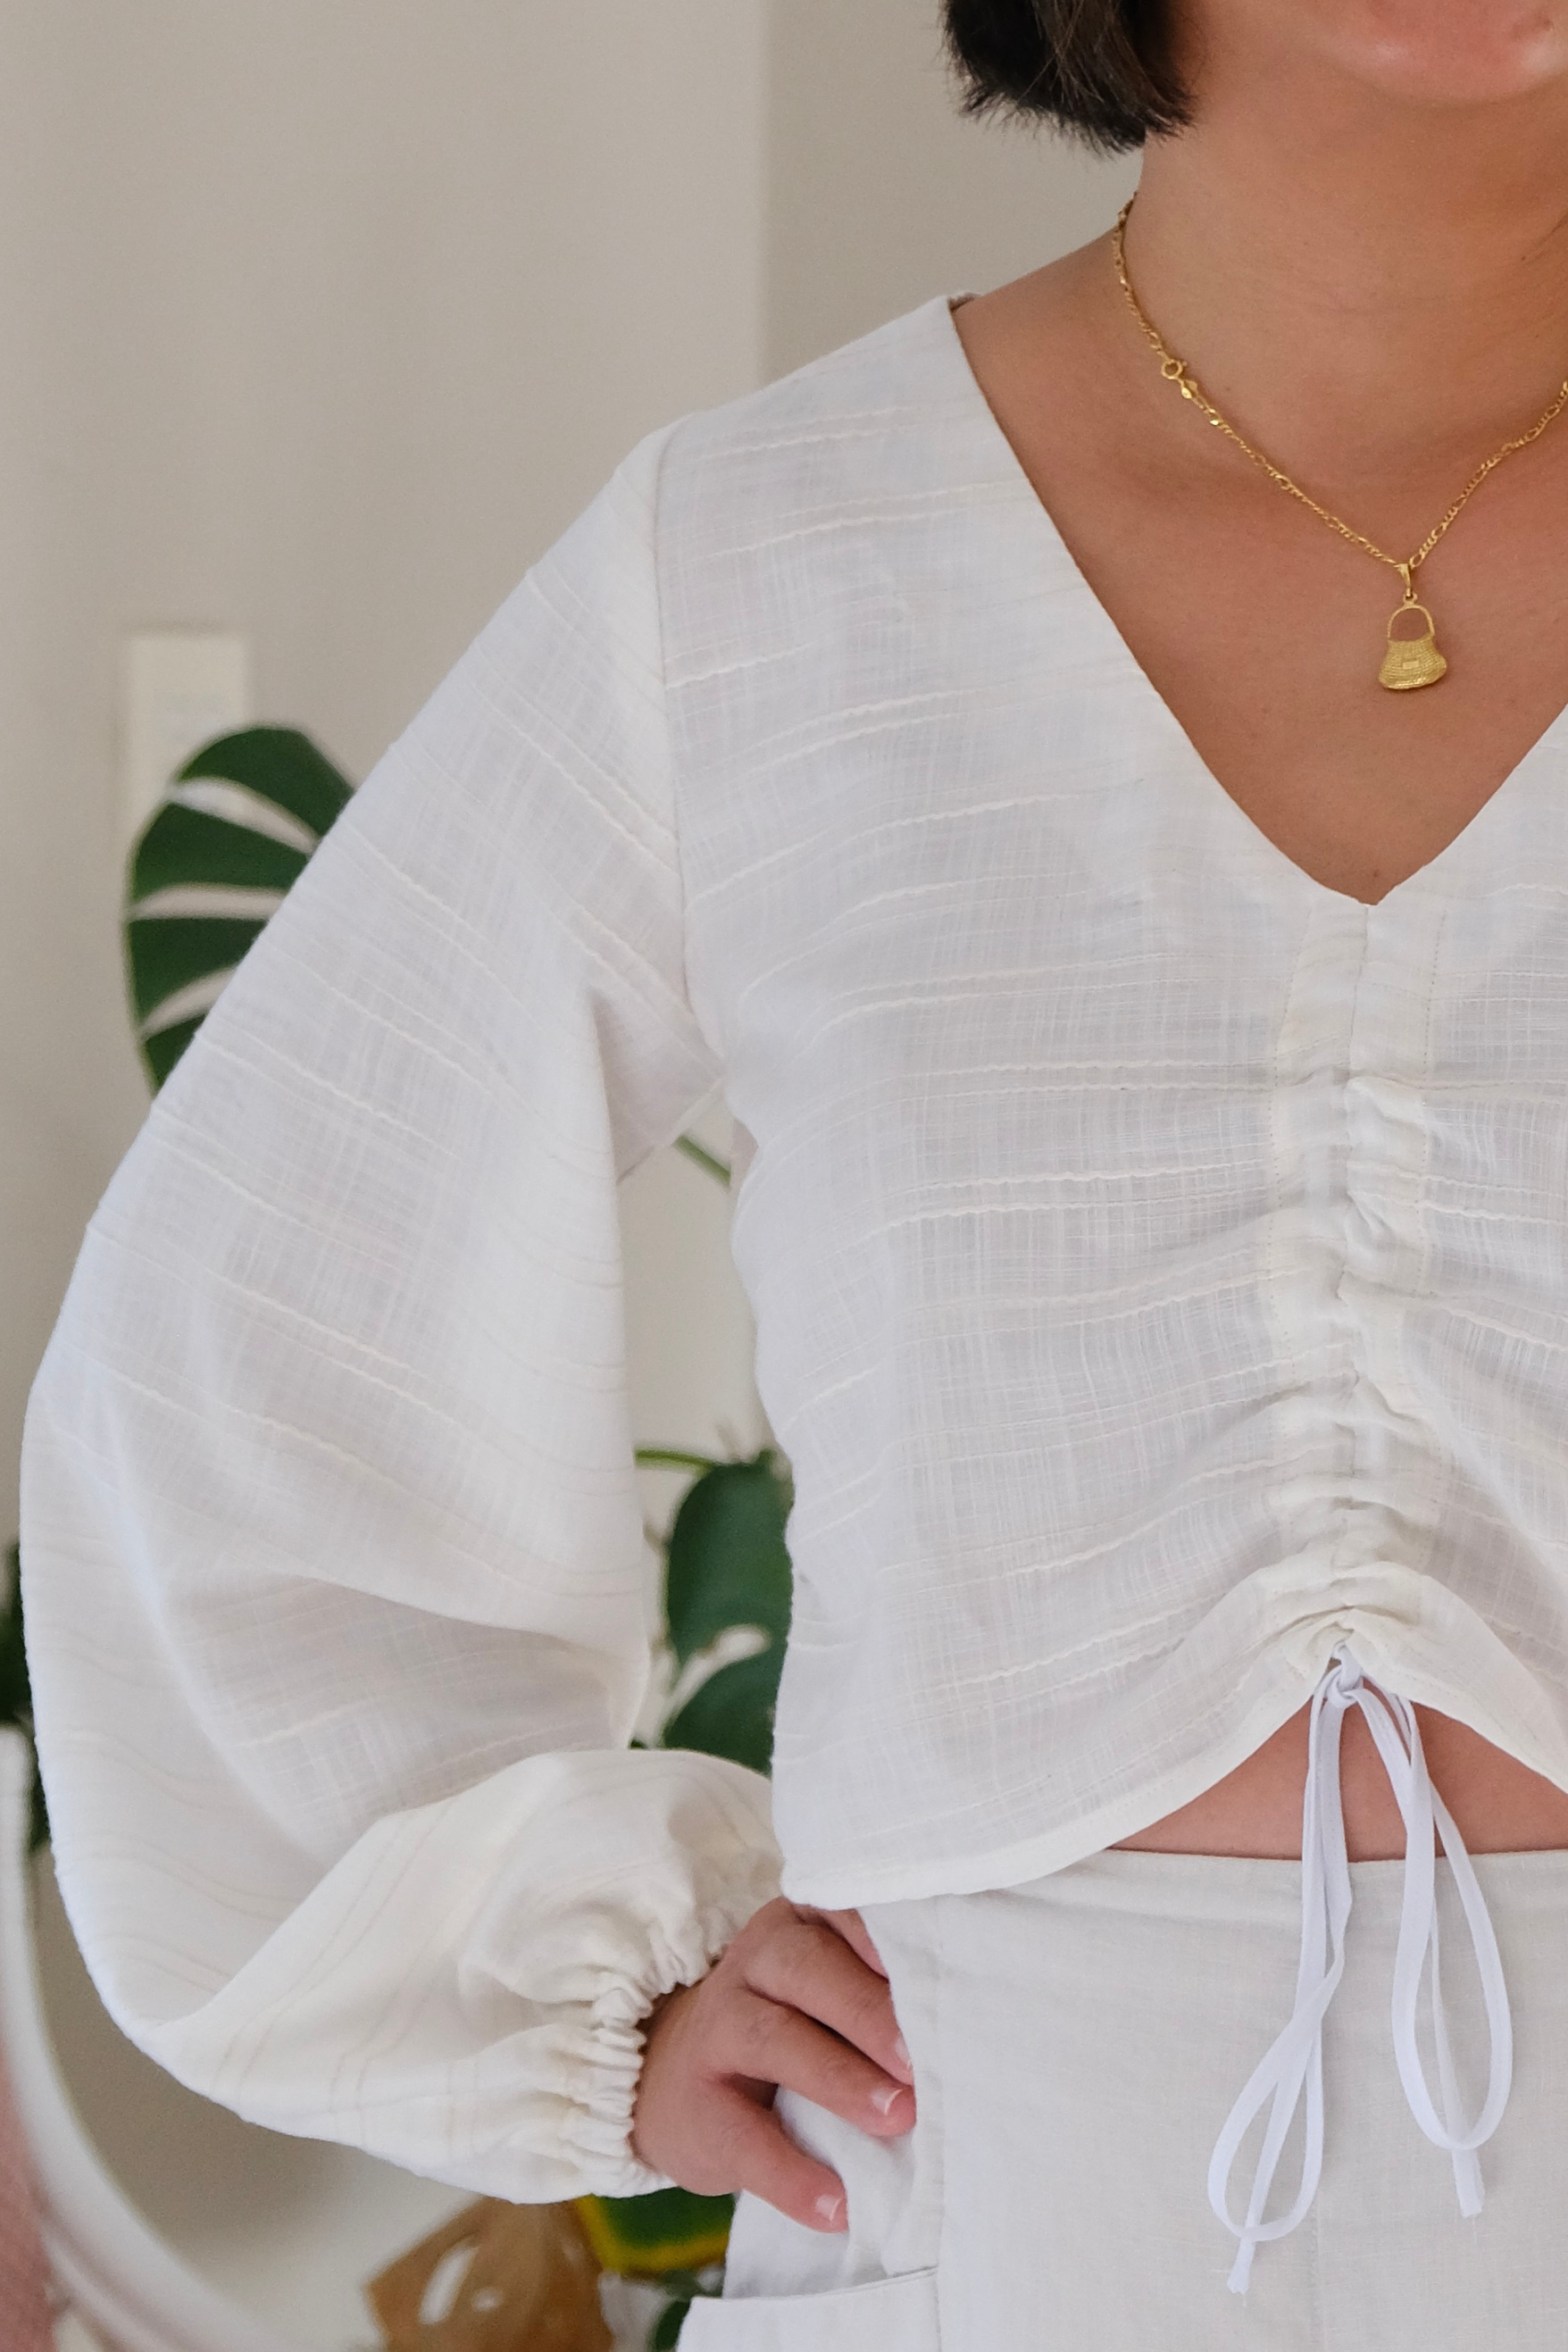
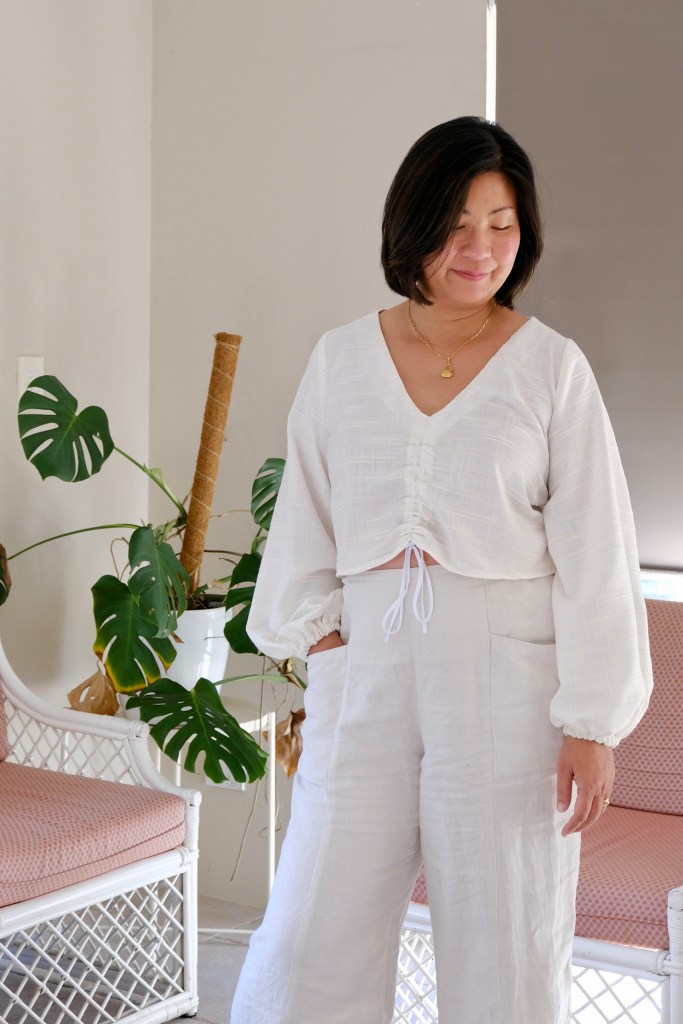
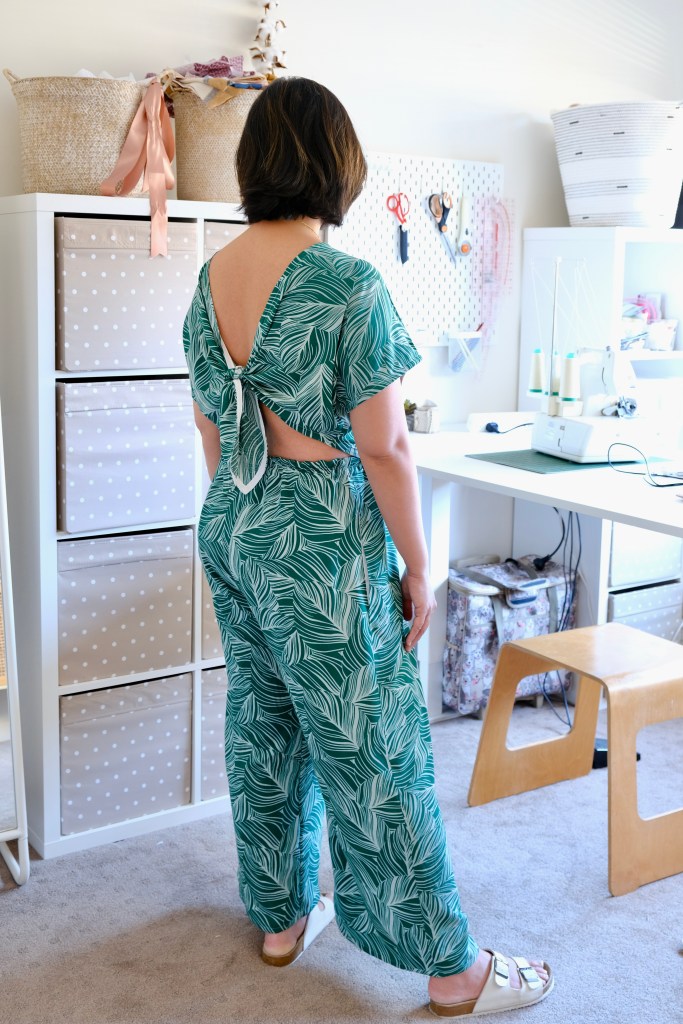
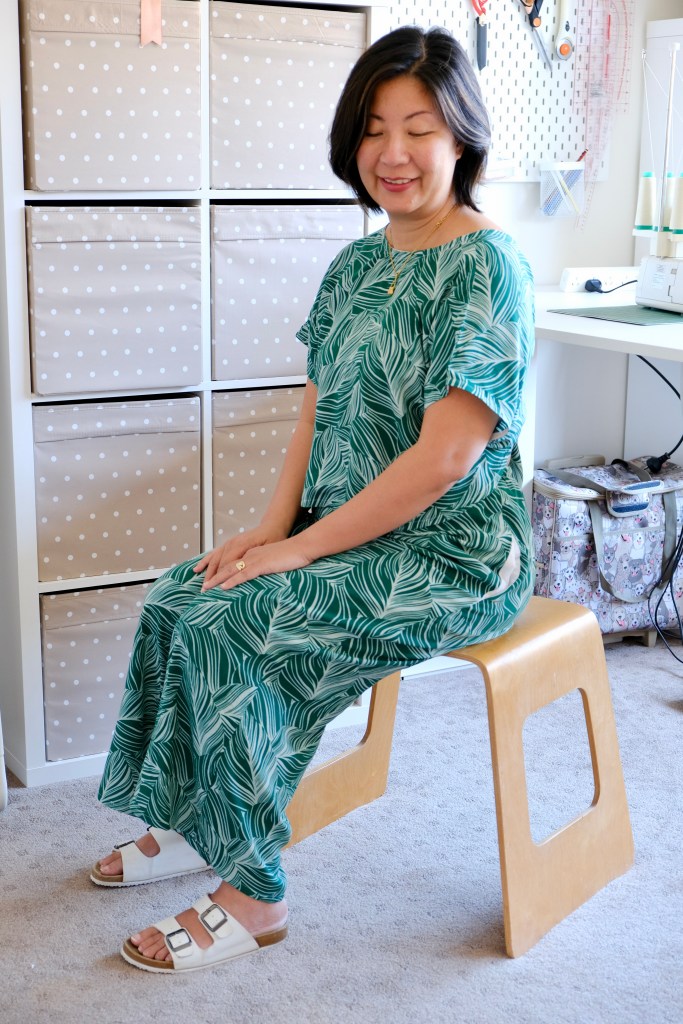
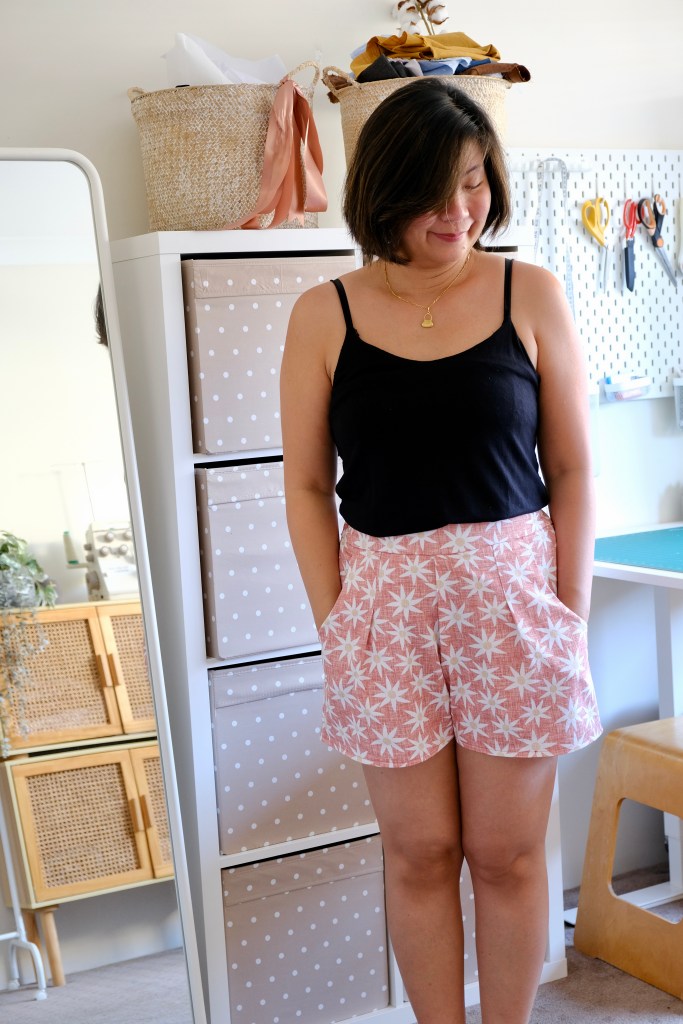
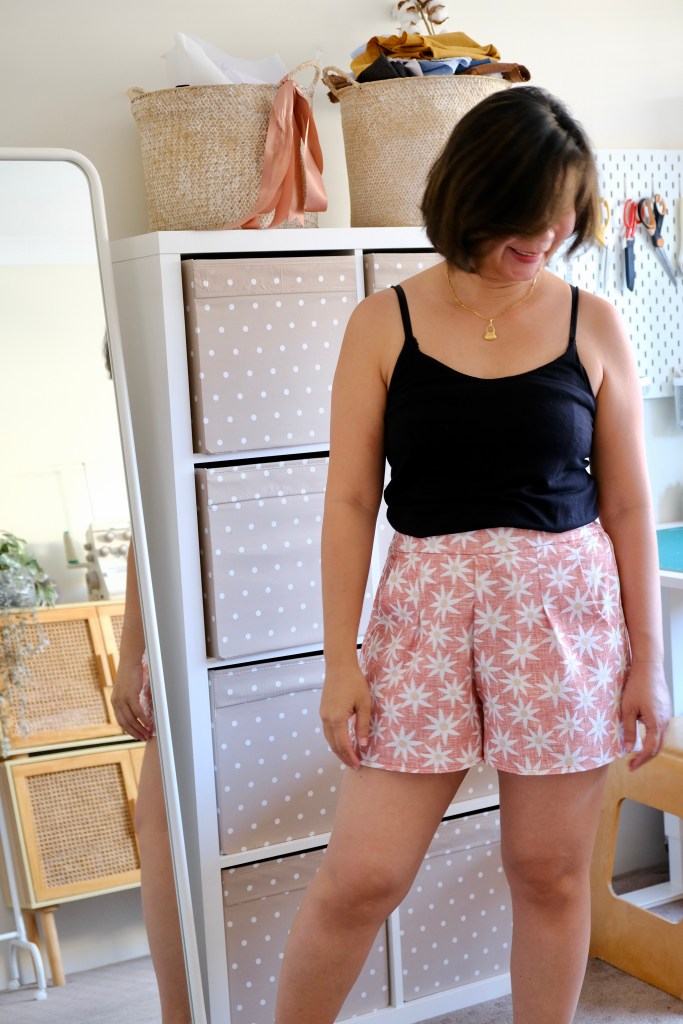
So, have you ever made something thinking it might not exactly be your style and it ends up being something you absolutely love? This is the Andi Top from the Swimstyle Andi set. I was curious about the design, which is what made me apply to be a Swimstyle Ambassador in the first place. It has a certain style and flair that is so unique and when you see the drafting, you’ll know what I mean.
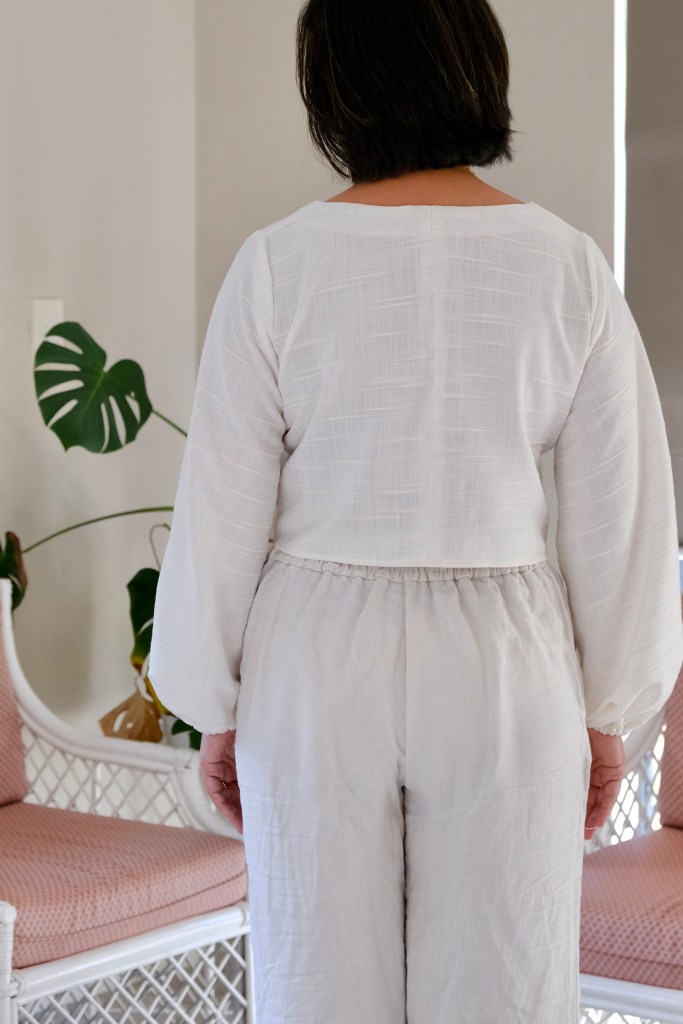
My version of the Andi Top has these billowy long sleeves that are attached to a bodice with a deep V and these ties that can be adjusted. I have quite a modest amount of tummy showing but the main idea is that it gives shape to the bust area without needing darts. It’s a very flattering top. I’m positively happy about the ruching created by these ties and the channels in the front.
For my measurements of 35-inch high bust, 38-inch full bust and 33-inch waist, I’ve made the Size L. It’s a great fit but it’s quite cropped so next time, I would lengthen by an inch. For this top, I sewed a narrow hem or a cheat’s rolled hem by sewing a straight stitch ¼ inch from the bottom of the hem and then pressing the hem up twice.
If you’re like me and can’t work a loop turner for all the money in the world, you could use some bias binding to make the tie for the blouse. It really saved my sanity. I know everyone has their special tool or technique, but it really stresses me out when I have to make a narrow rouleau. I simply folded the long edge to the middle and then folded over again in half and edge sewed the tie.
The Andi Top is made for woven fabric. My fabric is a sheer lightweight textured cotton. I had this on my Make Nine 2024 list where I wanted to use up nine pieces of fabric from my stash. I thought it was a perfect pairing because it’s very easy to gather this fabric. I also love the subtle texture woven into the fabric. The top probably appears quite white, but it is more of a soft beige.
I will definitely be sewing the matching skirt to this Andi Set. It’s been such an enjoyable sew. I noticed that Swimstyle Patterns have some unique features like the tabs that make it so easy and accurate to match up the pieces. I was grateful for this because my fabric did not really have a right side or a wrong side, so these tabs made it easy to tell where the pieces needed to be attached. The comprehensive illustrations helped there as well!
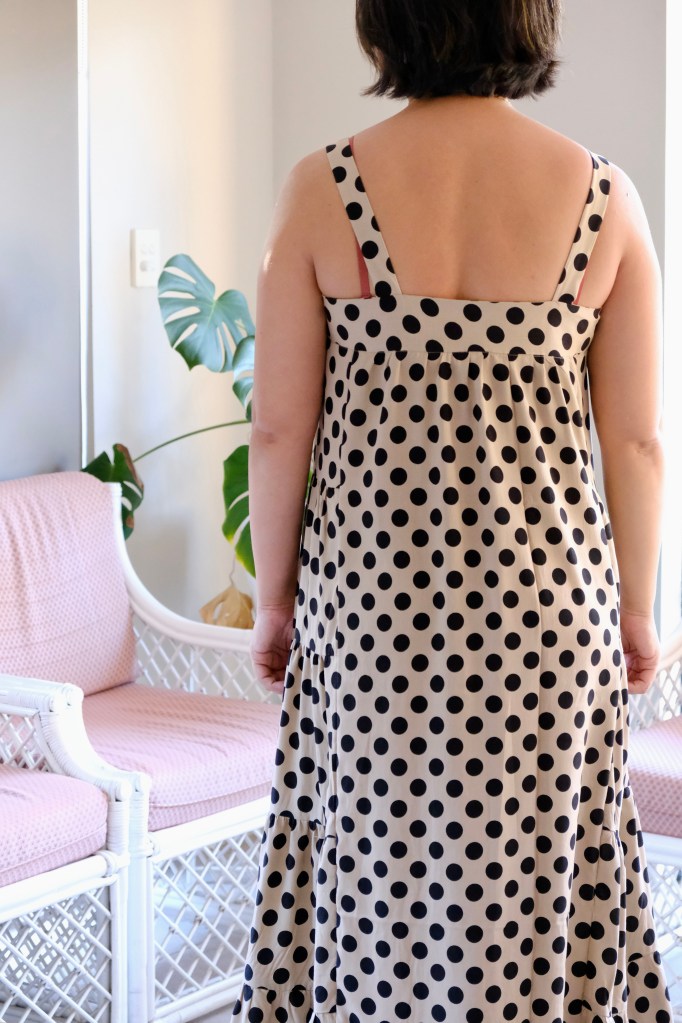
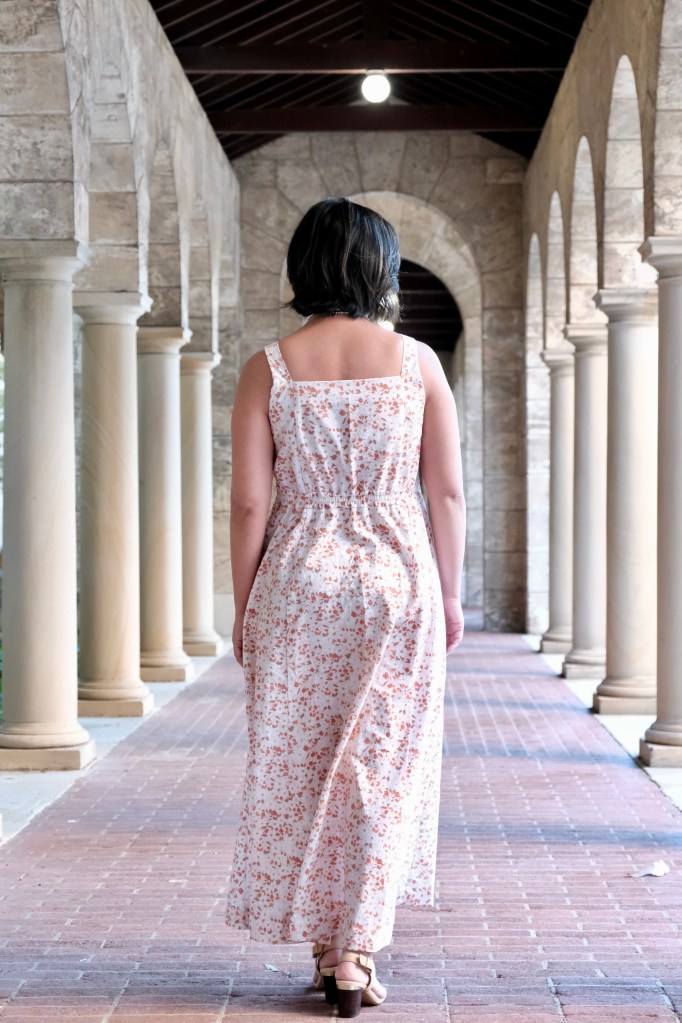
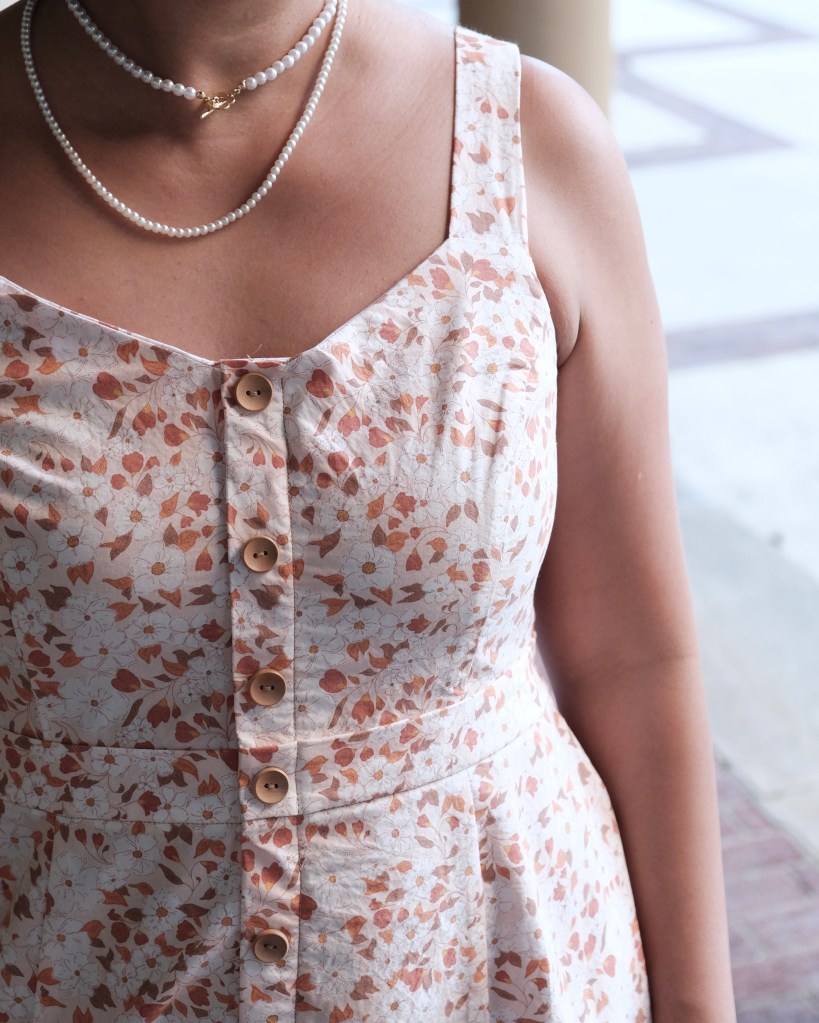
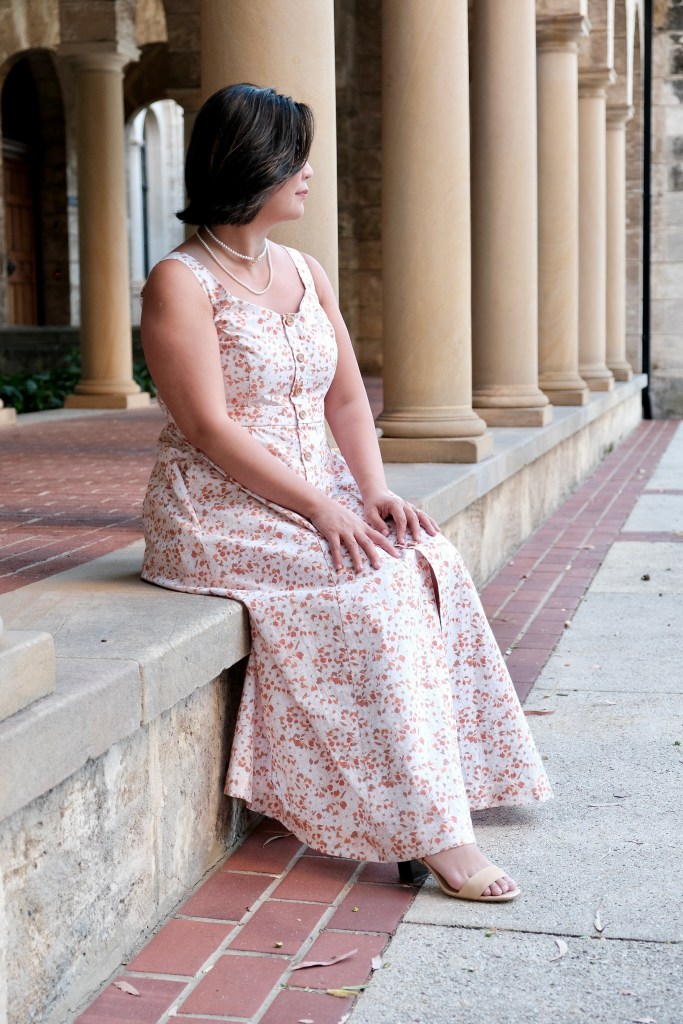
When it comes to floaty maxi dresses, there is nothing more iconic than the Chalk and Notch Marcel Dress. It’s immediately recognisable with the dress fitting through the high bust and the tiered panels along the side. I had sewn the tank top version as a wearable toile last year but was waiting to find the right fabric for the maxi dress. When I found this polka dotted rayon from East Coast Textiles, I thought that it would be the right combination.
The dress is quite loose through the full bust, waist, and hip area so the high bust measurement is the main measure for fitting. It also has cup sizes from A to D so the full bust measurement can be used to determine this. I made the size 12 A/B cup without any modifications for both the tank top and the maxi version.
Construction of the dress involved a lot of gathering. This was also why the right fabric must have a good amount of drape and be lightweight enough for gathering. Once you get the rhythm of gathering and then sewing the panels, putting together the dress goes quite fast. But it’s times like this that I wish I had a gathering foot! A quick note on sewing with rayon, I think I have listed some helpful tips in the past, but I would like to reiterate a few things. Remember to use a rotating blade cutter instead of scissors, mark your fabric before removing from the cutting table, use spray on starch if you want to stabilise the fabric, and stay-stitch necklines and armholes.
I enjoyed the pattern as the instructions and the illustrations were very clear. I also used the sew along tutorial that is available on the Chalk and Notch blog. The photographic tutorial was a nice extra but really, you could understand the pattern well enough from the written instructions provided.
This dress came together in a day which was lucky because I was making it for a getaway with my girlfriends. I hate sewing in a rush, but I knew the fit would be fine from my previous make of the tank top. The getaway was to Brisbane which is a beautiful city. It was quite hot and humid with periods of rain on and off. The dress was great for a dinner at the heritage listed Howard Smith Wharfs which is tucked under the Story Bridge, which everything revolves around in Brisbane. I was grateful to be able to spend some time with my oldest and dearest friends (they won’t be happy that I’ve referred to them as old).
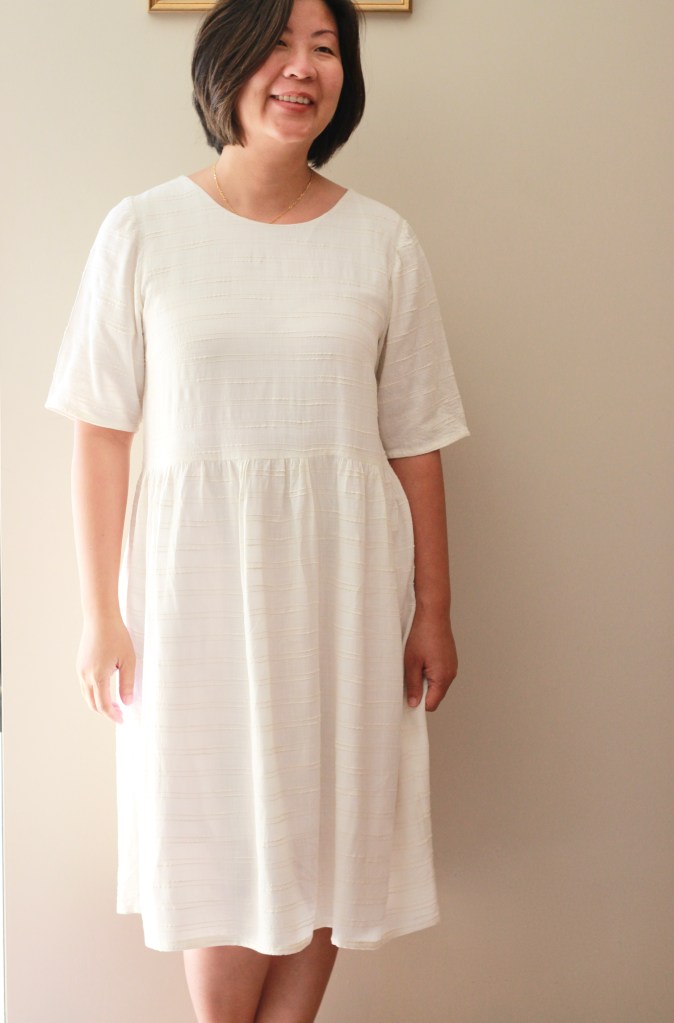
I can’t believe it’s been almost two years ago when I was a tester for the release of this Sew to Grow Lanti Swing Dress pattern. I’ve always meant to come back and sew it again because I do wear the two that I’ve made a lot especially my flax-coloured version. I have really enjoyed coming back to make the pattern as I knew the modifications I wanted to make, and I was already familiar with the sizing. Also, the pattern pieces are already put together which meant I could get into the sewing part faster.
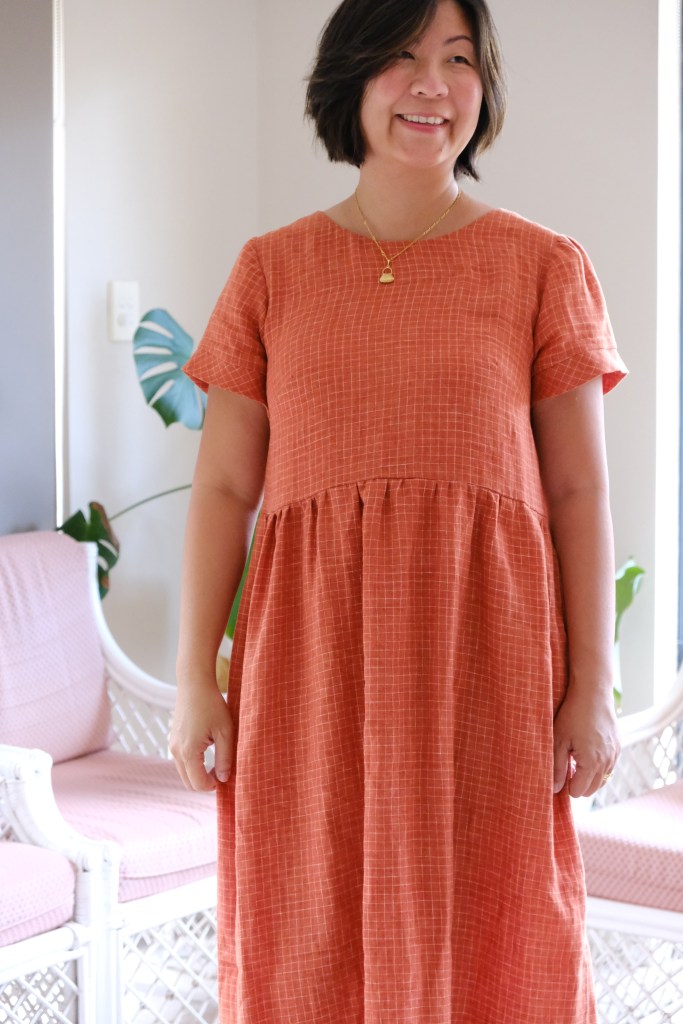
For this version of my Lanti, I wanted to use this Yarn Dyed Linen Grid Check which I bought from Megan Nielsen Patterns when she still had a shop. It’s such a beautiful quality linen that I have been hesitant to use it and also when you buy fabric ahead of time, you have to see if the pattern’s fabric requirements match your available fabric. I had 2 meters x 150cm available. The Lanti Dress comes as two versions, one is the smock style dress and the other is an A-line version. Initially, I thought I would take the opportunity to sew the A-line however, it would have wasted ¼ of the fabric. After looking to Pinterest for inspiration, I decided I wanted to make the smock style but add quite a lot of length to the skirt and to make it with short sleeves.
The smock dress has an empire waist with a boxy bodice. I kept to the size 12 that I previously made for my measurements of 38-inch bust, 33-inch waist and 40-inch hips. I modified the pattern by lengthening the skirt to 30 inches and narrowing the width of the skirt by 4 inches. I wanted to make the dress a midi length and I needed to narrow the width because the linen had a bit of body to it. It probably sits between the light and medium weight gage. Another small modification was to swap a button and button loop closure for a tie closure.
The instructions and illustrations with Sew to Grow patterns are well set out and written. However, I found myself deviating and sewing the pattern from my own preferred construction. I think that is a natural progression as you gain experience. Small things like pocket construction, seam finishes or attaching facings can all be sewn in different ways with the same outcome.
Needless to say, I’m happy with the outcome. My new Lanti Swing Dress will be easy to layer with leggings or with a cardigan thrown over. I was also experimenting with shoes. Chunky white sneakers or something neutral. The dress is so versatile and I’m looking forward to adding it to my autumn/winter capsule wardrobe.
Thailand has always been a much-desired destination that my husband and I have wanted to explore. We headed off to Phuket mid-March for a quick visit when my husband was lucky enough to win the trip through a work raffle! The tropics are known for hot and humid weather but there are some variations in the seasons according to when the monsoon is passing through. The best time to visit Phuket is between December and March with the temperatures between 24 degrees Celsius to 32 degrees Celsius and the lowest humidity in the year. It was often hottest at midday to mid-afternoon with a sea breeze picking up after 5pm.
So, armed with this information, I prepared my travel capsule. Believe it or not, I started with shoes. In Thailand, everyone wears flip-flops or sandals majority of the time, even when you are going to restaurants. Starting with shoes just makes it easier to pick out the items that I know will with the footwear.
The next item most worn are swimmers. I brought three pairs as I knew I would be swimming daily, and we had also planned excursions to the Elephant Sanctuary and the Ao Phang-Nga Marine National Park. The Elephant Sanctuary gets very muddy so I had a pair of swimmers that I knew I would put aside after that excursion (until I could get home to give it a proper wash). The Elephant Sanctuary was really the highlight of my trip. There’s no elephant rides at this sanctuary and the objective is the rehabilitation of elephants but it also includes looking after the livelihoods of the caretakers (Mahouts) of the elephants and their families. Phang-Nga Marine National Park was another outstanding outing. Most people know it from films like The Beach and James Bond.
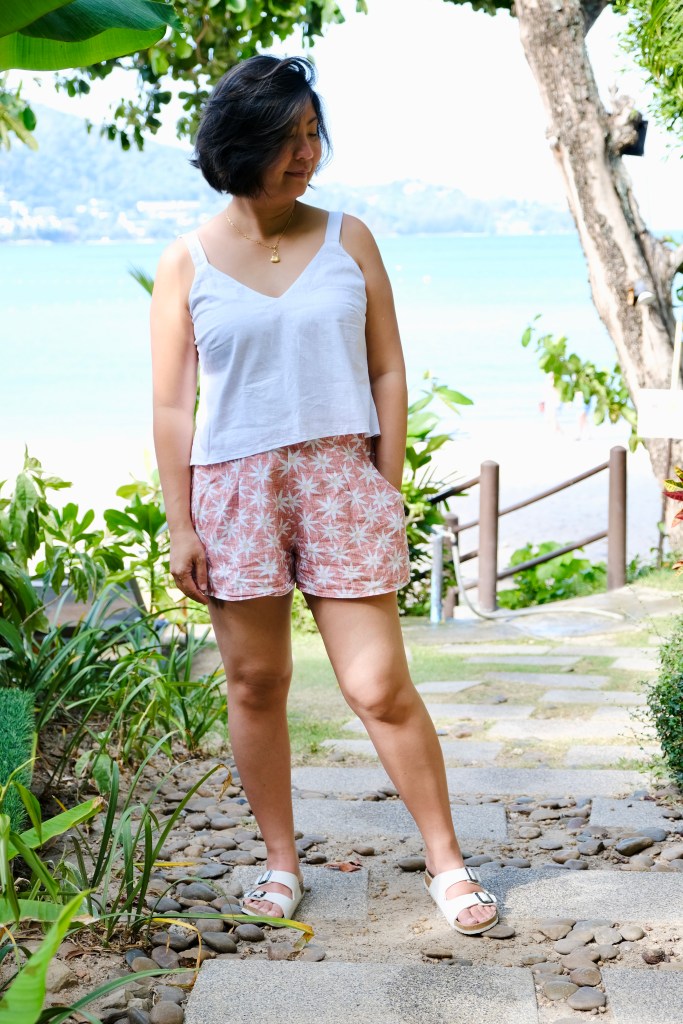
The best space savers were the dresses that I brought. I brought three, the Hannah Dress from By Hand London, not photographed unfortunately, but it was the first dress I wore out to dinner. The Pattern Scout Flora Dress was also very cool and easy to wear in the humid weather so it got a few wears and was great for beach walks and for dinners. Lastly, I also took along my True Bias Lora Dress which has a very flattering silhouette, and it was made with very lightweight cotton. Again, it was something that could transition from a shopping trip at the local markets to dinner at a restaurant on the beach.
Pattern Scout Flora DressTrue Bias Lora Dress
Surprisingly, the item that I over packed were shorts. One was left unworn. I had packed four but honest could have just packed two. I loved the Sorrento Shorts which is a great high-waisted style of shorts from Sew Eloh Patterns. This paired well with the Avola Cami and the white Cashmerette Brattle T-shirt. I packed and wore all three of my Brattle shirts.
Sew Eloh Sorrento Shorts and Cashmerette Avola Top
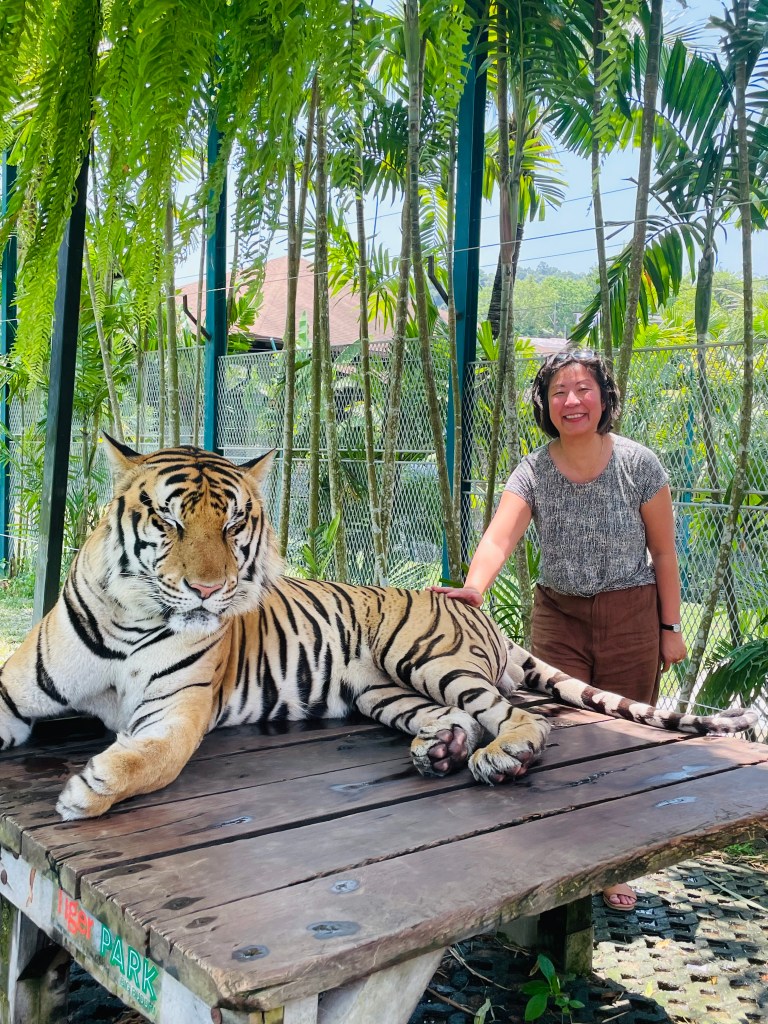
Thailand is home to some amazing temples with 94% of it’s population being Buddhist. To visit these holy sites there is a dress code where legs and shoulders are covered out of respect. I wore my True Bias Dani Pants with my Cashmerette Brattle Top and the linen in the pants were so cool to wear. We visited the Big Buddha which has amazing views and we also stopped by Wat Chalong Temple which is a huge complex of temples. Unfortunately, we were also taken to Tiger Park. I can’t comment on the ethics of this type of tourism. It was very clean and the tigers looked well fed but I did not do any research beforehand as I wasn’t expecting this stop. They are magnificent creatures and I hope that this sort of tourism encourages people to look after their habitat.
True Bias Dani Pants with Cashmerette Brattle Top
On the day that we went to Old Town Phuket, I wore my Sewhouse 7 Free Range Slacks with my Fabricstore Ash Cami. This was handy as there are a few temples that we visited in Old Town and we stayed until evening so my covered legs were kept safe from mosquitos. Old Town is filled with interesting Sino-Portugese architecture and reminds me of Malacca and Penang. It’s worth a look, I just wished we had timed our visit with the Sunday Markets which are famous as two streets are closed off for the stalls and food carts.
Fabric Store Ash Cami and Sewhouse 7 Free Range Slacks
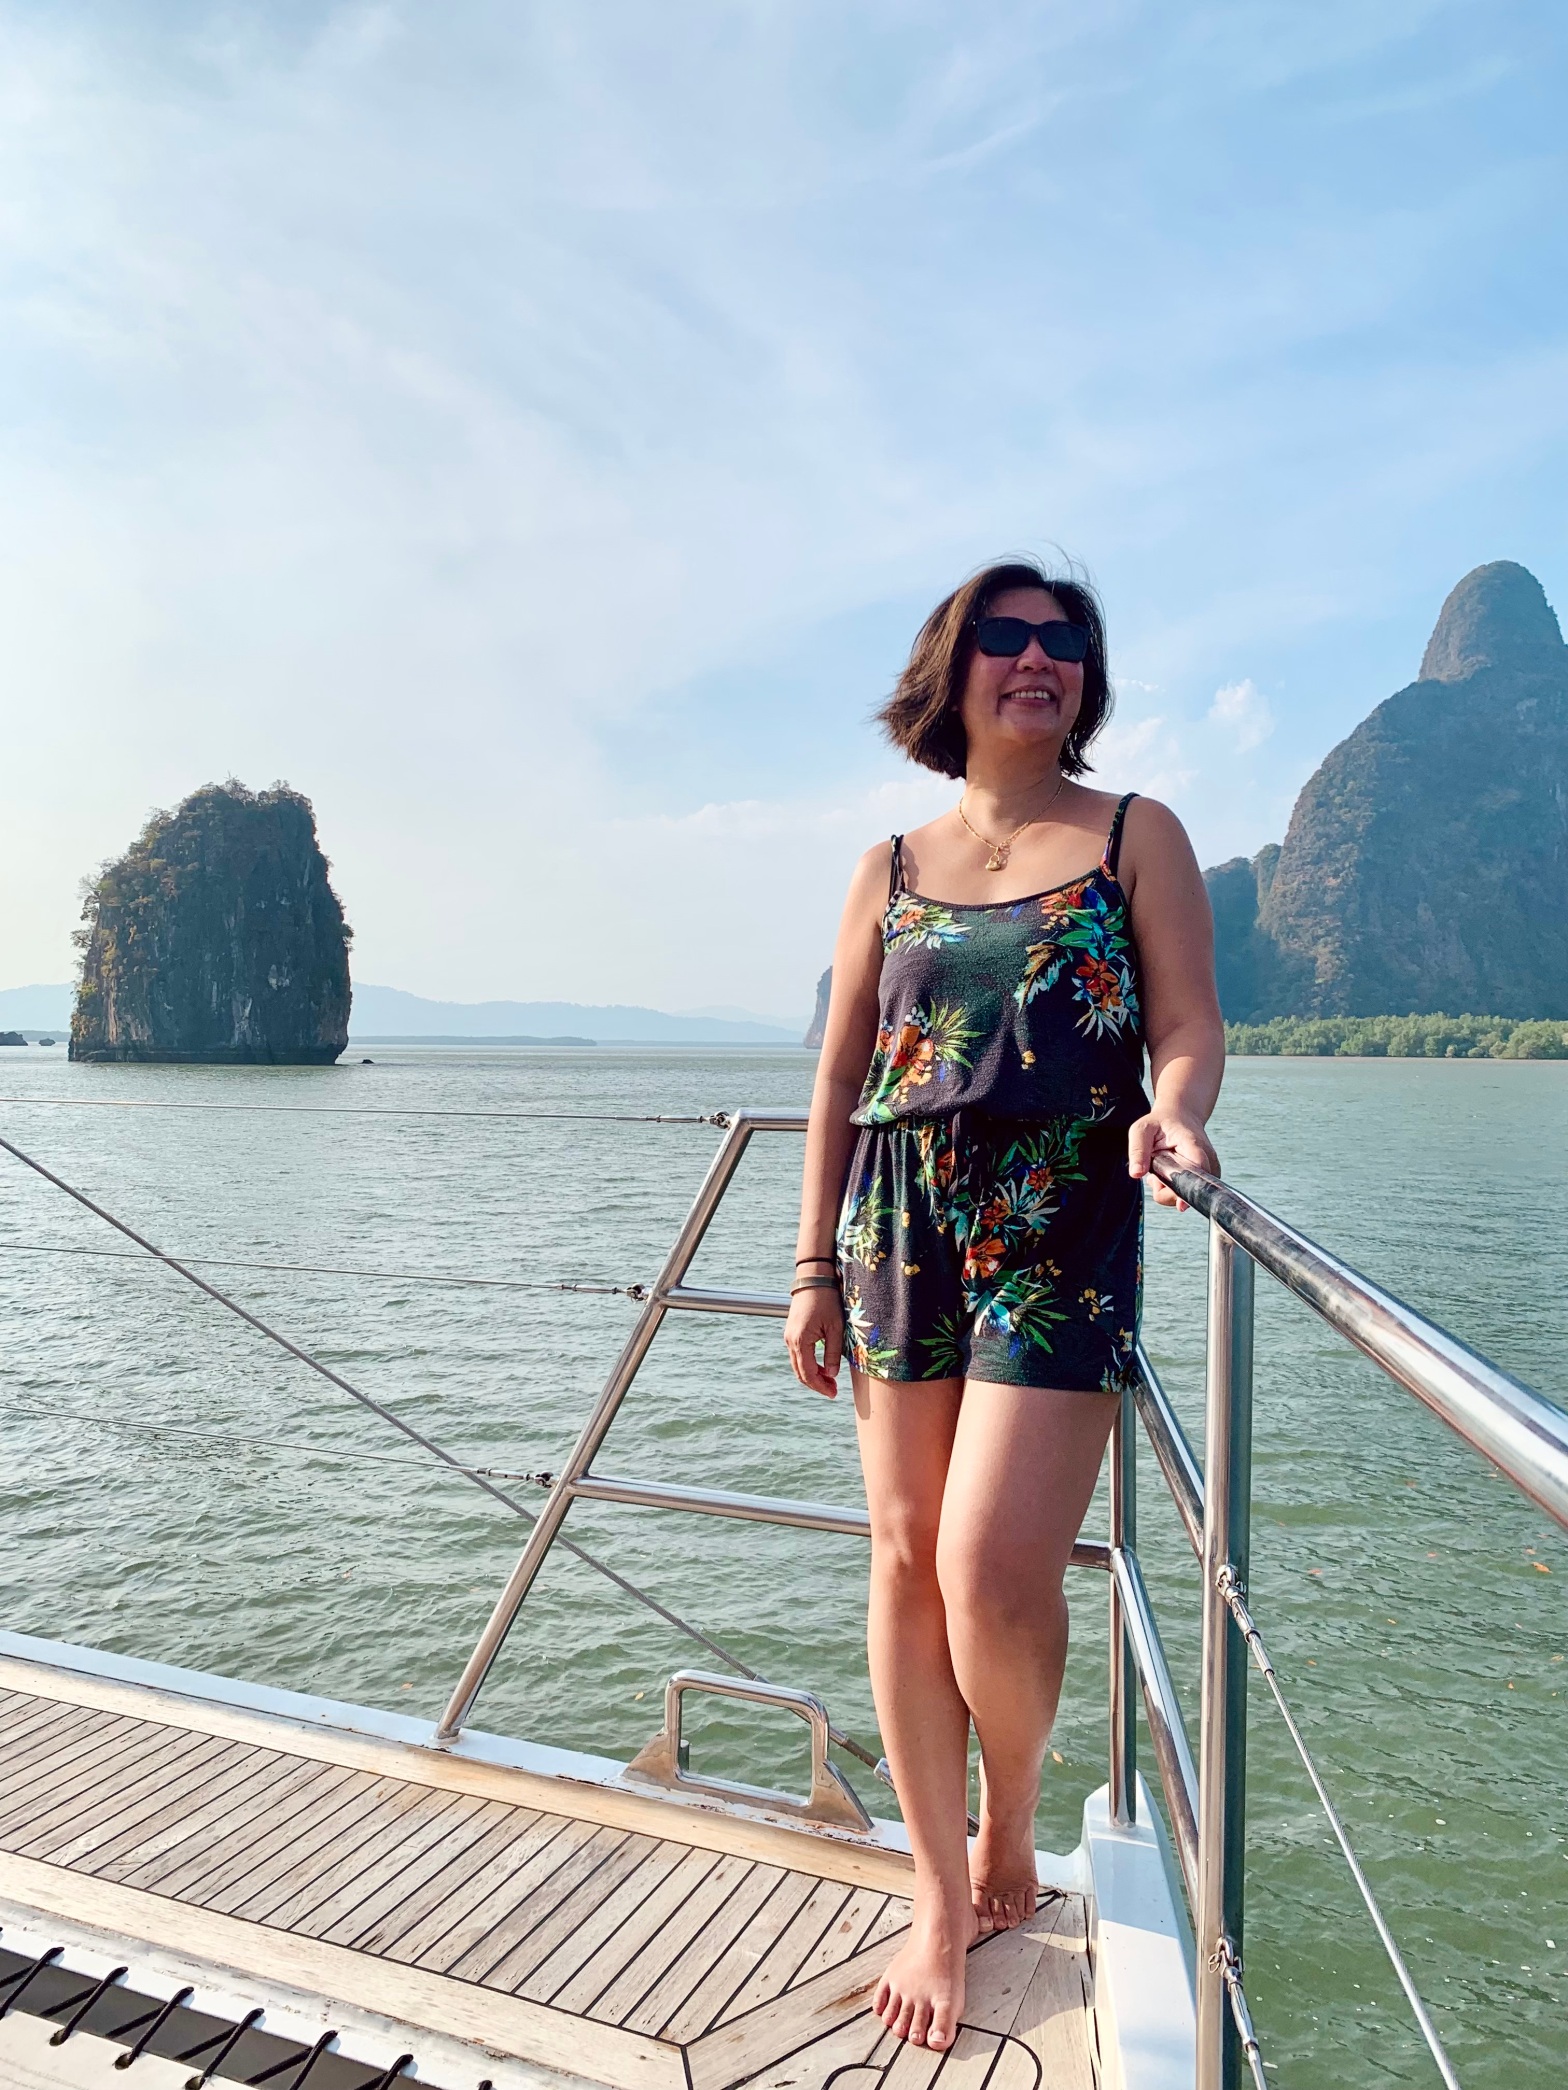
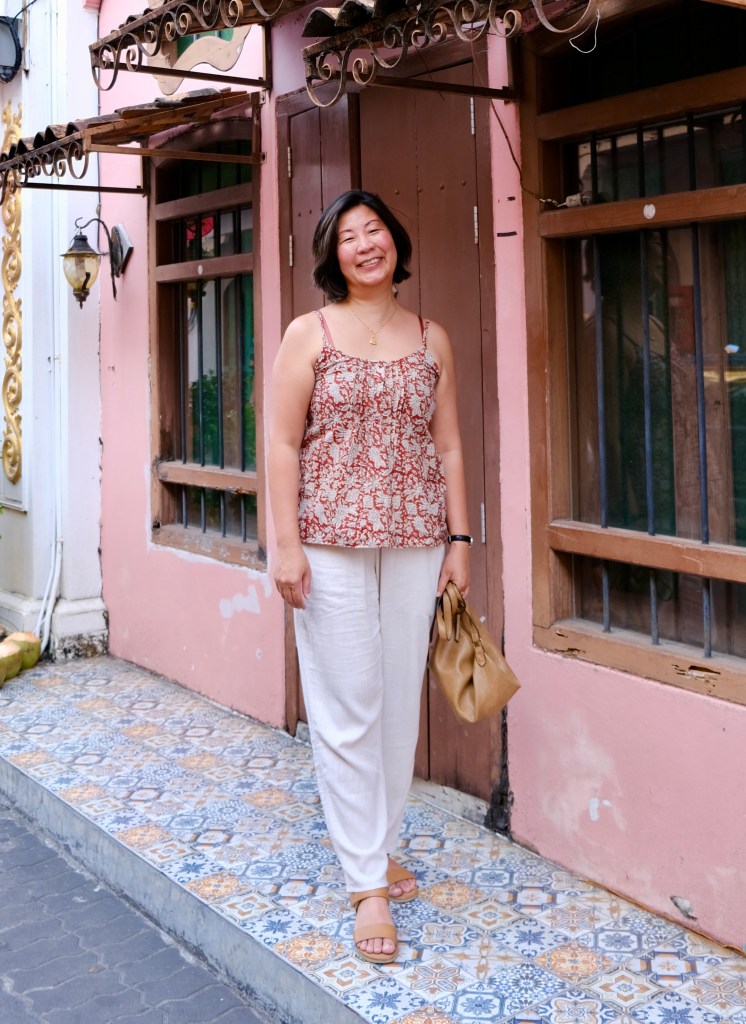
Apart for wildlife excursions and tourist destinations, my husband and I travel for the chance to taste the cuisine. We were a bit disheartened at first at the watered-down versions of Thai dishes we were being served at the venues we had tried until my husband came across Silk’s Restaurant. It’s a fine dining Thai Restaurant attached to a resort. For the special long lunch, I wore my Swimstyle Set made with the Tallulah Tie Top and the pants of the Tamarama Set. It was a delicious lunch and it felt special to get dressed up for the lunch date.
Swimstyle Set – Tallulah Tie Top and Tamarama Pants
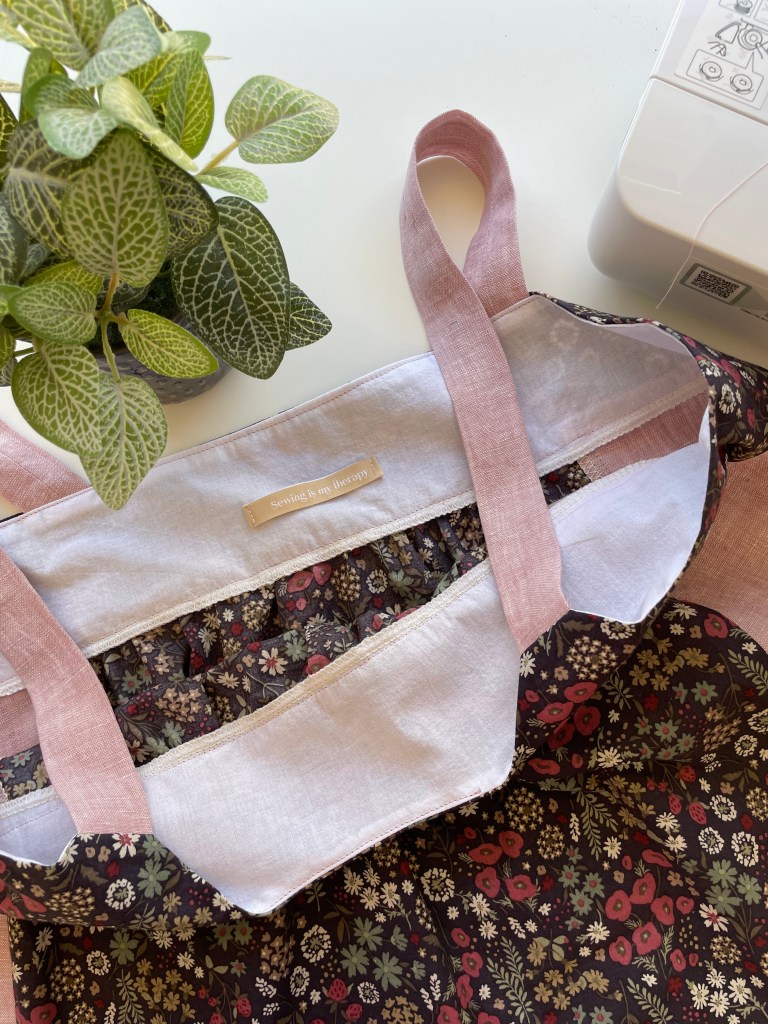
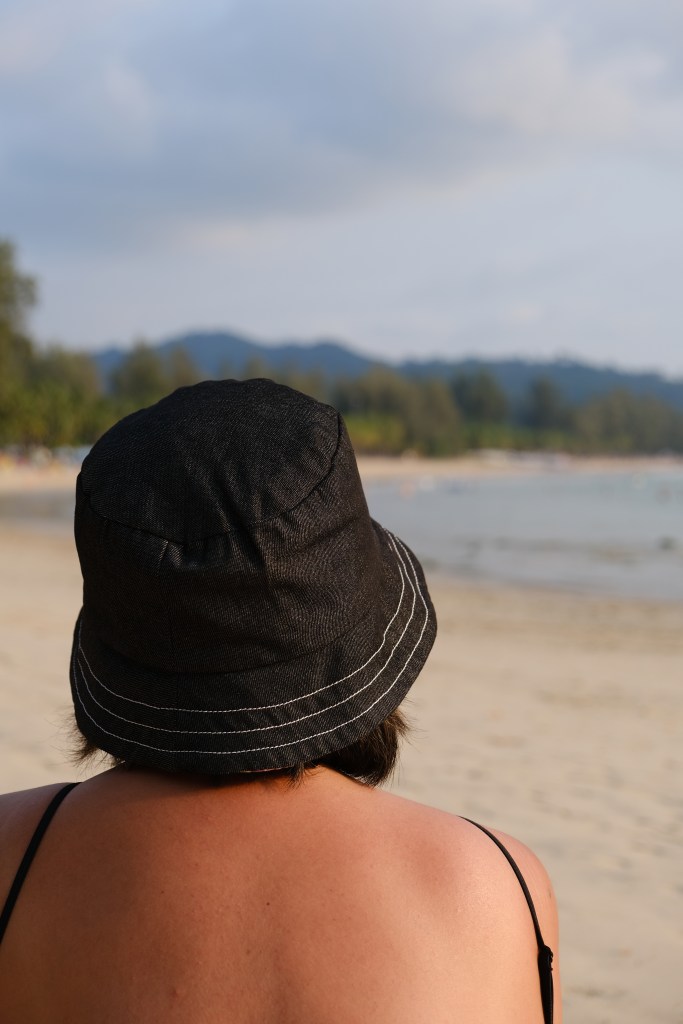
Final mentions are some accessories that I made and brought along. The Motif Studio Utility Tote was great as a poolside and beachside bag. It contained so much and the big pockets inside and outside were very handy. The other accessory was my Melco Bucket Hat. I’m super proud that I was a tester for this pattern which Melco are making free for their subscribers.
Motif Studio Utility ToteMelco Bucket Hat
I’ve probably overpacked by some people’s standards but I was happy with my items. The only unworn item was one pair of shorts and in a country where humidity can get quite high, I felt that multiple changes were needed out of necessity and sometimes excursions needed items that were appropriate for the context of that tour.
Last week, I received the very exciting news that I was part of the Swimstyle Patterns Ambassador Program! For my first pattern, I thought I would get onto sewing some resort wear for my upcoming holiday. The cutest pairing popped into my mind with the Tallulah Tie Top and the Tamarama Pants, the latter being part of its own set. I’m focussing this review on the Tallulah Top and will save the Tamarama for its own review.
The Tallulah Top is a boxy shaped top with a deep tie. It can be worn with the tie in the back or in the front. It has grown on sleeves, and it is finished with biased binding which can be ready made or there’s very detailed instructions on how to make your own. This time, I’ve chosen to save time and fabric by using ready-made.
I was quite nervous cutting into my fabric because I’ve not sewn Swimstyle Patterns before, so I was wondering about the accuracy of sizing. There was no need to worry as it was spot on for me. For my measurements of 35-inch-high bust, 38-inch full bust and 33-inch waist, the closest fit was the size L according to the sizing chart. I feel very comfortable with the fit. I decided that I’m more comfortable with the tie in the back and it falls in the perfect position to cover my bra strap.
Fabric choice is something I’m still learning about, so I was really happy that Swimstyle Patterns include an extensive list of specific suggestions. The pattern is made for woven fabrics, and it suits something lightweight and with fluid drape. I had a stash of rayon fabrics from East Coast Textiles which I had bought in anticipation of sewing something for the humid weather I’ll be travelling to. I decided it would be fun to use the Banana Leaves in Green.
The instructions printed with the PDF pattern, and I was worried that they would be too brief for me because there weren’t many pages. However, the patterns instructions are well set out with excellent illustrations that accompany the instructions in a clear and logical way. There were also photographic instructions that I could access which are a great additional reference. The pattern pieces were marvellously drafted. It felt quite architectural, and I was amazed at how everything came together. It was so enjoyable to sew something drafted in such a unique way. You can tell that this is drafted by someone who has had many year of experience in pattern drafting.
I’m looking forward exploring more of this unique drafting with my collaboration with Swimstyle Patterns.
This was a special pattern test as this is the inaugural pattern release from Linen Lab which is a family-owned fabric company based Korea. Another thing that makes this special is that they have based it on traditional Korean Hanbok. Just reading the history and background of the design was so interesting.
The Lotus Jar Skirt has a unique shape where the skirt billows out then taper back at the bottom of the skirt. The shape and how it’s held is determined by the type of fabric you use. Of course, the more structured fabrics show the shape more obviously. I’ve used two contrasting linen fabric with medium weight and drape. I’m thrilled that it’s holding that beautiful shape of the lotus jar which is so elegant. The skirt has a half elasticated waistband which is so easy to fit and wear.
The instructions are accompanied by photographs so it’s probably going to limit the use to those who work off a computer. I think you could print the instructions, but it might not be as clear. Generally, if you have some basic knowledge in sewing, it’s not hard to follow. It’s an enjoyable sew to bring together and doesn’t take too long either.
Sizing was pretty spot on for me. My waist being 33 inches and hips measuring 40 inches, I made the size 12 without any modifications. My height is 167cm and the skirt is a midi length as intended by the pattern. Conveniently, the skirt has been drafted with shortening and lengthening lines. My second favourite feature apart from the fabulous shape of the skirt are the big pockets!
I loved testing for Jo-Anna @sewingwithlinen who the designer of the skirt is. It was easy to give feedback and any questions were quickly answered. It’s a fun pattern to sew with potential for it to look different according to the fabric that you choose. There’s even the potential to hack it into an A-Line skirt! I think that Linen Lab might be making this a free pattern for their customers!
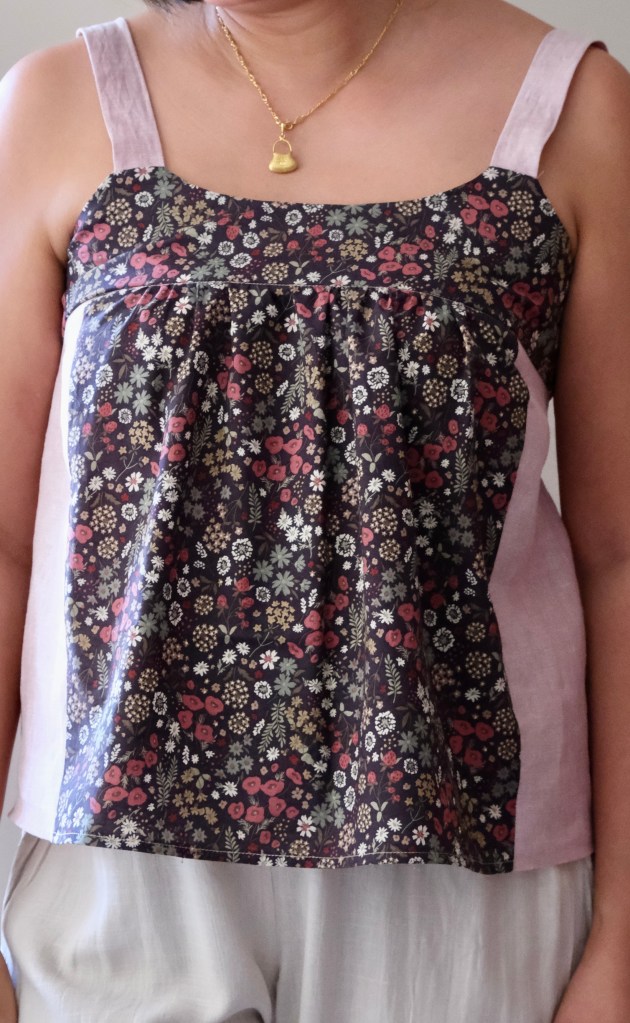
Another great pattern from Cashmerette! I love this wide strapped version of this camisole top from Cashmerette. I wanted a plain white camisole top, and this is such a well-fitting top. I’m also very happy with the length as I prefer to wear my tops untucked so this lands at just the right spot for me.
Top is just the right length
I’ve used the Cashmerette sizing calculator, and it has been so accurate that I have been confidently skipping the toile. Not that it’s recommended but I’m sewing for an upcoming trip and this sizing calculator has not let me down yet! For my measurements of 35HB: 38FB: 33W, it was recommended that I sew a C Cup, size 10 bodice grading to a size 14 waist. I think it’s very comfortable and the only adjustment needed was to trim 1.5 inches off the straps.
The fabric is from my stash. It’s a beautiful white linen/cotton blend with subtle texture created by the weave. For the lining, I’ve used a white muslin. I tend to use muslin for lining because it’s very light and the weave is loose, so it’s works very comfortably as lining. Sometimes, if the lining is made from stiff cotton, it can pull the shell of the top or dress out of shape. Whatever, you use for lining must be loose and have some give.
Great wide straps that cover the bra straps
This pattern also comes as a dress. I have some fabric earmarked for the dress. This pattern is lovely as a slip dress. I want to use the other strap option which is a narrow strap and uses rings and sliders to make it adjustable. That would be something new to try as I’ve never sewn that before.
A future Avola Dress?
This top will be a great core item in my closet. It’s fun to make colourful dresses but it’s items like this which are the workhorse of a closet! Happy to be adding to my basics collection.
When Eloh Patterns released the Sorrento Shorts pattern, I was quick to jump on and buy it because I love the look of that flat front and I find semi elasticated trousers and shorts to be quite comfortable. Anything that doesn’t squeeze me in the middle! These shorts come with the bonus of extra big pockets, and I love the little flare facilitated by the pleats in the front.
It’s a straightforward pattern to sew and fit. I made a size 12 with my waist measurement of 33 inches and hip measurement of 40 inches. I did receive an email after my purchase with updated instructions about choosing the right size as the waistband is narrower than the hips. I usually look at both hip and waist measurements before deciding on a size. Sometimes I grade between sizes. I was unsure why that instruction had to be updated in the pattern? I did my usual try on before attaching my waistband and everything worked out fine in the sizing.
The pattern suggests medium weight fabric, so I chose to use some leftover poplin from my stash. Feeling very pleased that I’m working through my stash this year. If I’m honest, the motivation to get through the stash is so I can justify buying some great fabric that I’ve bookmarked. Just waiting for sales! The poplin has worked very well for the pattern.
Seam allowances. This pattern has 2cm as the seam allowance due to French seams. I must be honest and say that I overlocked my seams as I only tend to use French seams with thin, lightweight, or delicate fabrics. I know it’s the choice of the seamstress and the pattern maker but I was wondering if the French seams would be bulky in this category of fabric? I ended up trimming all my seam allowances down to 1cm to reduce bulk. I guess you can argue that 2cm is not that far from a 5/8-inch seam allowance which is quite standard for woven fabric patterns so I didn’t necessarily have to trim the seams down.
Generally, my one little criticism is a storm in a teacup because overall, Eloh patterns has impressed me. The fit, design and instructions that included illustrations are an excellent standard. I won’t hesitate to purchase more of her patterns. It was a really relaxing sew which is much needed after a stressful week. I love how sewing focusses my mind on something completely different for a while. Also, straight after sewing, I put them on, and they are superbly comfortable to wear! Great for the heatwave we are experiencing.
This is not a sponsored post. Melco fabrics gifted me the fabric and reached out for a review without any obligations to post. When Melco fabrics reached out to me, I hadn’t really heard about print on demand fabrics. Basically, the concept is that you can order from a variety of featured artists, in this case, Deer Fiorella, and you can order the substrate and fabric amount needed which is what will be supplied. Less waste, more sustainable and environmentally responsible. I love that this is happening in the sewing arena.
I chose the Gypsy Girl Sundance for my Holyoke Dress in a poplin. The Holyoke is a Cashmerette Club pattern which is a maxi dress featuring princess seams, button placket, a partially elasticised waistband and most importantly, pockets. I had used the skirt of this pattern to pair with the Hamden dress bodice in a previous make, but I really wanted to make the Holyoke dress in its original form.
Poplin is not the usual type of fabric that I reach for, but I wanted to try a more structured look for the dress. Poplin was a popularised in the 1950s with those beautiful full skirt dresses. It’s really durable and wrinkle resistant but still lightweight enough to wear comfortably in warmer weather. I’m really impressed by the quality of the dye and the cotton from Melco. There was no loss of colour when I gave the fabric a hot wash and iron when preparing the fabric for sewing. It’s normal to expect a bit of shrinkage from cotton which is why it’s important to prepare the fabric before sewing. The amount wasn’t noticeable for my pattern.
The poplin is 110 grams per square meter (GSM) with medium drape, so I used a universal needle size 90/14 on my machine. This worked very well but I had a bit of a hairy moment when I was trying to sew through several layers of fabric at the waistband. I think there were a few skipped stitches, but I wasn’t going to redo that area as I was just grateful not to break any needles. I guess I could have sewn up to the waistband and then swapped the needle to a heavier size, but the button does close over the waistband anyway.
Sizing a Cashmerette dress is so easy because of the unique sizing calculator for their patterns. It’s as easy as punching your numbers in and getting your sizing recommendation. Mine was 35-inch high bust, 38-inch full bust, 33-inch waist and 40-inch hips which recommended a size 10 bodice, size 14 waist and size 8 hip. I still made a toile as poplin does not have any stretch, so the sizing needs to be spot on. I followed the “Sew a quick and dirty muslin” tutorial for the toile. It is greatly detailed for anyone who isn’t familiar with the toiling process. I ended up making a slight adjustment to the side seams of the bodice.
Melco have really impressed me with the quality of their product. I love the designers featured and the fabric is a beautiful quality. I’m thrilled that they’re not just producing beautiful fabric, but they are passionate about ethical and sustainable fashion. Making and wearing something that has had a light touch on the environment makes me feel good about being someone who sews because sewing supports slow fashion for some of those same reasons.
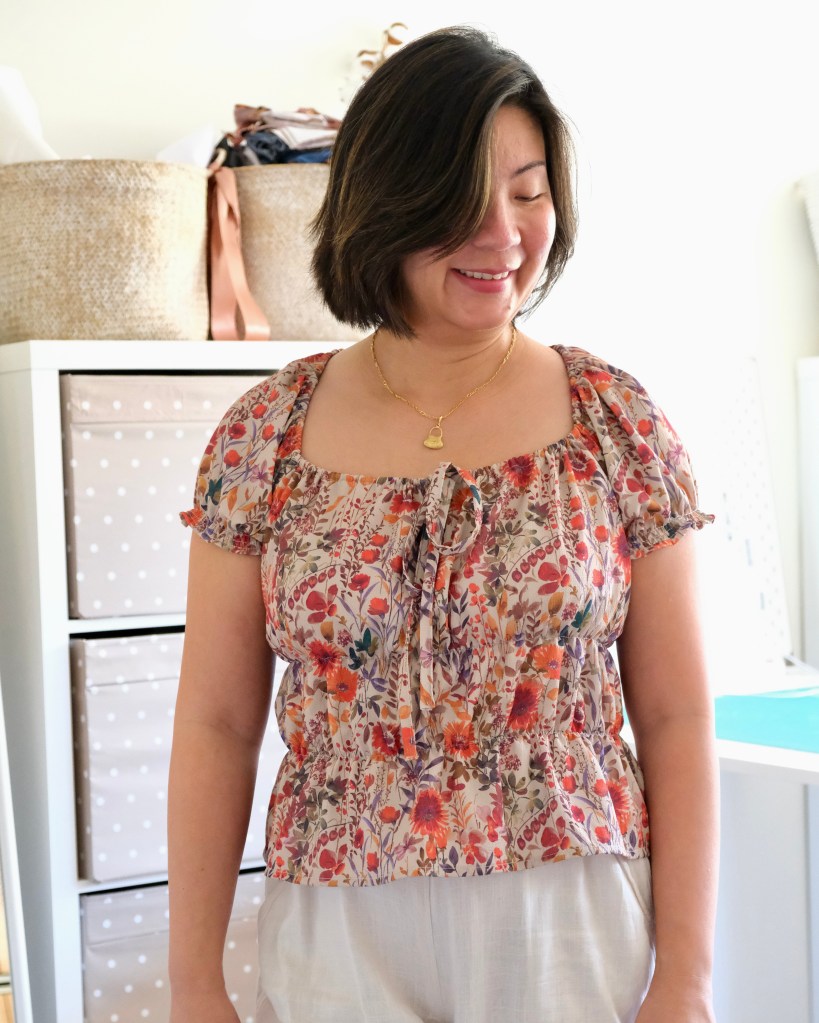
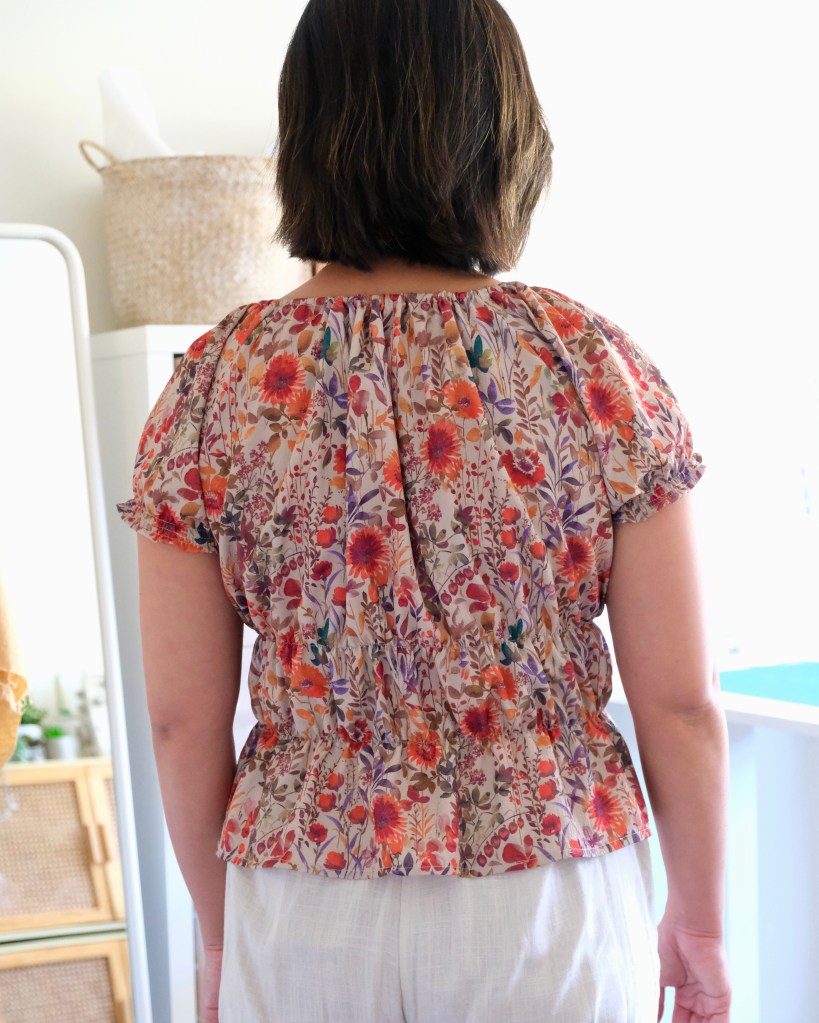
Pattern Scout has released a new pattern! I was lucky enough to get on the testing team. I love testing for Pattern Scout, the patterns are always well set out and comprehensive. It makes sewing so straight forward. Another reason I wanted to do this test was that the pattern included shirring which is a skill that I have been curious about for a while now.
The style of the Joni Blouse is very feminine and has the cottage core look with the puff sleeves, gathers around the square neckline and shirring to add shape. I’ve made the blouse version for the test, but I can’t wait to go back to sew the dress version. Now that I’ve figured out shirring, I’m hooked and can’t wait to do more of it. In the dress version, there’s multiple rows of shirring on the back bodice.
The Joni Blouse is made for lightweight woven fabric. I’ve used a beautiful crepe which I found at my local Spotlight Store. I would have also used a lightweight linen, rayon, or cotton lawn. The crepe is very light weight and easy to wear. The blouse only required about 1 ½ meters of this fabric. I also had to get shirring thread which is a very fine elastic thread that must be transferred to a bobbin.
Some tips that I would recommend for shirring is to test out a piece of your fabric before starting. I played around with the tension because when I first started, I couldn’t see much gathering. I increased the stitch length to the longest length, and I also moved my tension dial up to a 7. I hand wound my elastic thread onto the bobbin and was firm but did not pull on the elastic thread. The instructions also gave some tips how to sew multiple rows of shirring which I’ll test out when I make the dress version. I did a back stitch at the beginning and end of the row, but I wasn’t sure if this is something that everyone does?
My sizing was in the size 12 range and with the generous amount of ease, I did not have to make any fit alterations. My measurements are 35HB:37B:33W. This pattern has a range of sizes from 0 to 30. The best thing about Pattern Scout patterns is the cup size option. So good that I don’t have to do an SBA! I used the B Cup option.
The construction came together quite quickly. I love the construction of the square neckline. The drawstring is threaded through a channel that you make around the neckline which makes it easy to shape to the size you want and sits so comfortably. Also, the sleeves come in three options and its summer here, so I made the short-sleeved version. It was easy to install with the raglan sleeves.
First pattern test of the year! So excited to discover a new pattern. Hope that there’s more to come.