Ella Dress

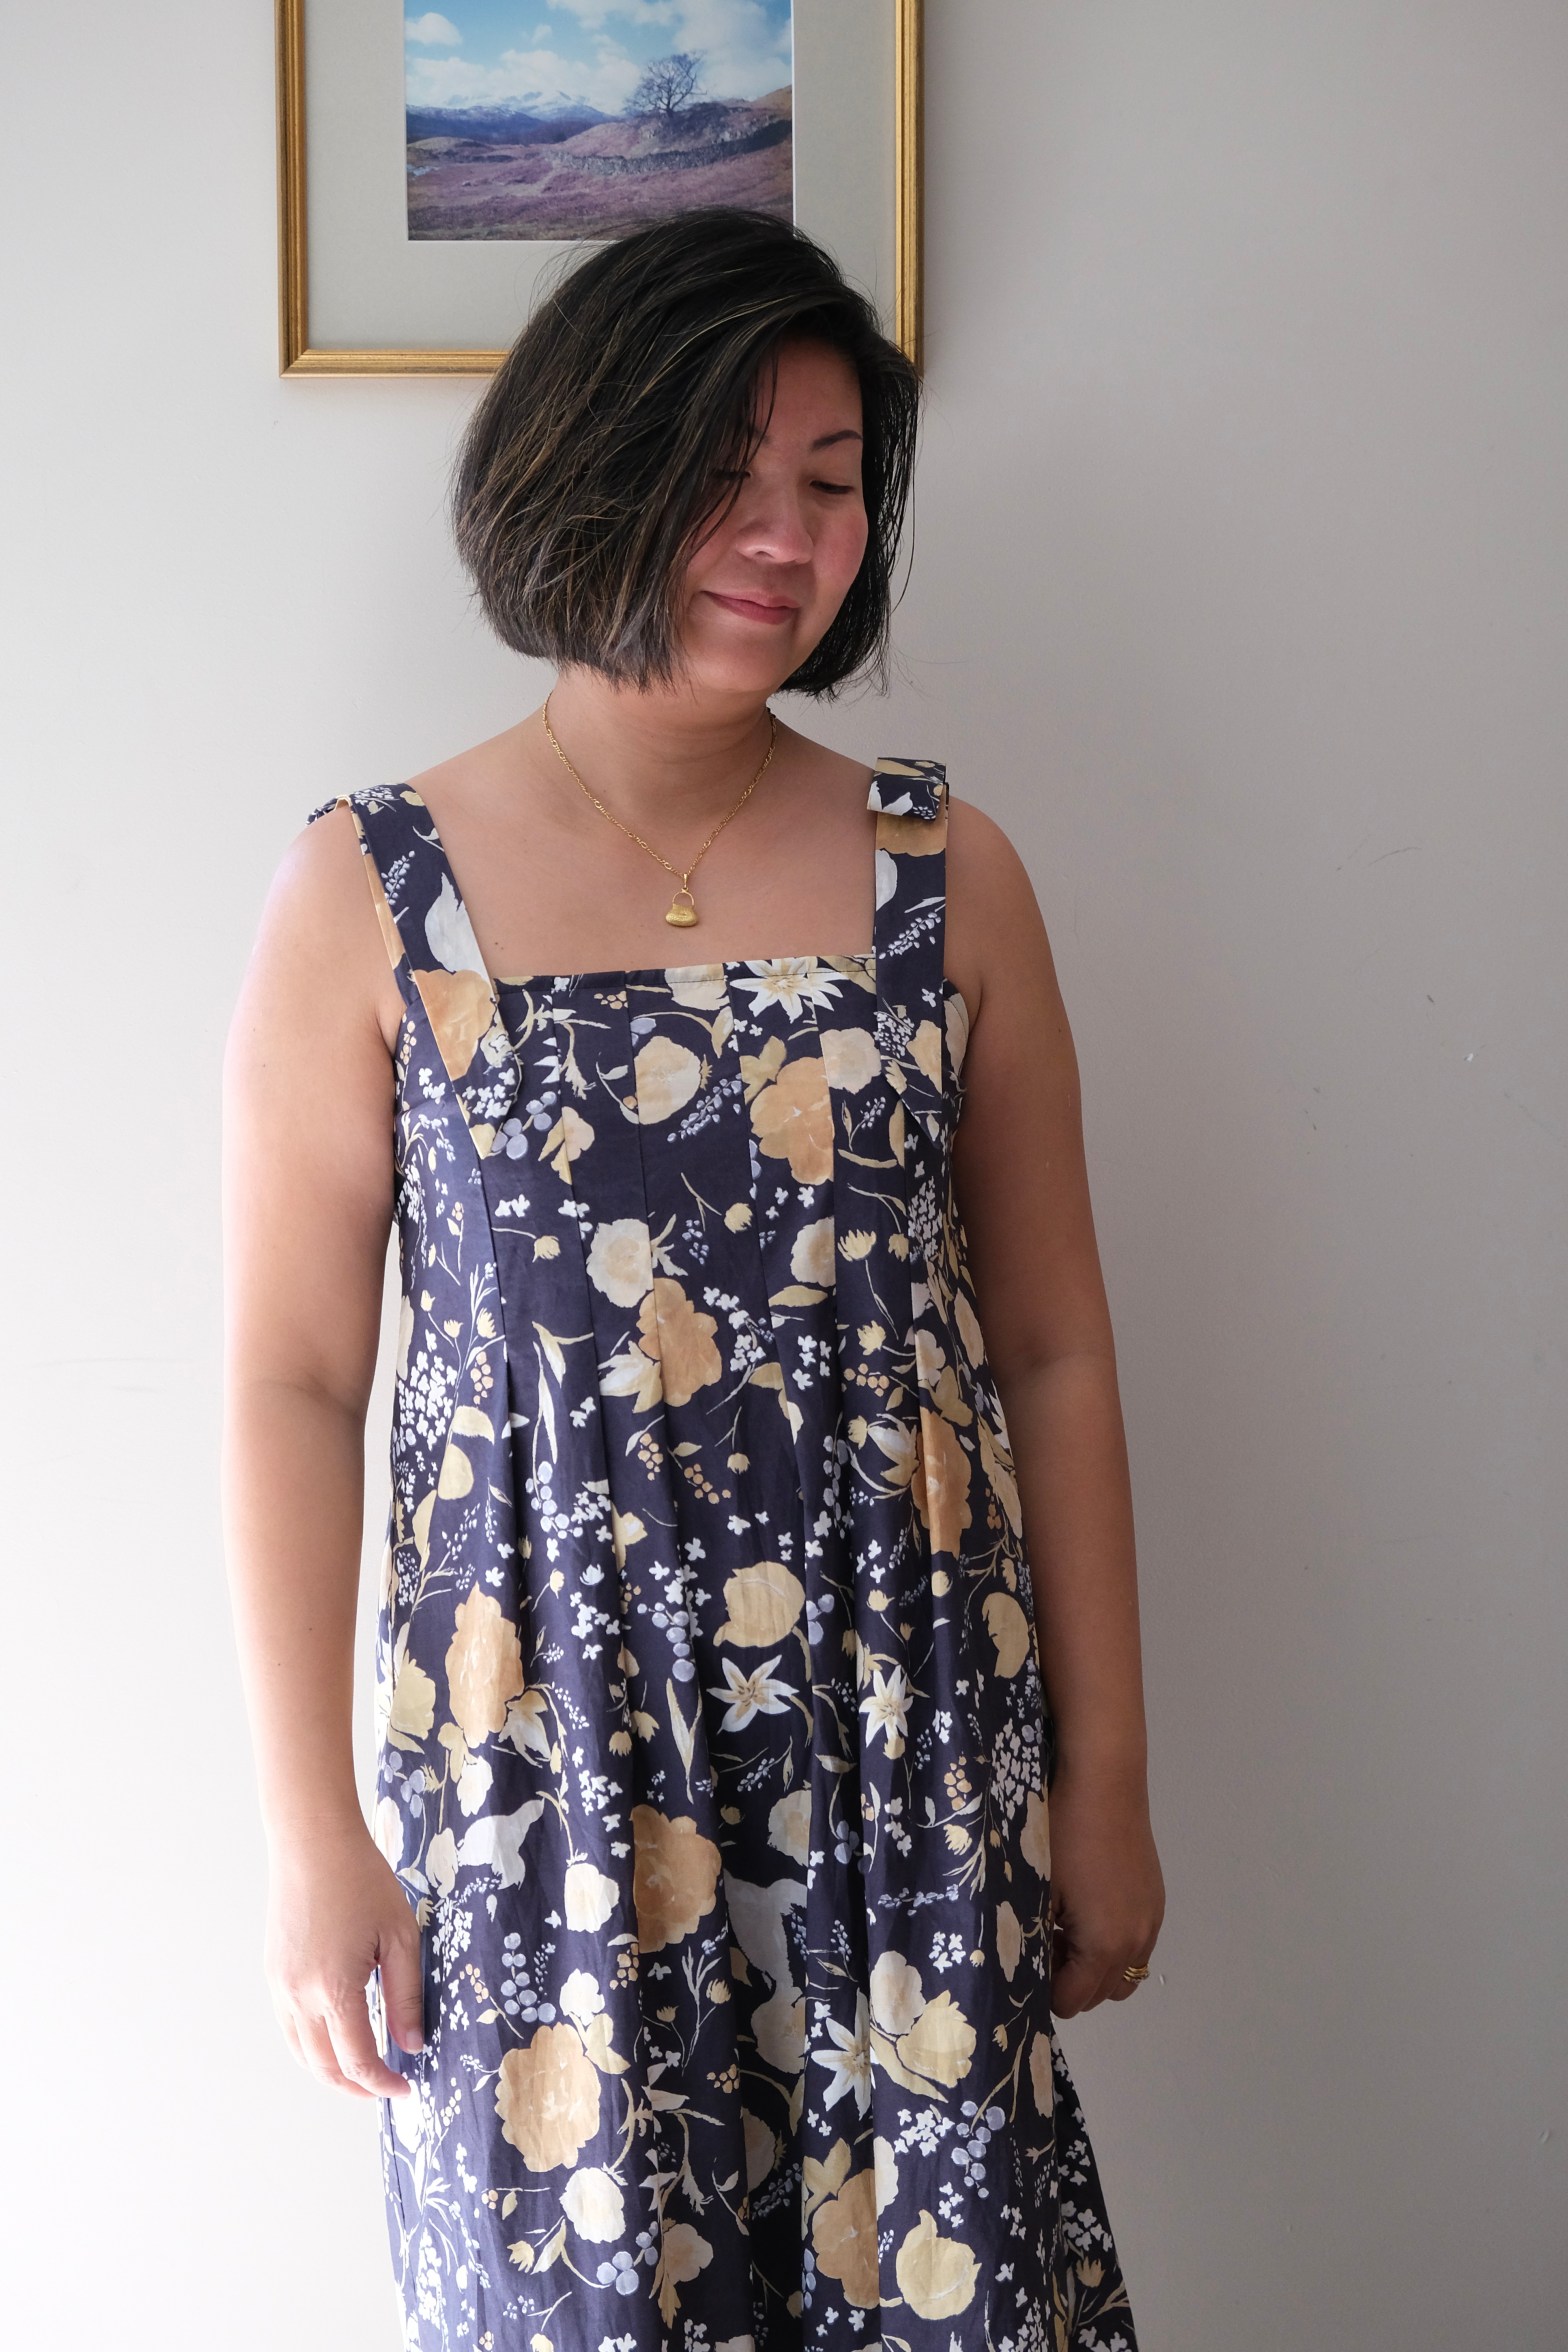
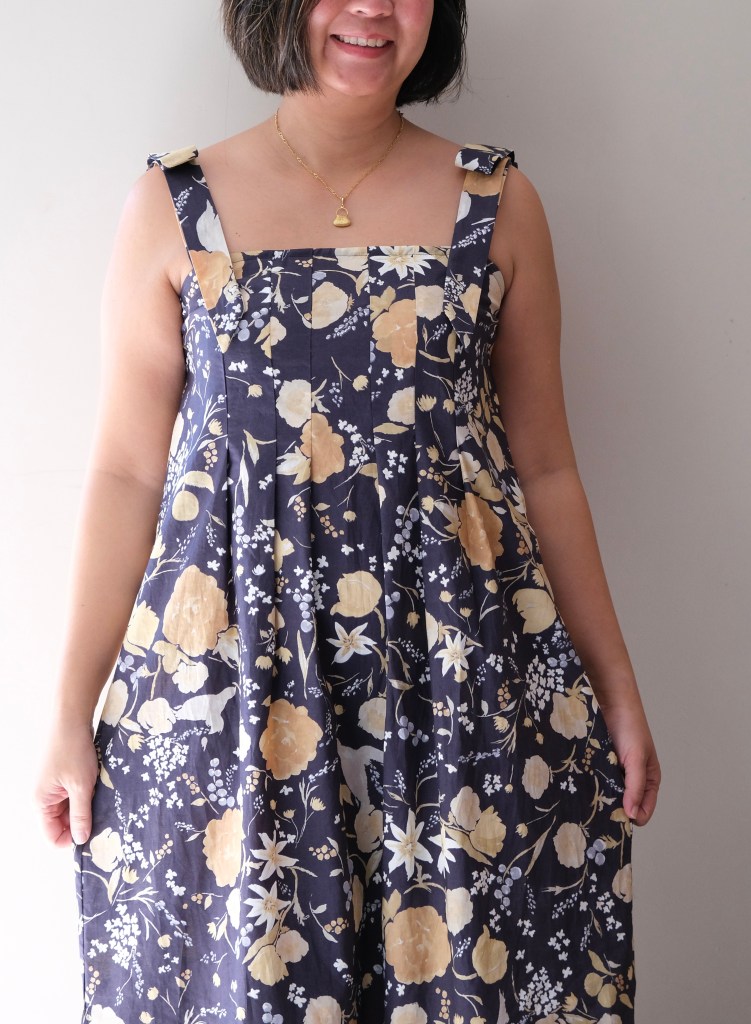
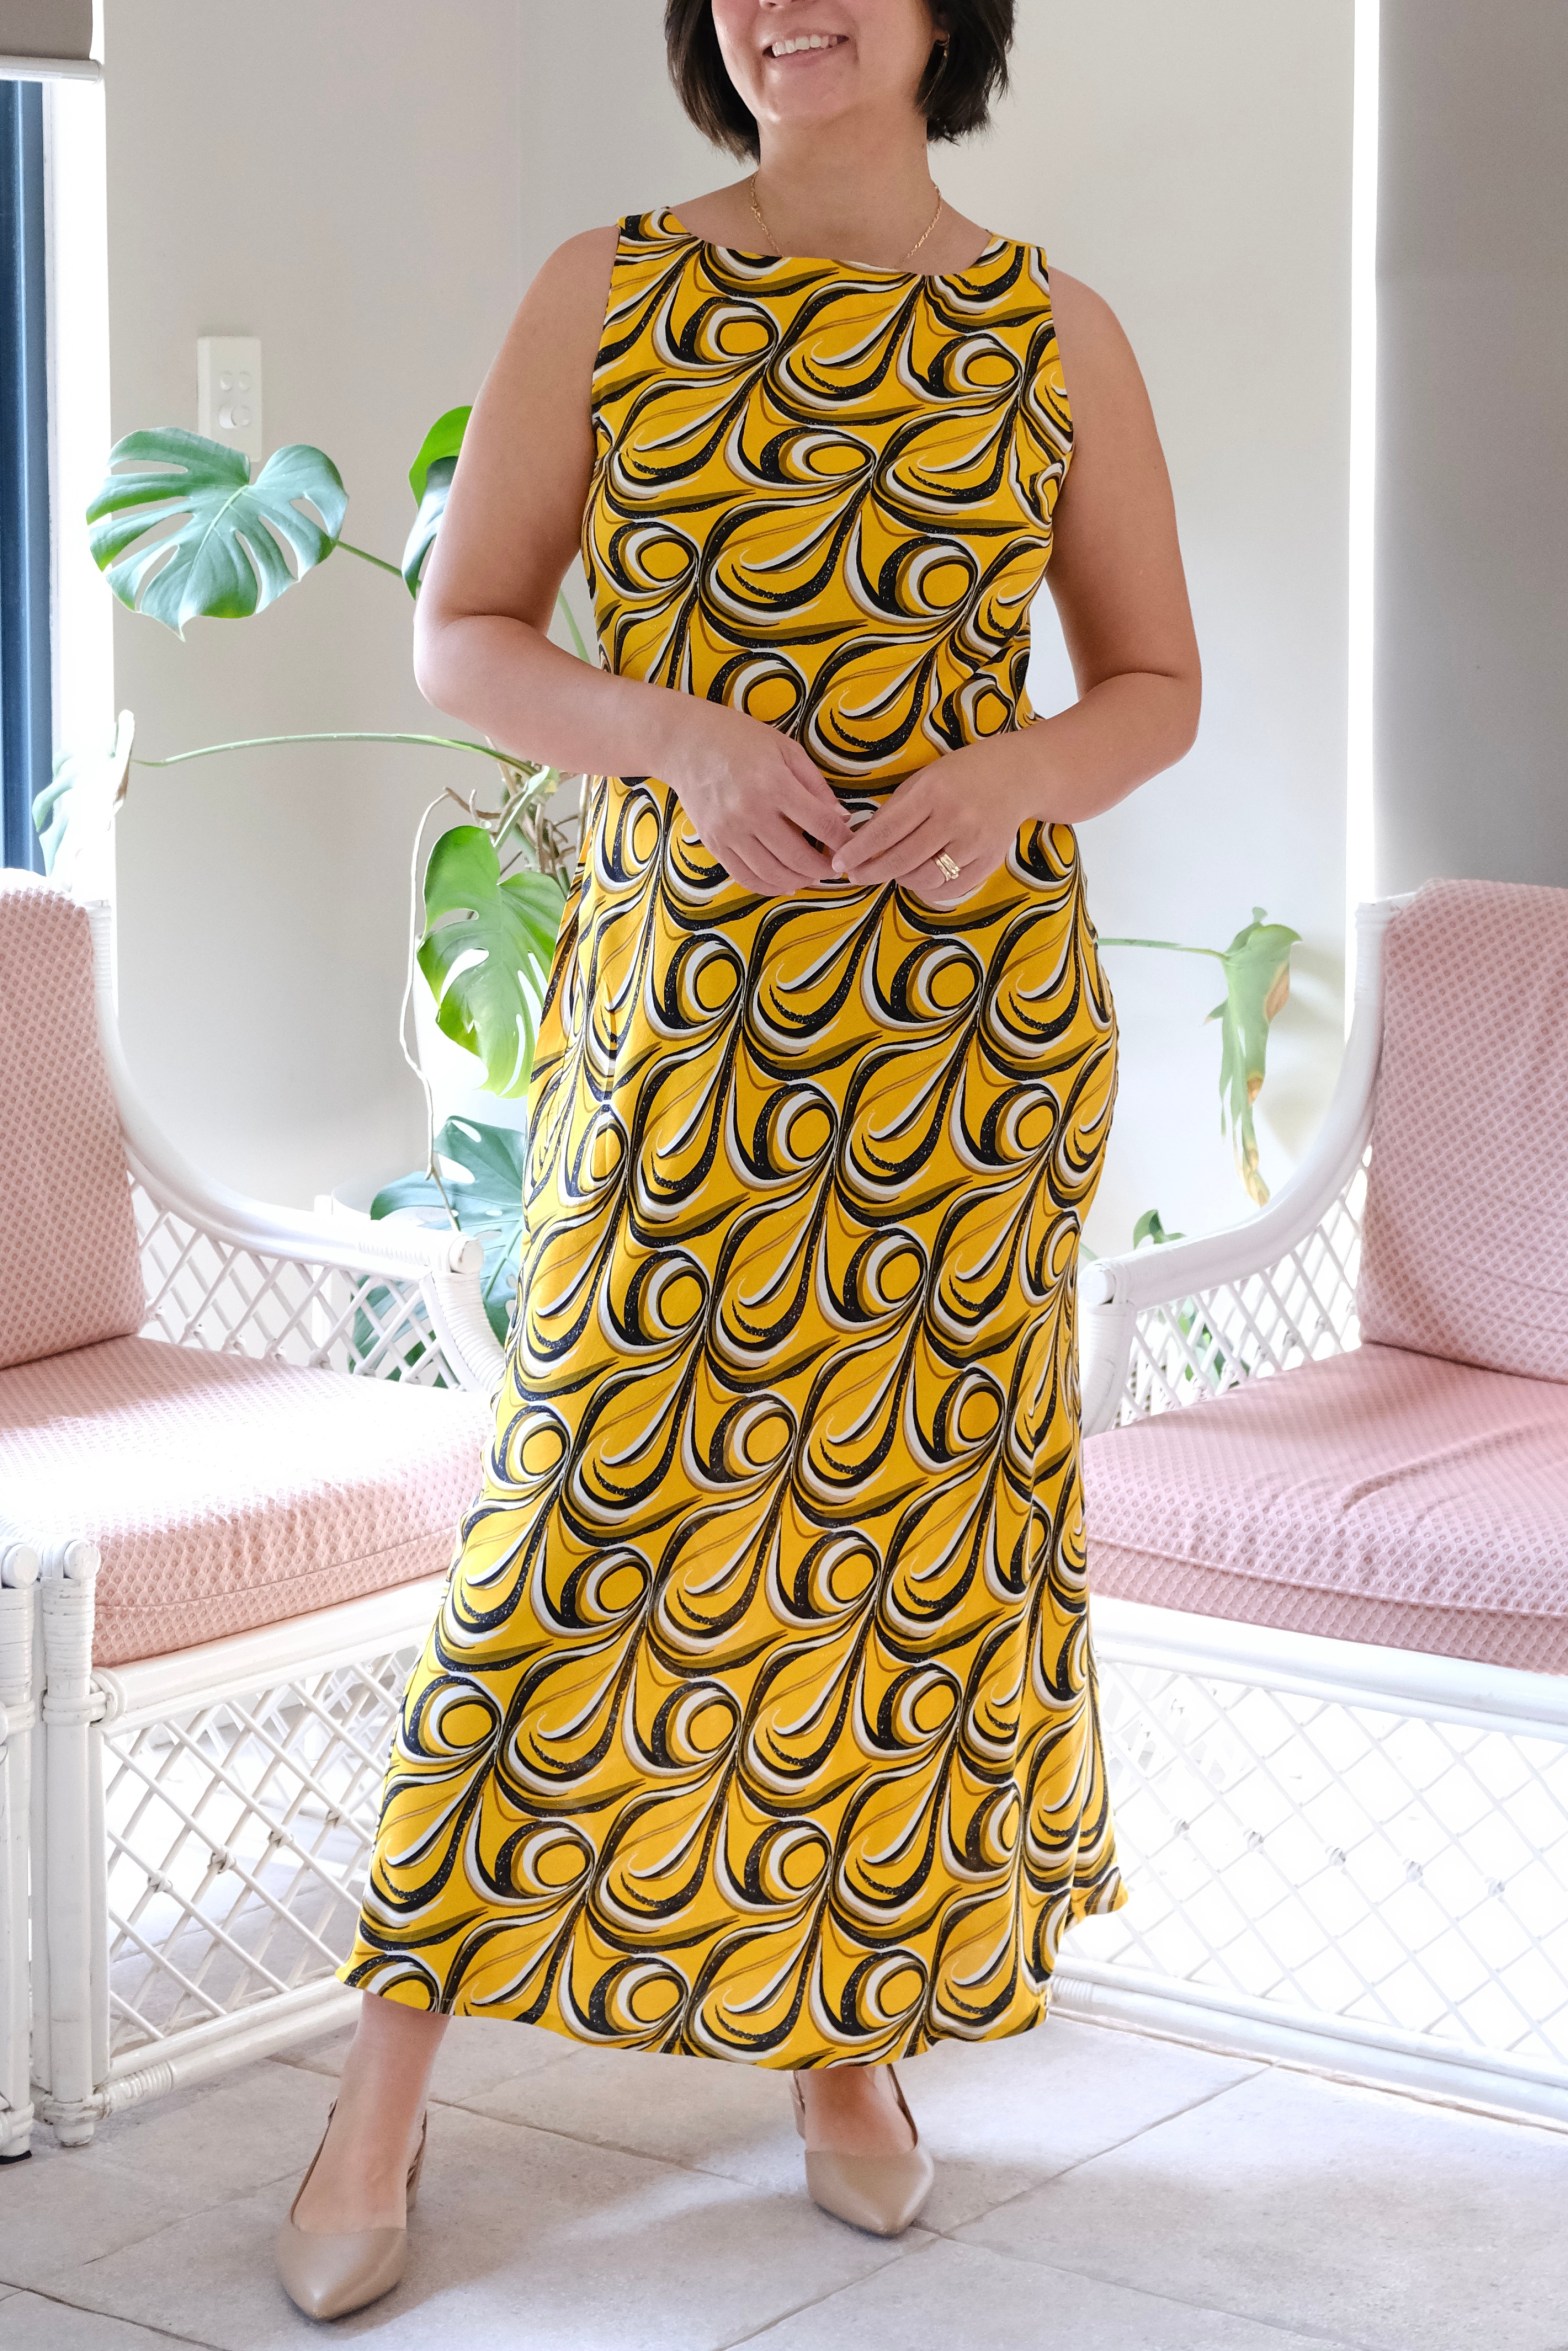
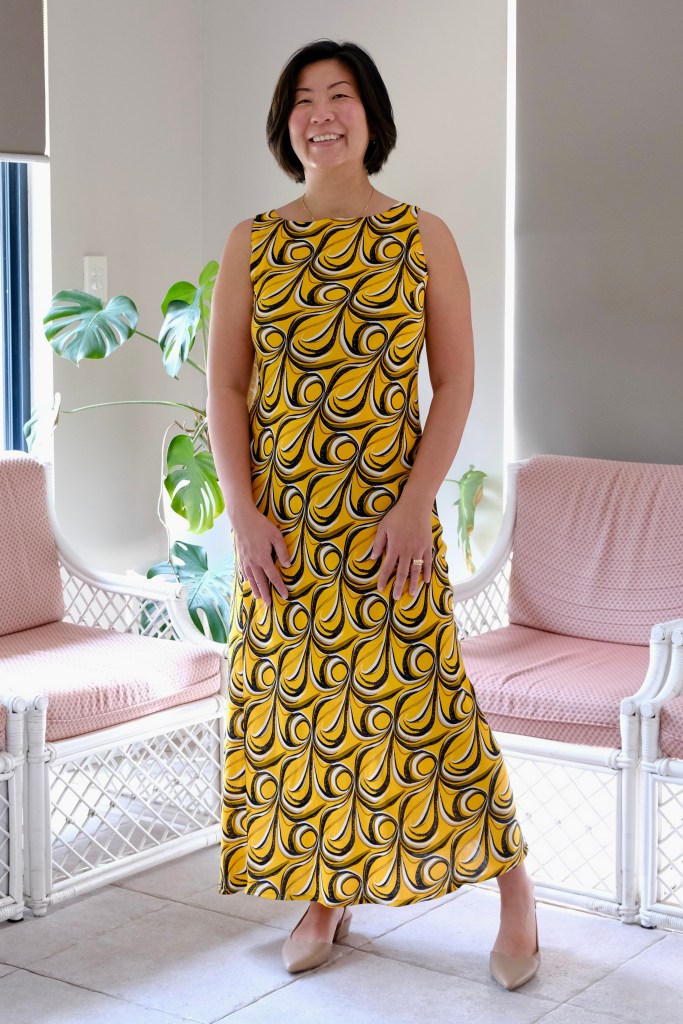
Pattern Scout has done it again! This is the newly released pattern from Pattern Scout, and it hits the mark of a timeless classic. The Ella is a sleeveless shift dress which can be sewn on the bias, so it just skims the curves. It’s a classic with the boatneck midi dress. If you’re looking for a pattern with some skill building features, there are instructions for French seams, sewing on the bias and installing the invisible zip.

I was lucky enough to get onto the testing team. I really like testing for Casey and have sewn many of her patterns. The instructions are always comprehensive and easy to follow. The illustrations are great, and she also has a YouTube Channel which is another great reference. I’m sure she will be providing some great sew along videos for the Ella Dress. I also like the sizing especially the inclusion of cup sizes.

This pattern is drafted for woven fabric. It would suit anything light to medium weight with fluid drape. I used a rayon from East Coast Textiles. I had discovered East Coast Textiles through some sewing friends and really love their rayon. Luckily, a new batch had arrived when I was doing this pattern test. I had three meters available which was perfect for the pattern to be cut on the bias. The pattern can also be sewn straight grain which can be a fabric saver.

My measurements of 35HB:37FB: 33W:40H fits the size 12, B-cup. The pattern is drafted for an average height 5’9” (175cm). I’m slightly shorter but decided not to shorten the length with this make because I was testing the piece. There are always good instructions about fit and how to modify the pattern included with Pattern Scout Patterns. Without shortening the length, the dress does look more maxi than midi on me. I have decided to leave it as a maxi because I would wear it more.

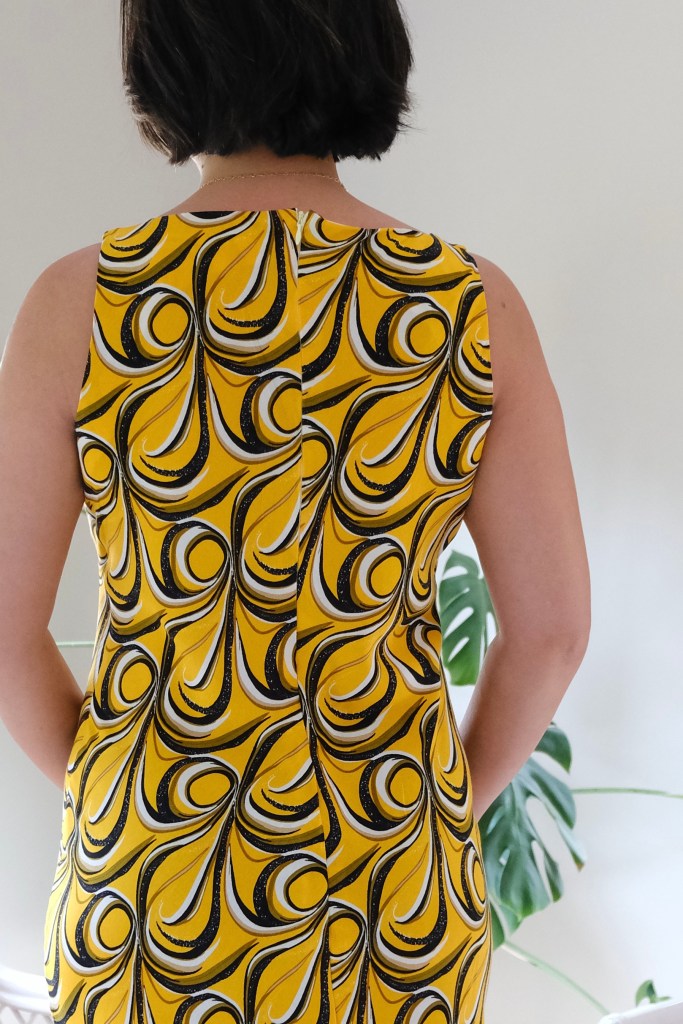
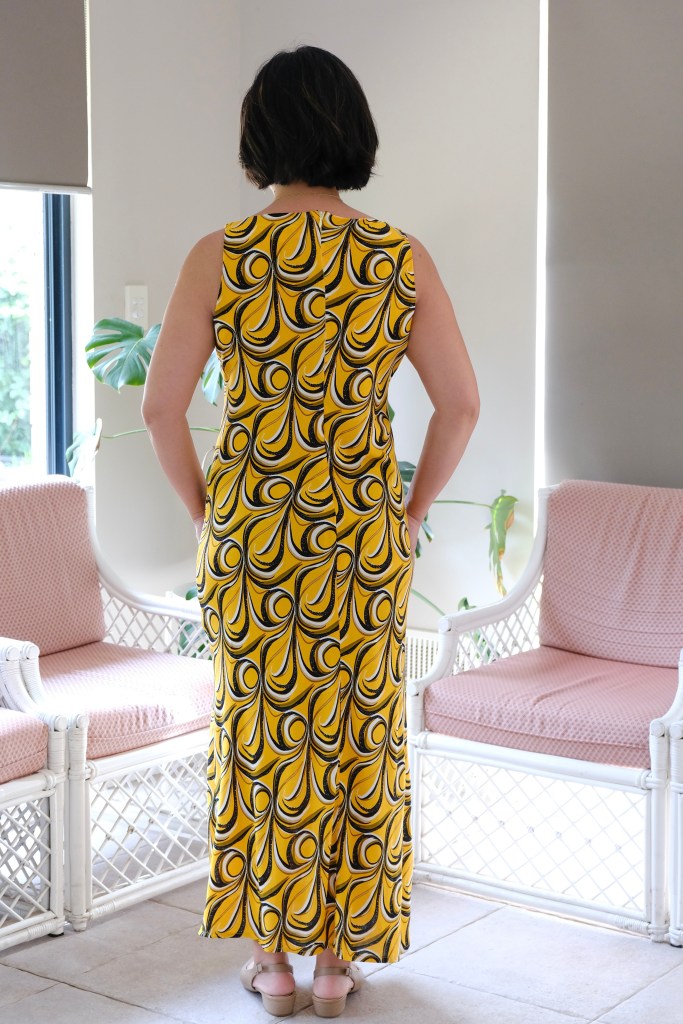
The dress is neatly finished off with French seams and the neckline and armholes have facings. I feel like this is a great pattern for practicing some of those advanced sewing skills. I also liked the instructions for installing the invisible zip. I still haven’t bought myself an invisible zipper foot, but I think I’m used to it now. I use a normal zipper foot, but I make sure that I iron open the zip tape to sew as close as possible to the zipper teeth.

It’s nice to have a wardrobe staple like the Ella Dress. I feel that this silhouette is a classic and doesn’t date. It’s something I will return to sew again and again. I can’t wait to wear this in summer. Maybe I’ll make one that will be suitable for winter layering and add lining. 

Thanks for reading and happy sewing!

X Em

Joni Blouse

Pattern Scout has released a new pattern! I was lucky enough to get on the testing team. I love testing for Pattern Scout, the patterns are always well set out and comprehensive. It makes sewing so straight forward. Another reason I wanted to do this test was that the pattern included shirring which is a skill that I have been curious about for a while now. 

The style of the Joni Blouse is very feminine and has the cottage core look with the puff sleeves, gathers around the square neckline and shirring to add shape. I’ve made the blouse version for the test, but I can’t wait to go back to sew the dress version. Now that I’ve figured out shirring, I’m hooked and can’t wait to do more of it. In the dress version, there’s multiple rows of shirring on the back bodice.

The Joni Blouse is made for lightweight woven fabric. I’ve used a beautiful crepe which I found at my local Spotlight Store. I would have also used a lightweight linen, rayon, or cotton lawn. The crepe is very light weight and easy to wear. The blouse only required about 1 ½ meters of this fabric. I also had to get shirring thread which is a very fine elastic thread that must be transferred to a bobbin. 

Some tips that I would recommend for shirring is to test out a piece of your fabric before starting. I played around with the tension because when I first started, I couldn’t see much gathering. I increased the stitch length to the longest length, and I also moved my tension dial up to a 7. I hand wound my elastic thread onto the bobbin and was firm but did not pull on the elastic thread. The instructions also gave some tips how to sew multiple rows of shirring which I’ll test out when I make the dress version. I did a back stitch at the beginning and end of the row, but I wasn’t sure if this is something that everyone does?

My sizing was in the size 12 range and with the generous amount of ease, I did not have to make any fit alterations. My measurements are 35HB:37B:33W. This pattern has a range of sizes from 0 to 30. The best thing about Pattern Scout patterns is the cup size option. So good that I don’t have to do an SBA! I used the B Cup option.

The construction came together quite quickly. I love the construction of the square neckline. The drawstring is threaded through a channel that you make around the neckline which makes it easy to shape to the size you want and sits so comfortably. Also, the sleeves come in three options and its summer here, so I made the short-sleeved version. It was easy to install with the raglan sleeves.

First pattern test of the year! So excited to discover a new pattern. Hope that there’s more to come. 

Thanks for reading and happy sewing!

X Em

Flora Dress

Featuring Nani IRO Rakuen silk and cotton in black

The Flora Dress is a new release from Pattern Scout. I was excited when I saw the release because she had detailed this dress on her YouTube channel last year. It was just made from rectangles of fabric with pleats. The simplicity of the dress is exactly the style that I love Pattern Scout patterns for. With the pattern release, the rectangle fabric concept is still there with a bit more refinement in the neckline but still retaining the wide tucks to fit the bodice.

The dress is made for lightweight woven fabrics that do not have any stretch. It was so lucky that I had the Nani IRO Rakuen fabric from DIY District. This fabric is a blend of silk and cotton with a composition of 70 percent cotton and 30 percent silk. It’s beautifully soft and lightweight at approximately 129gsm (a bit under 5oz). “Rakuen” translates to “paradise” which is depicted by the flowers and birds in a garden in what the description describes as a black background but, I would say that it’s more of a midnight blue background. I’m not disappointed as I prefer this colour.

Construction begins with sewing these pleats or tucks in the front and back pieces. It was a very satisfying exercise once you get into the rhythm of matching the notches of the tucks, folding, and marking the lines for the length of the tucks, sewing, and pressing the tucks and then repeating the whole process until the fabric was shaped into a fitted bodice that flared out into a flowy skirt. I guess the process reminds me of origami which is quite meditative and rhythmic when forming the shapes with the process of folding. It also requires the accuracy of origami, so I made sure that I measured the distance of the top and bottom of each tuck.

My sizing fell between the size 12 and 14 with a full bust B Cup. I did a toile of the size 12 because looking at the final measurements, there is a fair amount of ease in the waist and hips. I prioritised the bust measurements in choosing my size which worked out perfectly. To make the toile, I cut the tank top pattern pieces only which saves fabric. I used some of the remnant cotton lawn pieces from various previous makes. When making a toile, I find it’s important to use similar fabric. I’ve learnt this the hard way in the past!

Sewing with the beautiful Nani IRO cotton/silk fabric was lovely. Again, due to the fine nature of this fabric, I sewed with a 75/11 needle to make sure the fabric wouldn’t catch when sewn. I also pre-washed my fabric with an organic detergent (no enzymes) in a cold wash and air dried it. I remember shrinking some rayon once because I thought I would cheat and skip the pre-washing. Bad mistake! It shrunk so significantly that I couldn’t wear the top. That was in my first year of sewing and I’ve not made that mistake again. The other tip I can give regarding sewing with this fabric is to be careful when pinning the fabric. I used my quilters clips at times rather than making holes with my pins. I need to invest in some finer pins like what they use for bridal dressmaking, and I need to sort the blunt pins from the pincushion.

Amazingly, I did not use my overlocker in this make. Pattern Scout is great for their instructions for French seams. I decided to follow those instructions and I’m getting more skilled using French seams. It’s a satisfyingly neat finish. The neckline is finished with bias tape which there are also great instructions if you want to make your own. I used some pre-made black bias tape which saved me a bit of time and fabric. 

As you can see from the photos, I’ve sewn the long midi version of the dress with wide straps, and I left out the pockets. I know everybody loves pockets but with the finer fabric, I did not want to risk the outline of pockets and to be honest, I never use pockets in a dress because I’ll always have a bag. It’s a great inclusion in a pattern but I decided to skip it which made the construction even easier. The last thing to point out is the side slits of the dress. Slits are an important inclusion if you want to stride out or ascend stairs with a natural gait!

The Nani IRO fabric is another beautiful gift from DIY Fabric. This is another item sewn for my holiday capsule. I’m looking forward to wearing the beautifully soft and breezy fabric in the heat. It will be good for the evenings where I’ll need something a bit dressier for dinner but will remain cool to wear. There is also a light sheen from the silk in the fabric which probably hasn’t been captured in the photos. It gives the dress a luxurious quality and feels amazing. I can’t say enough how beautiful this fabric is to sew and wear.

Thanks for reading and happy sewing!

X Em