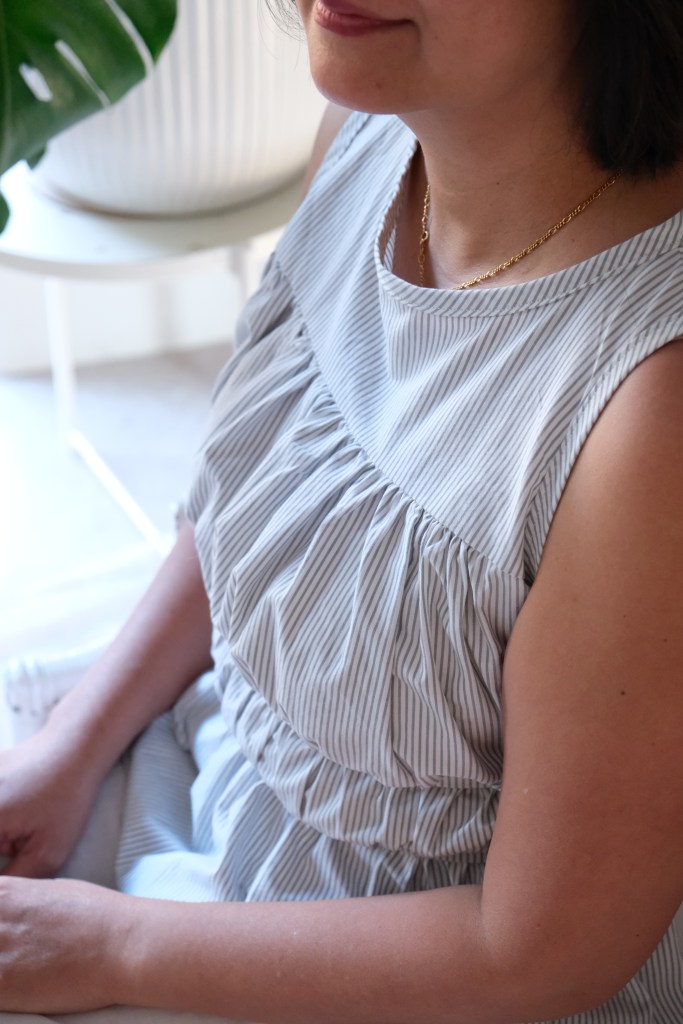
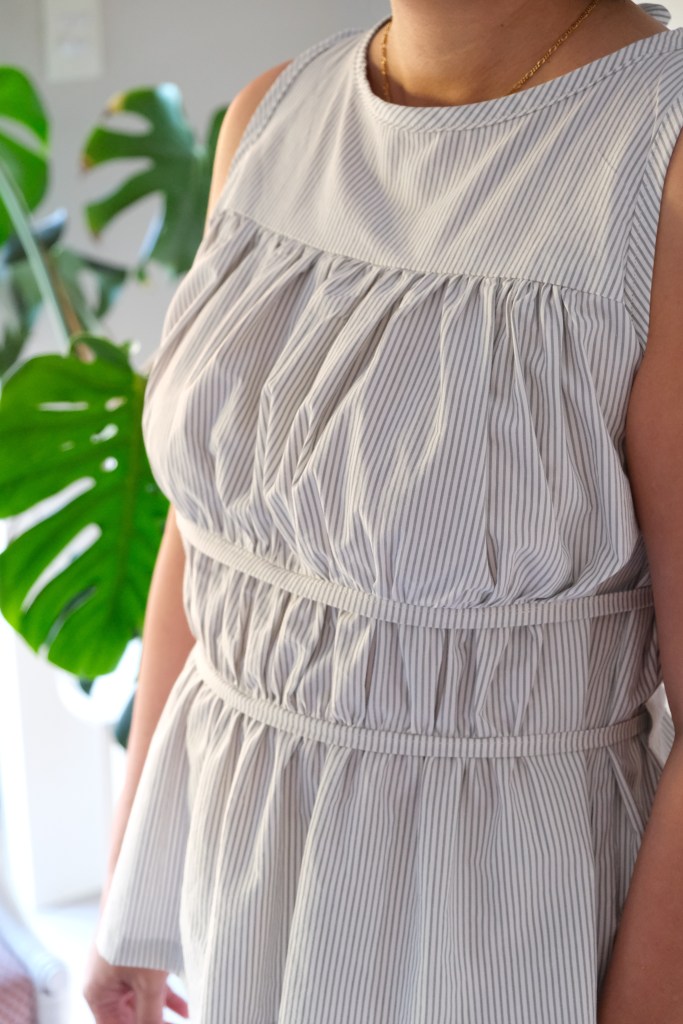
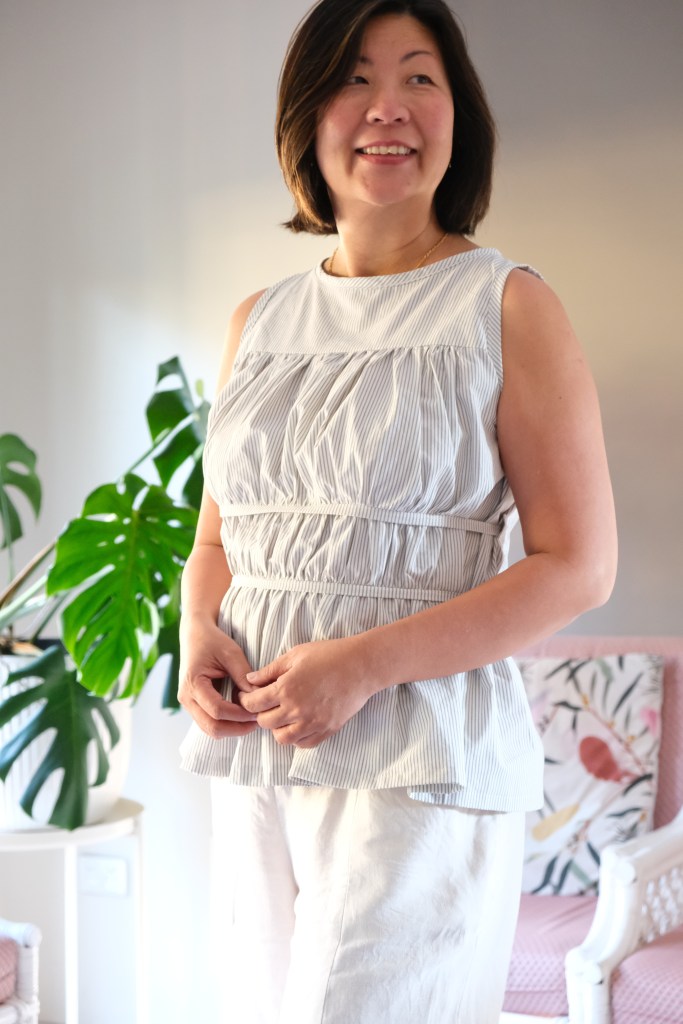
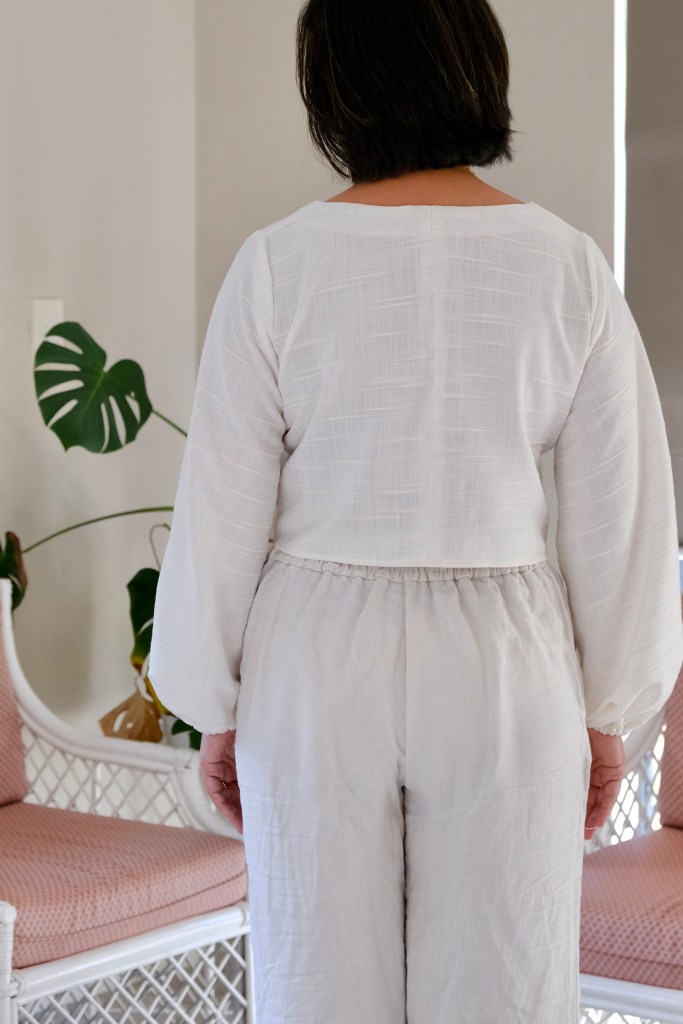
So excited to get into the testing pool for the newly released Swimstyle Patterns Paloma Top. I just loved the unique style and design immediately. The top features two ties that are sewn down at the front and are threaded through the back. These ties can be left loose, or they can be used to cinch in under the bust and waist to feature a peplum. It also features a yoke and gathering with biased binding to finish the neckline and arm openings.
This pattern is designed for woven fabric. I used a medium weight cotton that I extracted from an old doona cover. It was nice how the cotton gave it some structure but in my next version, I would use a lighter weight fabric. I have thrifted some old Saris and would been keen to experiment with that. The Saris are made from georgette fabric so it would be super lightweight and drapey. This version is my tester version so it’s not perfect but I was so excited to share it.
My sizing is always consistent with Swimstyle Patterns. My measurements of 38-inch bust, 33-inch waist and 40-inch hips sat within the Size L so that is what I tested. It was pretty much spot on. There was one adjustment that all the testers agreed on, and it was quickly adjusted and remedied. Apart from that, I didn’t find any other adjustments were needed.
There was some suggestion of making a dress version of this top which I had thought of when I was making it. I think this would make such a pretty dress! I have matched this top with quite a few items already in my closet, so I know that I’ll be getting a lot of wear out of it.
I’ve been so lucky to test quite a few patterns this year. It’s an enjoyable process to help in a small way, bring a pattern to life. Testing for Swimstyle was enjoyable and stress free. I liked the testing period, and the Facebook group was helpful and communication was orderly. Looking forward to making the Paloma Top again.
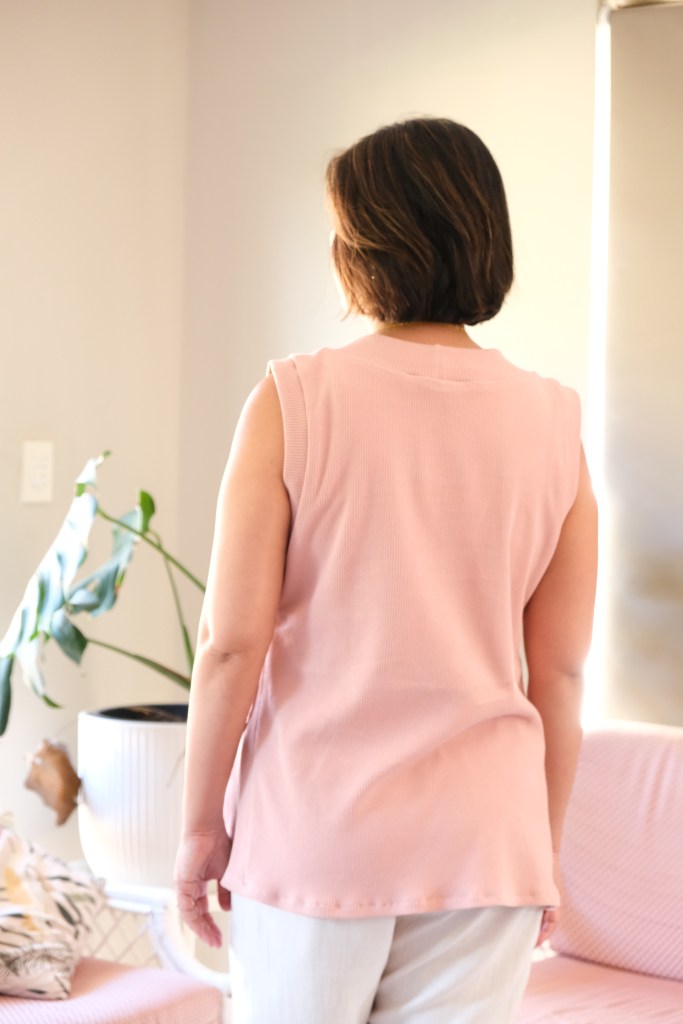
Some patterns I sew are real skill builders and the Viola Vest is one of these. I have a few things to work out with this pattern, and I considered not sharing until I made a version that I was one hundred percent happy with, but this blog has always been a journal for my sewing whether successful or not. I decided that I should jot a few notes down and come back to it.
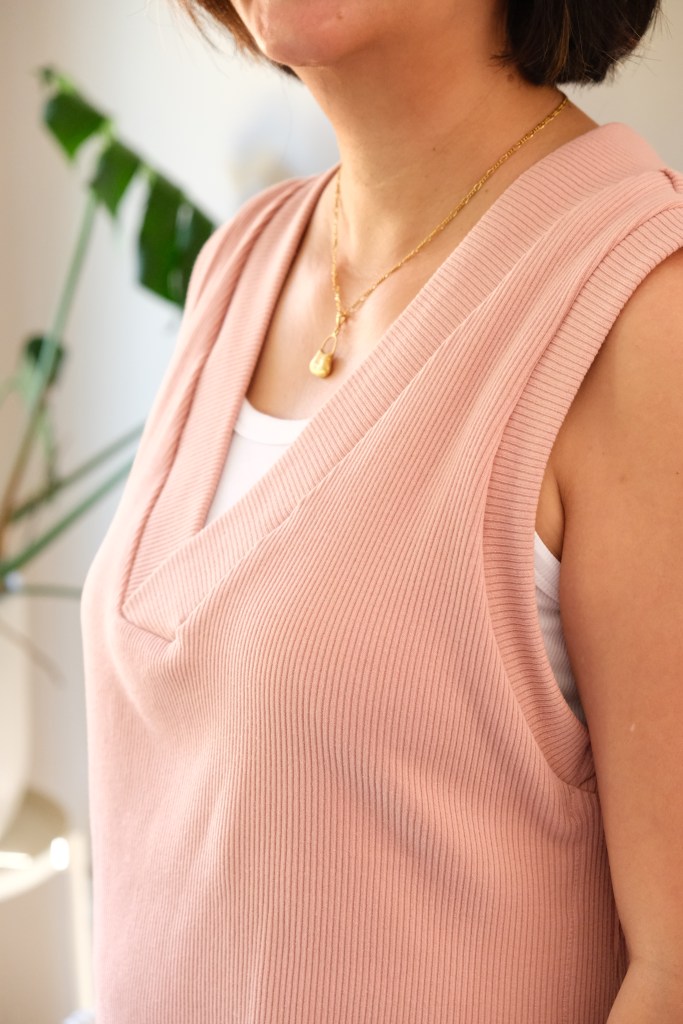
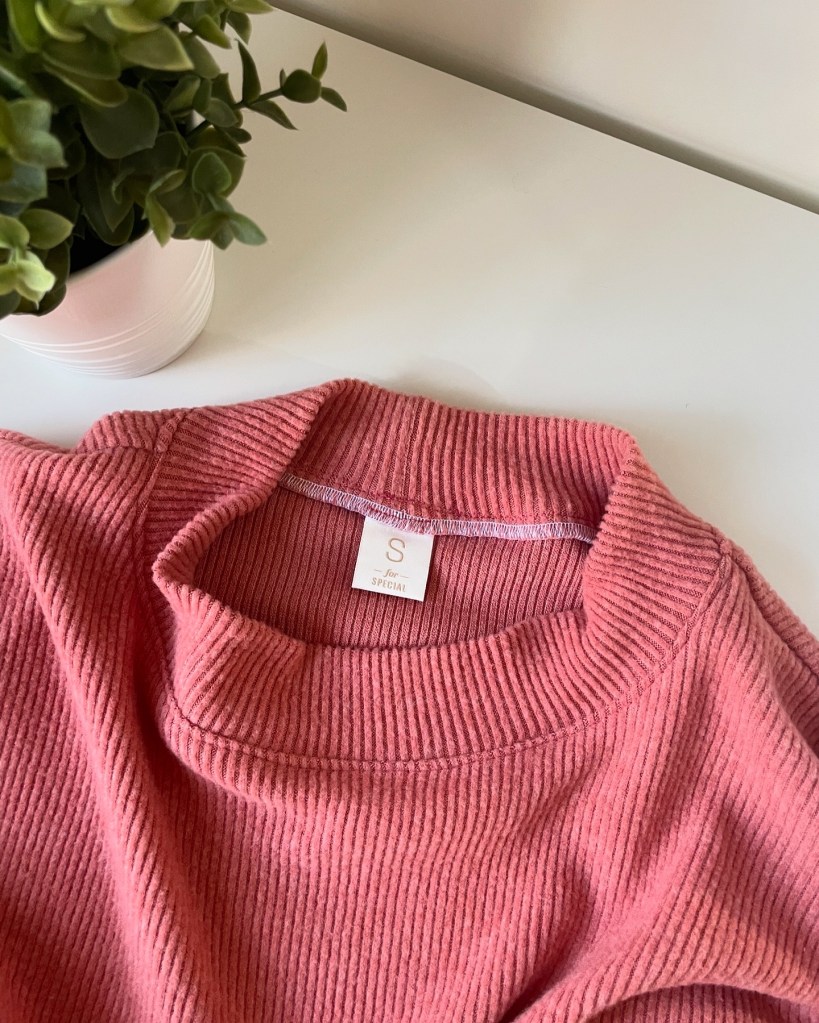
Swimstyle Patterns has been my go-to for elegant, elevated core wardrobe items. The Viola Vest is drafted for knit fabric and has a wide V-Neck with angled, overlapped side seams. It has an oversized relaxed fit. I bought this for that relaxed oversized look.
My measurements of 38-inch bust, 33-inch waist and 40-inch hips fit into the L size range so that was the pattern size that I cut. Generally, this was great. I like how the pattern also included how to choose the right fabric with what stretch and recovery was needed. I found a ribbed knit that was suitable, but I didn’t consider how bulky the ribbed knit would get. I do have a very basic home sewing machine which might have also affected my ability to deal with the bulkiness of my fabric.
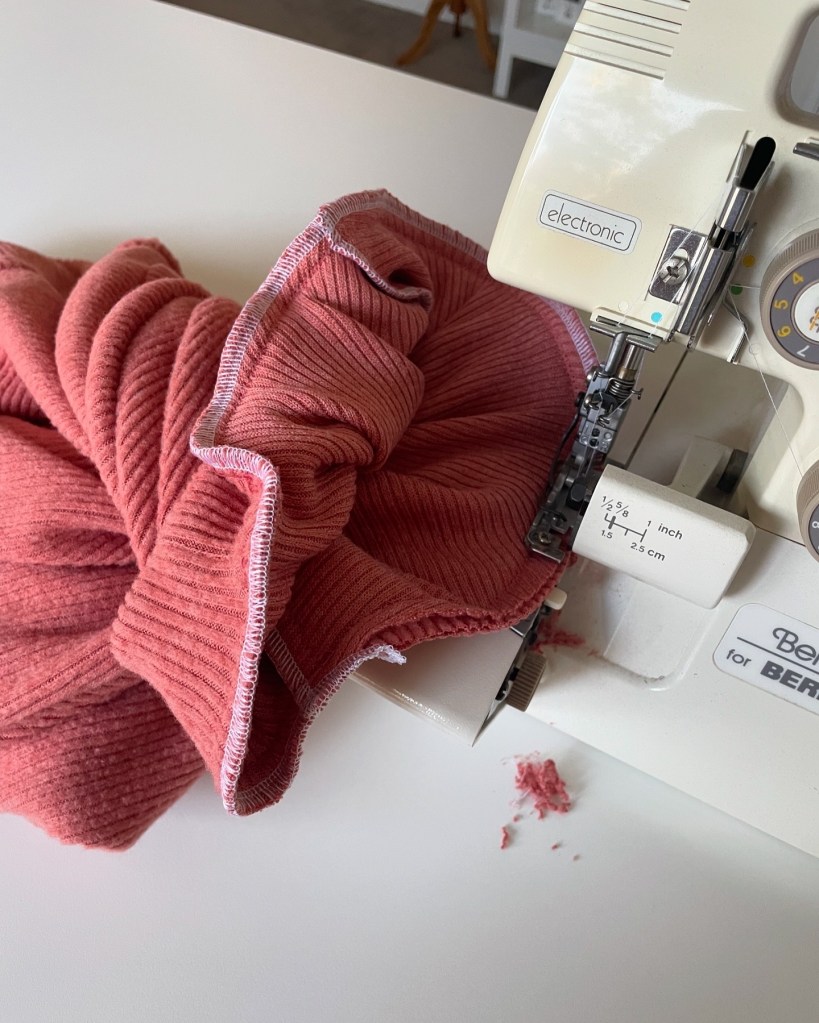
The part I thought I would struggle with was the V-Neck. It actually worked very well and was easy with the excellent instructions provided. I felt that I skilled up by sewing this neckline. The part that I couldn’t work with was the angled and overlapped side seam. The side seams are neatly folded and finished before being angled to sew together about 4 layers. The folded seams provided a great finish to the vest. However, with 4 layers, I had problems getting the angle and the bulk made it hard to stitch the seam as instructed. In the end, I had to sew it with a straight stitch.
Another thing is the hem which is sewn and prepared all in one before joining the side seams. The bottom is a bit wavy so I must have pulled the fabric a bit when sewing. I’m a bit of a perfectionist and I considered unpicking and retaking the photos but I decided to leave it and try again with another fabric. I need to give myself more grace when it comes to my sewing.
So, I’m not sure if the armhole sits too low because of my modified stitching or whether this was part of the design. I need to find slightly thinner fabric to make it again but I’m not sure if I should size down. This is why I like stalking a pattern on Instagram because it’s handy to see items on other people (regardless of size).
I would have always worn this vest with a shirt or tank top underneath anyway, so I still feel this is a good addition to my closet. I’ll be trying to find another knit for this vest because I love the look so much.
Featuring Fabric from the Devonstone Fashion Summer Abroad Collection by Lindsey Rae
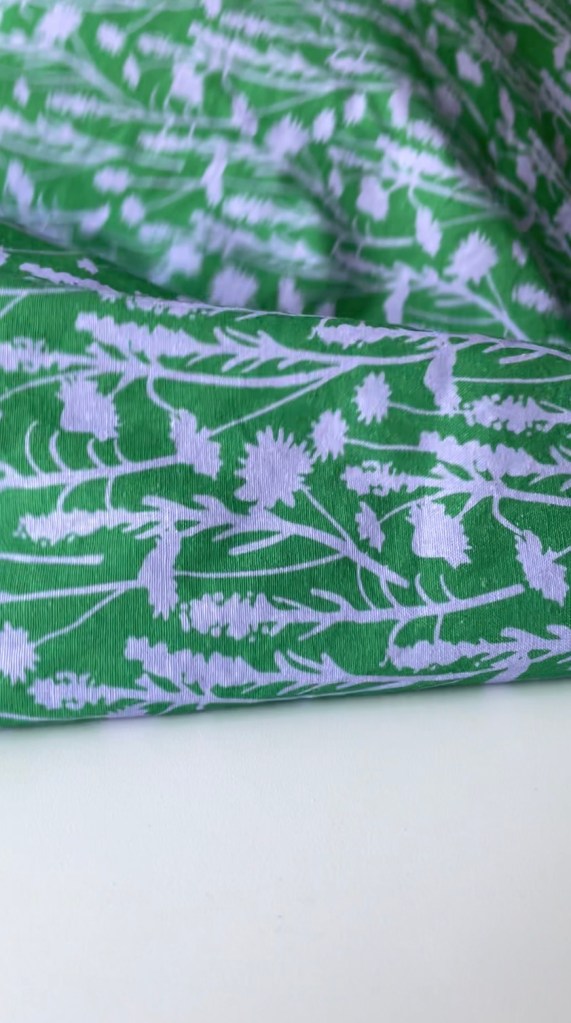
So excited to feature the latest fabric collection from the immensely talented Lindsey Rae @sewtogrow. It’s currently available for wholesale through Devonstone Fashion. It was hard to pick which design I wanted but I settled on the Cornwall Oceanside Print in a luxe linen cotton blend. It is fifty-five percent linen and forty-five percent cotton, 180-185 gsm and 145cm wide. The pattern is reminiscent of wildflower fields. I love the riot of colour in this collection. Best of all, it will also be available in a variety of substrates like rayon, poplin, and jersey to name a few.
Cornwall Oceanside Print
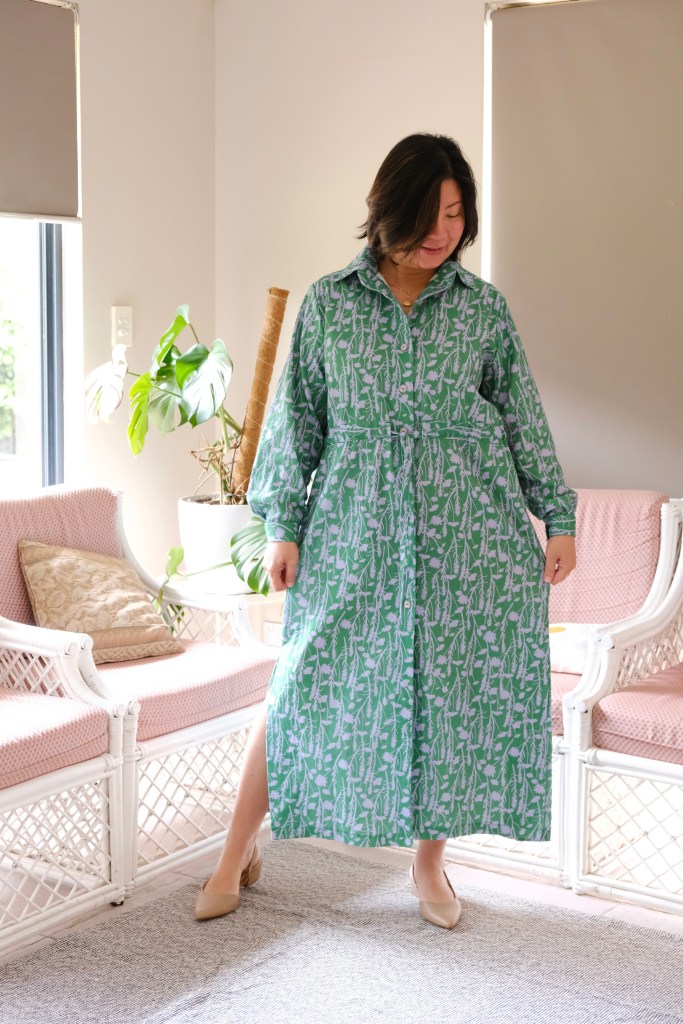
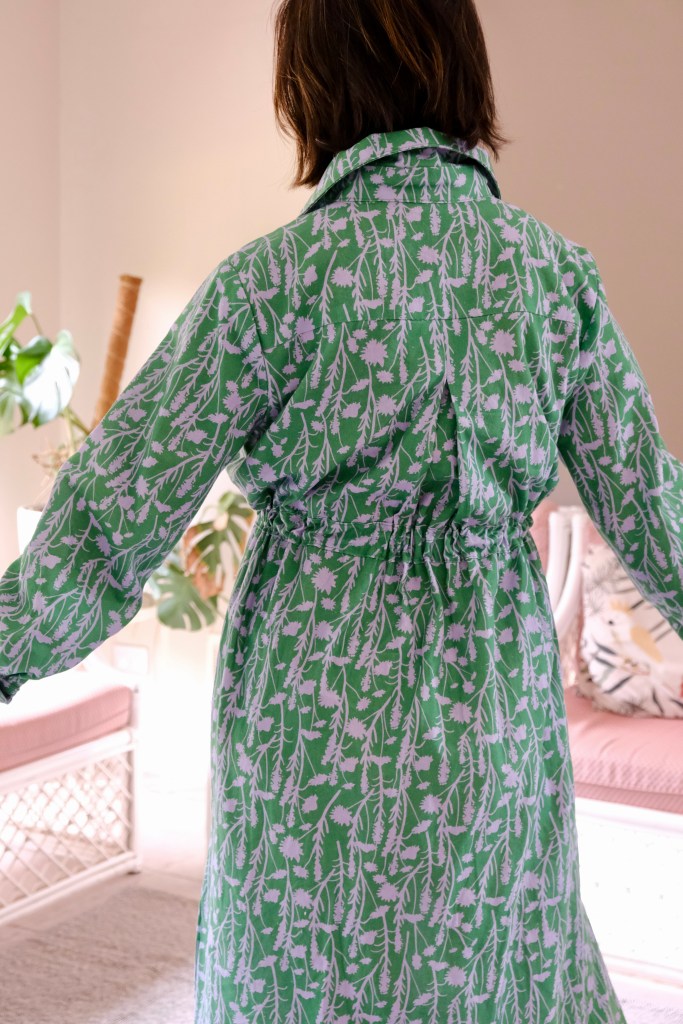
The pattern that immediately came to mind when I received the Cornwall Oceanside Print Linen was the Swimstyle Ritual Dress. I had bought this pattern last year but was waiting for the perfect fabric to match it. It’s basically a shirt dress but with the additional features of the drawstring waist casing in a maxi length. I haven’t had the opportunity to sew many collars and cuffs, so this was another consideration in my choice. The instructions for these are superb for entry level sewists.
Wearing it with waist cinched in and with it loose
As with any other sew, I washed the linen cotton on a cold cycle and popped it on the medium setting in the dryer. There was no noticeable shrinkage and no fading of the dye. I like how the addition of the cotton to the linen helps to reduce wrinkling and cuts down the time it takes to iron. I do appreciate that relaxed vibe that wrinkling in linen can give but I prefer to start wrinkle free and earn the wrinkles along the way.
Of course, I also checked my needle. I left it on the universal 90/14 gage needle that I had been using. I matched the fabric with the Gutermann CA 02776 thread. I’m not sure the colour of the print shows up in the photos, but the print consists of shadows of mauve flora on a background of green.
The Ritual Dress has quite a lot of ease in the pattern sizing, so I chose my usual Size L for my measurements of 38-inch bust, 33-inch waist and 40-inch hips. I did not make any modifications. My height is 167cm. I felt the pattern was true to size and fitted comfortably. Perhaps the sleeves could have been shortened slightly but I wanted to have the full-length sleeve and a properly maxi dress. I guess I’m great at sewing summer outfits, but I really need to make items that will see me through the cooler weather. I think this dress fits the bill nicely.
Ritual Dress in Cornwall Print Linen Cotton
The collar and cuff instructions were great if you lack experience in this area. It’s really made for novice level and can highly recommend it. The Summer Abroad linen cotton has been such a good quality fabric to sew with. It still has that slight stiffness that linen starts with so it feels a little bit course on the skin but that will soften with a few washes. I know that’s sometimes a concern with linen, but it really doesn’t take long for it to season to a soft and pliable garment.
Hopefully, the Summer Abroad collection will be available for purchase soon from your favourite fabric store! Currently, it’s available for wholesale through Devonstone Fashion. Keep your eyes out for it from the Sew To Grow newsletter.
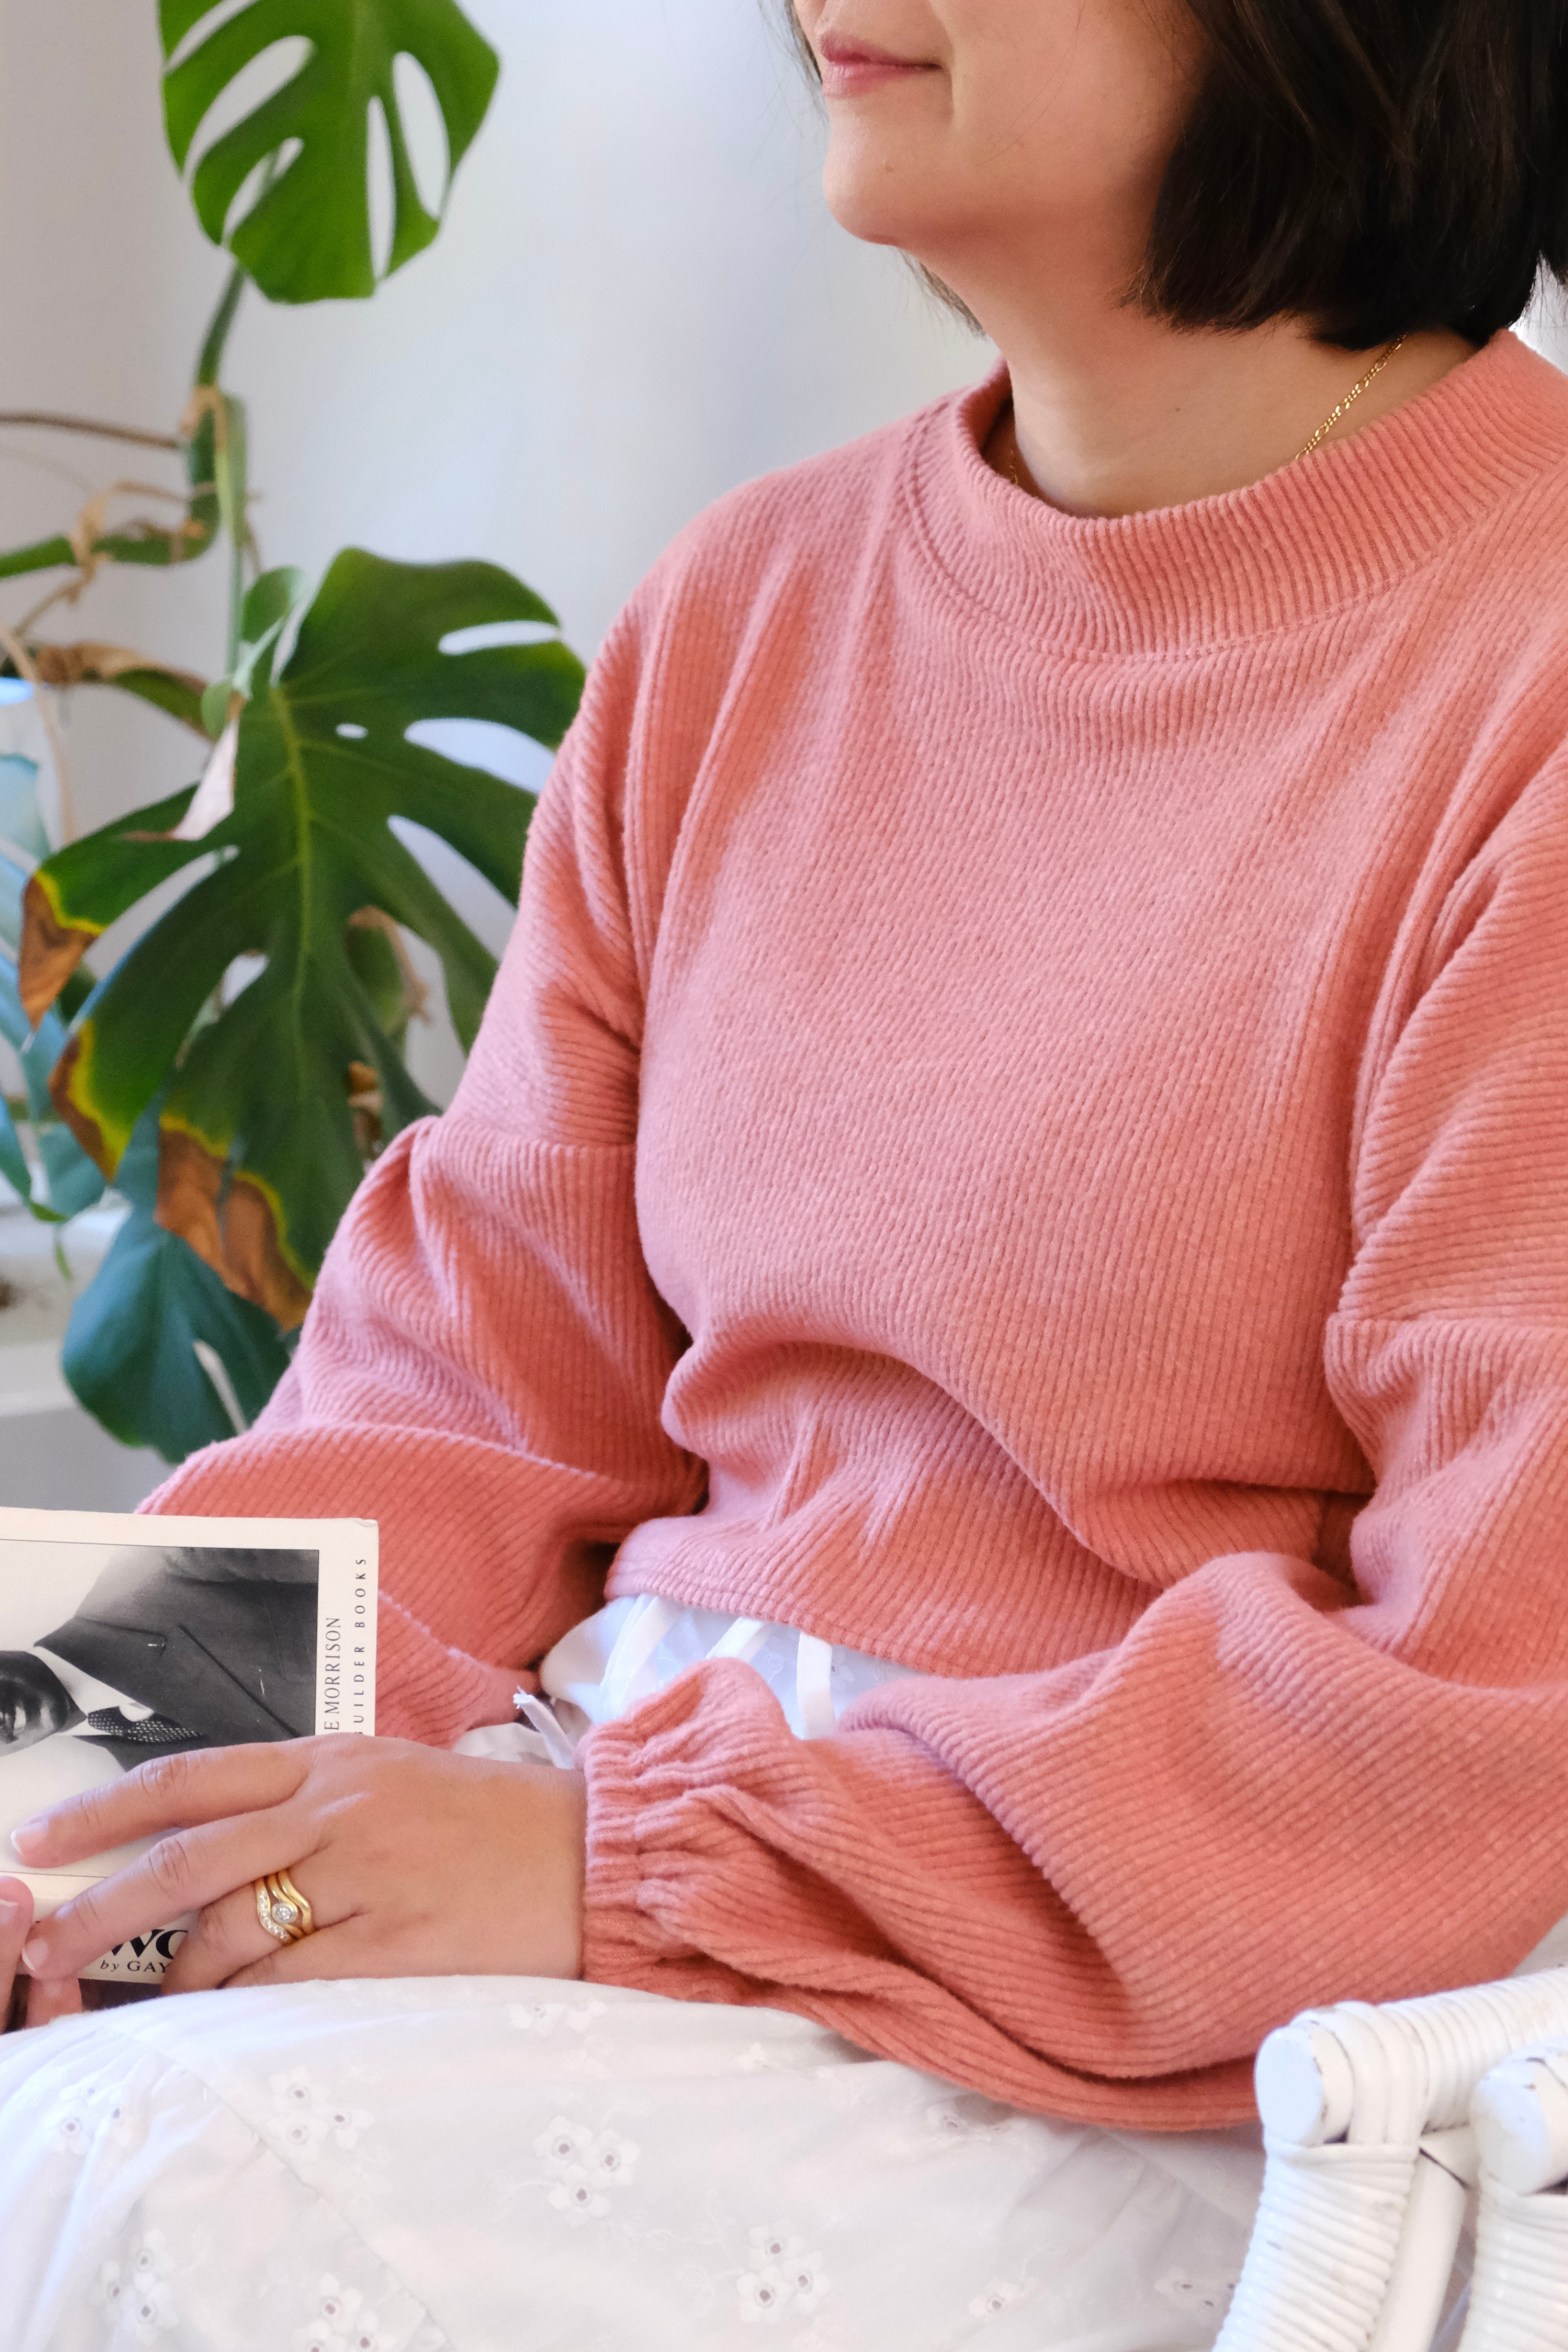
It’s taken me awhile to sit and write the review of the Swimstyle Billow Sleeve Knit* because I was tempted to start sewing another one straight away. However, the weather is warming up, so I’ll give it a break before making another version. I really admire the very organised sewists that plan their sewing according to the seasons. I can’t seem to keep up and it ends up frustrating me, so I don’t even try!
The sleeves are what drew me to this pattern. I decided on the cropped version with the regular neckline. There is also a longer version which I think would suit a lighter knit. I managed to score this dusky rose ribbed knit from my local fabric store. It is the perfect match for this pattern. It’s very soft and cozy to wear.
As with my other Swimstyle makes, I chose to sew the size L for my measurements of 38-inch bust and 33-inch waist. The sizing has been impressively consistent, so I didn’t bother with a toile. This saves me so much in fabric. It’s great to have a pattern that is so reliable.
Knit fabric has been a challenge that I wanted to try and master this year. I had some issues with my hem. It’s always the smallest things that give the biggest, unexpected challenge in a project. I had to reach out to the sewing community online and as usual, everyone was so generous with their advice. The first time I tried to sew my hem, it became wavy and looked awful.
The tips that were given to me included:
Use a ball point needle and use a zig zag stitch (2 Length: 2.5 Width), which I did.
I found the fabric pieces slipped a bit so I’m hoping to invest in a walking foot next time.
Someone suggested that I stabilise the hems and shoulder seams with clear elastic or knit interfacing. I think I’ve seen something on the True Bias Website which might help.
Another tip I learnt from someone was that if the serger is stretching the fabric out, you can turn the differential feed higher to avoid that (to avoid that wavy hem).
To resolve the issue, I unpicked my hem and resewed it with a twin needle. It needed a bit of steam and a press to regain its shape.
So glad that I’m part of a generous community and it’s made it so much easier for me to progress my sewing.
Thanks for reading and happy sewing!
X Em
*Gifted as part of the Swimstyle Ambassador Program but all opinions remain my own.
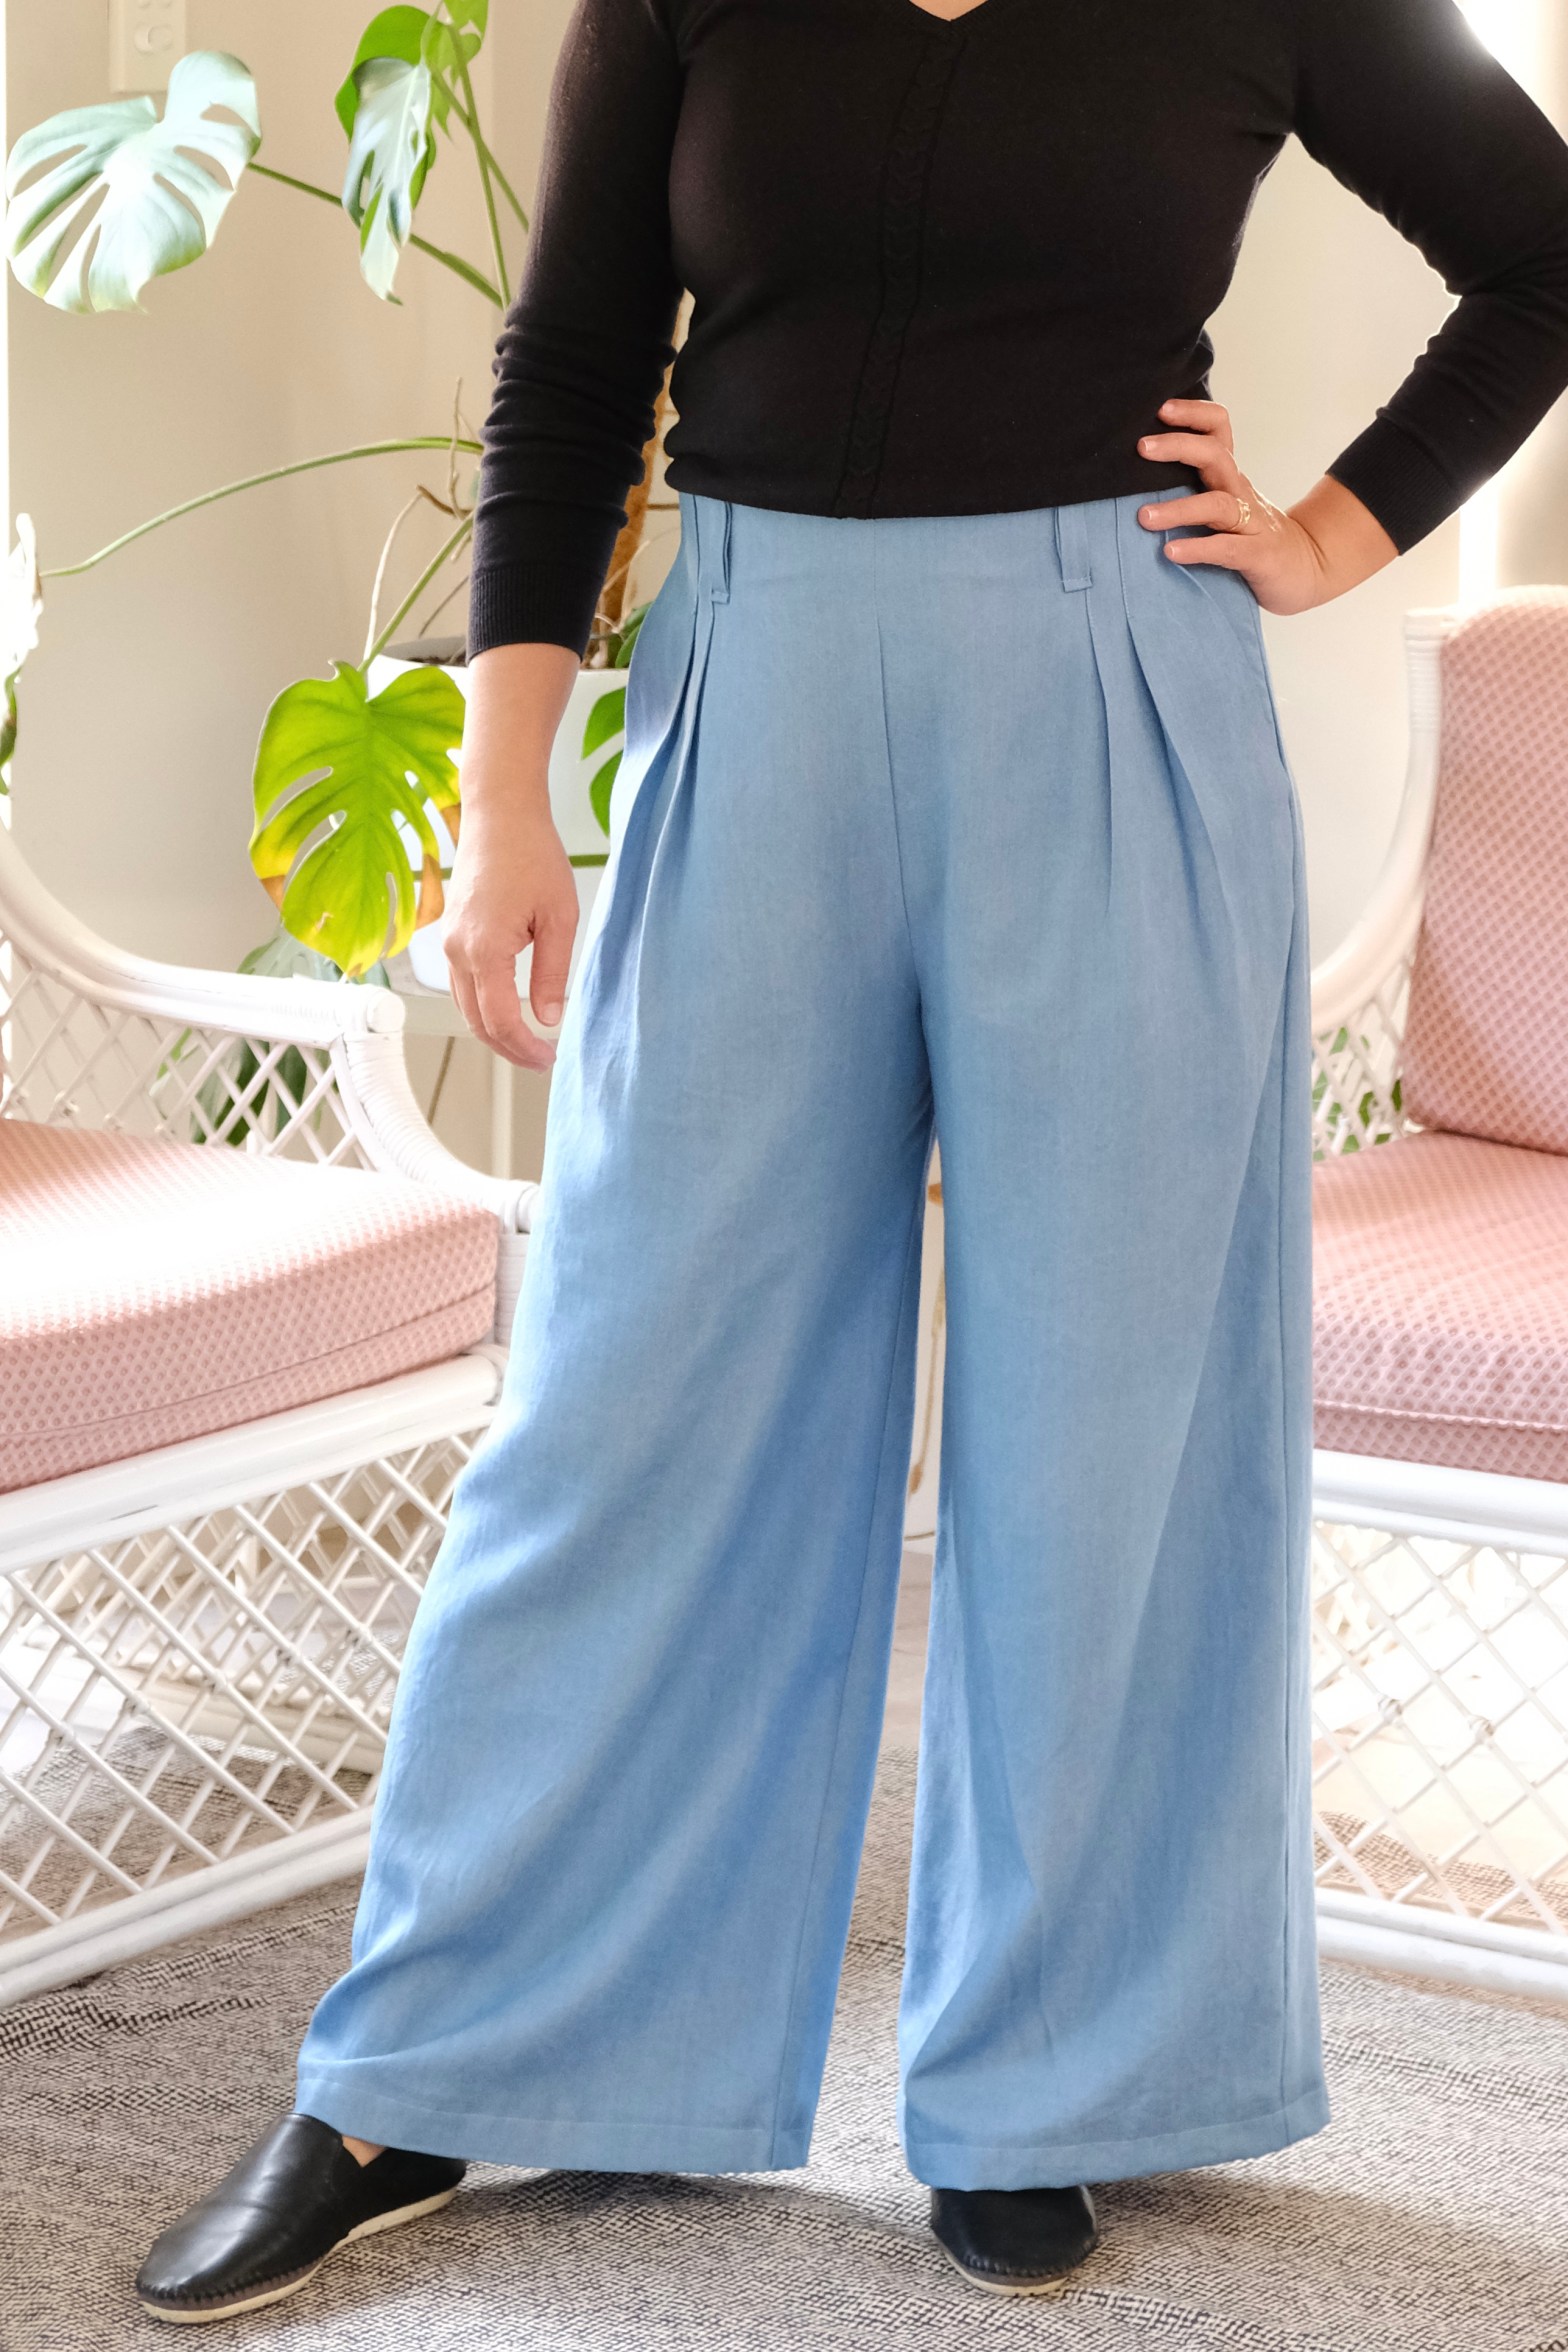
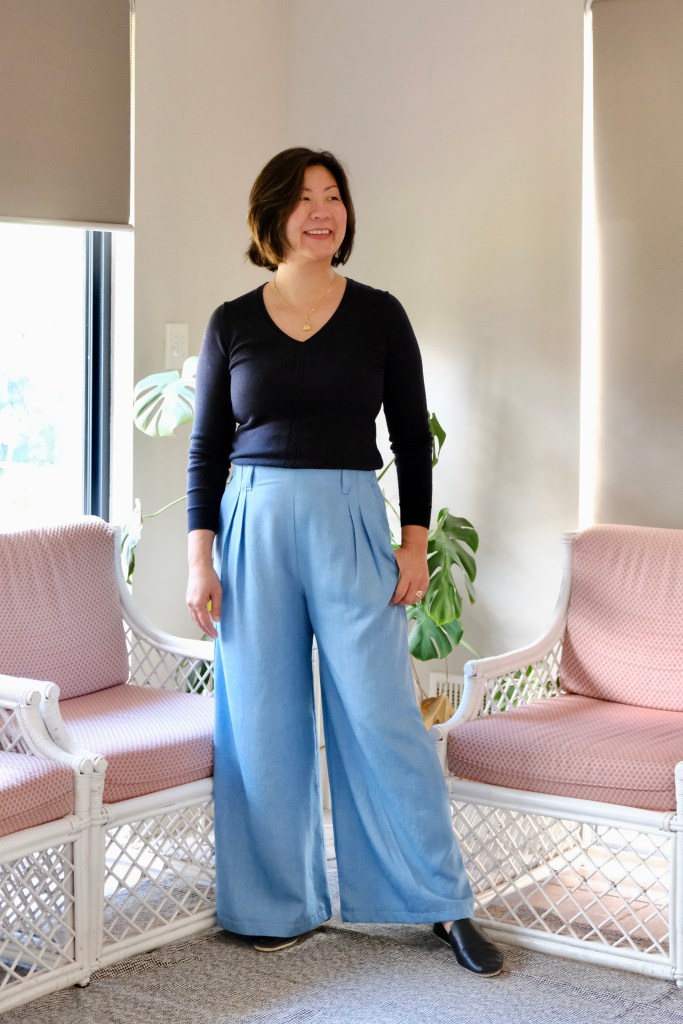
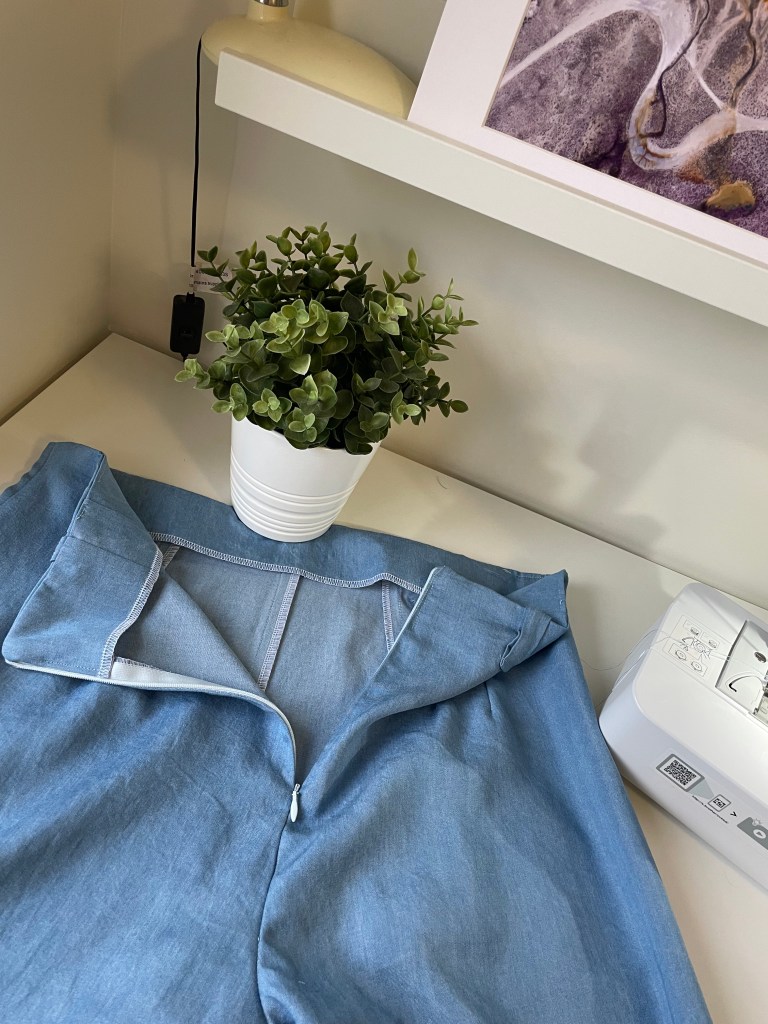
Sewing my first pair of jeans has now got me on a roll for sewing fitted pants. I feel that a lot of fear for sewing pants comes from fit issues. Well, at least that is the case for me. I thought this would be a good pattern to try because the fit is determined by a series of darts and pleats without a waistband. I also love the pattern for its classic tailored silhouette. As a Swimstyle Patterns Ambassador, I am gifted with the pattern, but all opinions remain my own.
Swimstyle High Waist Pants
This pattern is designed for lightweight woven fabrics, so I picked up a denim Tencel fabric which has smooth drape. I was a bit naughty and did not toile this pattern. I would usually have sewn the shorts version first but it’s winter here and I wanted to sew something I could start wearing straight away. The other reason I didn’t toile was because the darts and pleats can be adjusted to fit the waist. The wide leg style of the pants means there is quite a lot of ease which is easier to adjust. The bonus of the generous 5/8-inch seam allowance is that it’s more forgiving when trying to fit a pattern the first time.
In the other Swimstyle Patterns that I’ve sewn, I have found the drafting true to size. My measurements of 33-inch waist and 40-inch hips means that my size falls between L and XL. I decided to sew the L and to adjust the seams if needed. In the end, I did not have to make any adjustments, and the L fitted me perfectly. The pattern does include belt loops which helps with sizing when you’re wearing the pants, but I can happily wear the pants without a belt. My only adjustment was the length of the pants. I shortened the pattern by 3 inches. This was done by trimming 3 inches from the bottom of the pants.
PocketsKnife PleatsInvisible Zip
The sewing went smoothly with the fantastic instructions. Until the end. I realised when I was doing the final press of the pants that my front knife pleats were facing the wrong way! They were facing centre front rather than towards the side seams. It was an unfortunate time to find this mistake because I was out of motivation, I had already packed everything away and I could not face having to unpick the waist facing and trying to reattach it. The consequence of this mistake is that the front doesn’t fall the right way when I sit. I am not too bothered by it and will still wear my pants, but I will make sure I correct this in my next iteration of the pattern. My next pair of this will be in linen.
I’m so happy to finally have the confidence to sew pants. I was doing a happy dance with the installation of my invisible zip. I used to be so afraid of zips especially invisible zips, but I have worked out my favourite method which works for me. I’m so glad that I jumped in and I’m looking forward to sewing more pants.
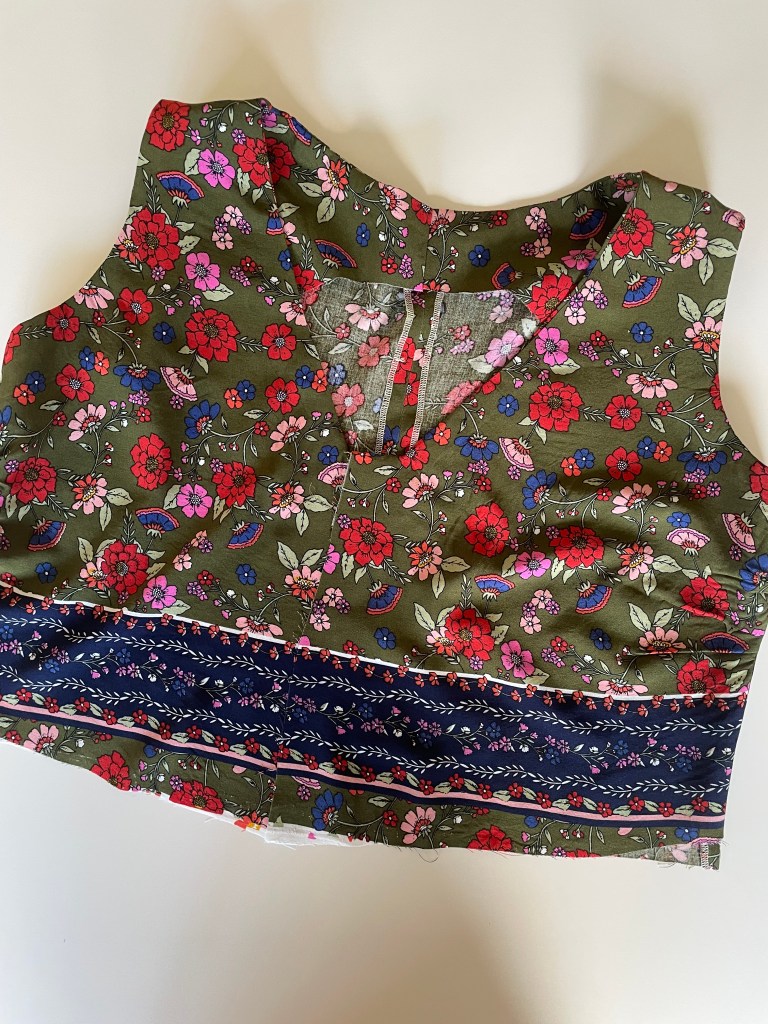
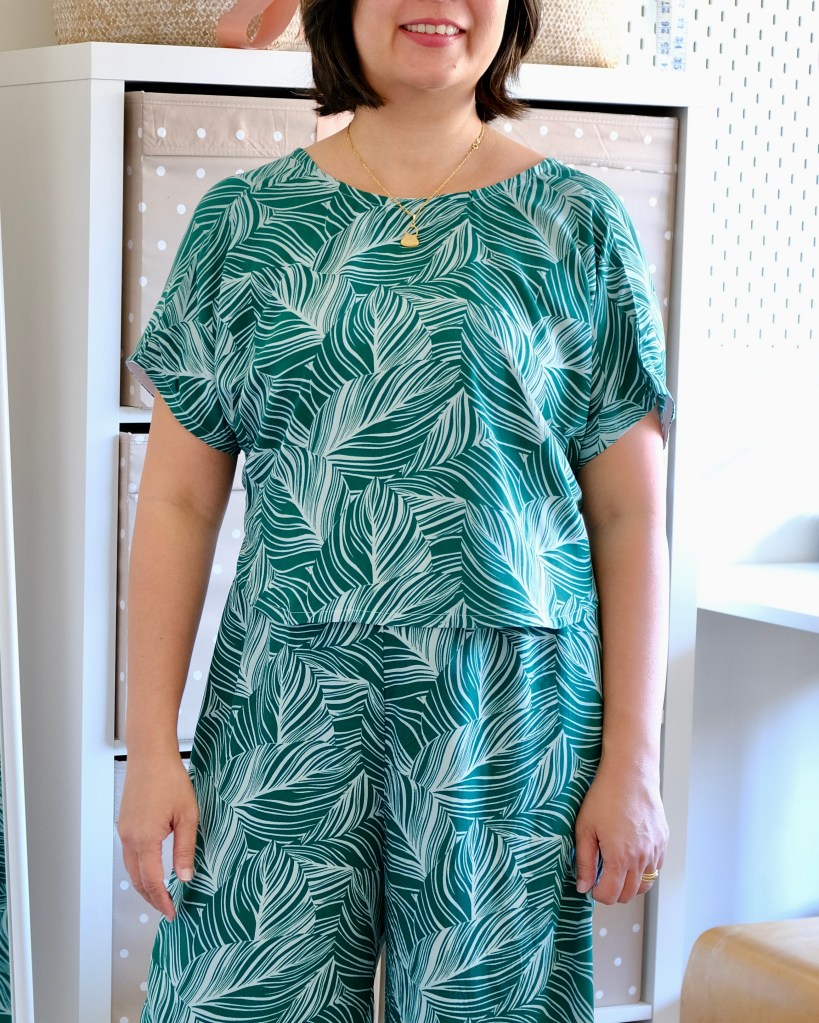
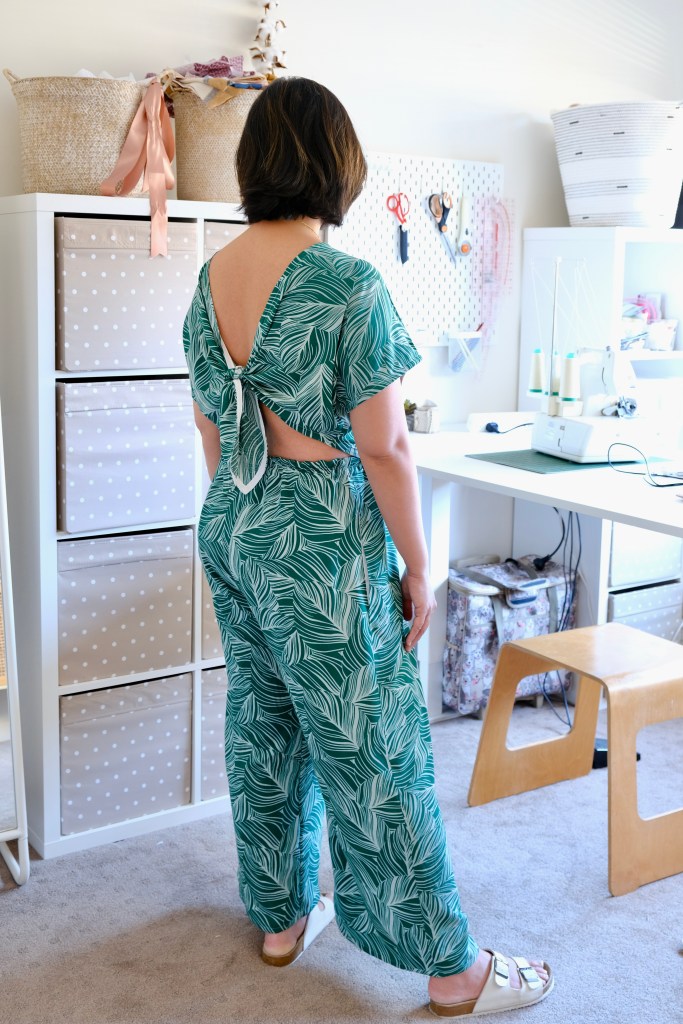
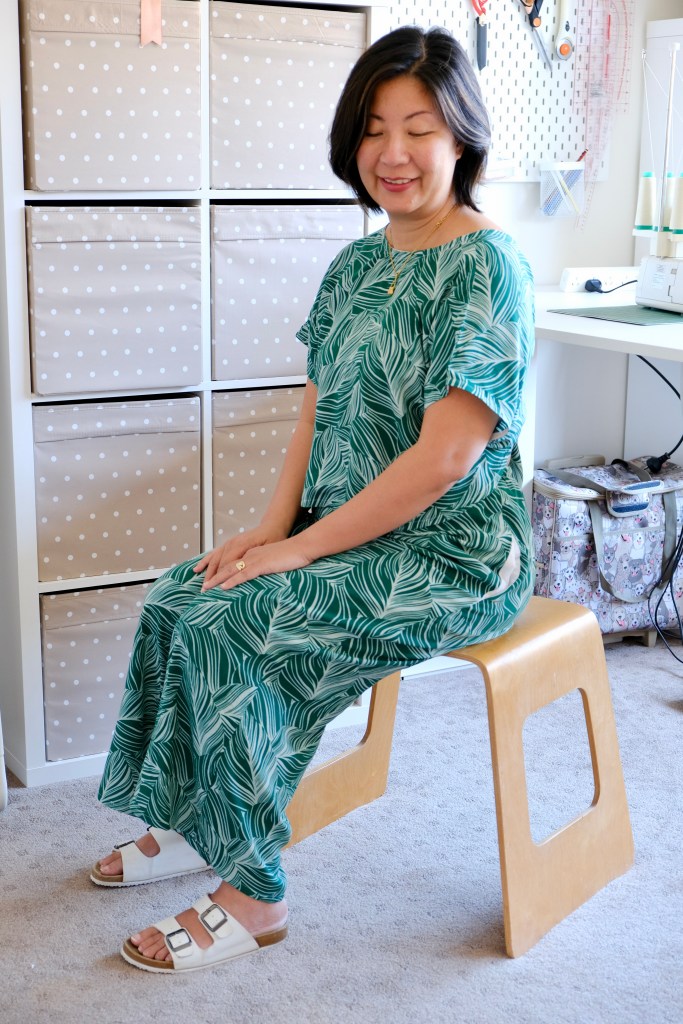
Brunching with other ladies who sew can be dangerous for the budget. It was during one of these brunches when I discovered East Coast Textiles and their fantastic selection of rayons. They also have other fabric, but I was mainly interested in the rayon which I bought three pieces at a bargain price. The one I’m featuring has a border print which I wanted to challenge myself with. Initially, I thought of making another pair of flint pants or a pyjama set but when I was sewing up my Andi Set Top, I thought of how this fabric would pair so well with a sleeveless version of the full Swimstyle Patterns Andi Set.
So, I set about researching how to sew with border prints. First, I had to decide how to use the border print. Seeing as there was no seam running vertically in the front of the skirt, I decided to use the border to emphasise the bottom of the blouse and the skirt. I think this was a nice way of pairing the set and adds a bit of matching detail.
The second challenge was cutting the fabric. The border runs along the selvedge on both sides, so I had to cut the pattern cross grain. We don’t usually cut cross grain because there is more stretch to the fabric this way but since the pattern pieces are not too heavy and allow for lots of drape, it’s okay for this pattern.
This was good in theory but challenging in execution. It took me a whole afternoon to figure out how to align and modify the pattern pieces to fit the border nicely. Rayon is very slippery fabric so another challenge was cutting everything accurately so the seams would line up and not interrupt the border print. I’ll try to describe what I did. For the top, I lengthened it by 1 inch but when sewing the side seams of the top, I did not match the sides according to the notch provided but by the border print. This gave me an uneven bottom edge, so I then trimmed it to even it up before finishing the bottom hem. The side seam of the Andi Top has gathers on the front bodice piece, so this is how I was able to modify it. For the skirt, I cut the pattern as it is drafted but left the bottom of the skirt straight. When I had matched and sewn the side seams, making sure my border print had matched up, I trimmed the bottom raw edge following the curve of the pattern piece before finishing the hem of the skirt. There are probably a few ways of doing this but, I found that this worked best for me. This skirt has two side splits, so it wasn’t too difficult to use the border print for this.
The sizing was true to size. I sewed the Size L for the top and the skirt without any modifications. My measurements are 38-inch bust, 33-inch waist and 40-inch hips. I decided to make the long tie for the top. I finally worked out how to use my loop turner properly which make the process a lot easier and faster. I swear that the loop turner I bought came with gave me completely different instructions which is why I’ve struggled in the past!
Instructions and illustrations are excellent with the pattern which makes it so enjoyable to sew Swimstyle Patterns. I have been gifted the pattern as part of their Ambassador Program, but they are excellent instructions and all opinions in this article remains my own. One small annoyance is that I think the pattern is made more for people who like to trace their patterns not the people who cut into them like I do! No hate please, do as you like but I tend to print the size or sizes I need and then cut accordingly. There are no size layers when you print and there’s also no differentiation of the cutting lines so it’s a bit easy to get lost. I mention this because I did! I started with the line for size L and then somehow was cutting the size M. Luckily, I had noticed quite quickly and could stick the paper to repair it.
The design is superb, and you can tell that these patterns are designed and drafted by someone with a lot of experience. The set has a beautiful look and fit. Even though the skirt has an elasticised waist, it looks sleek and well fitted. I also love the elongated tie which is an elegant part of the design. So happy with how this set turned out. I love sets because of how versatile they are. Whether you wear each piece styled independently or together.
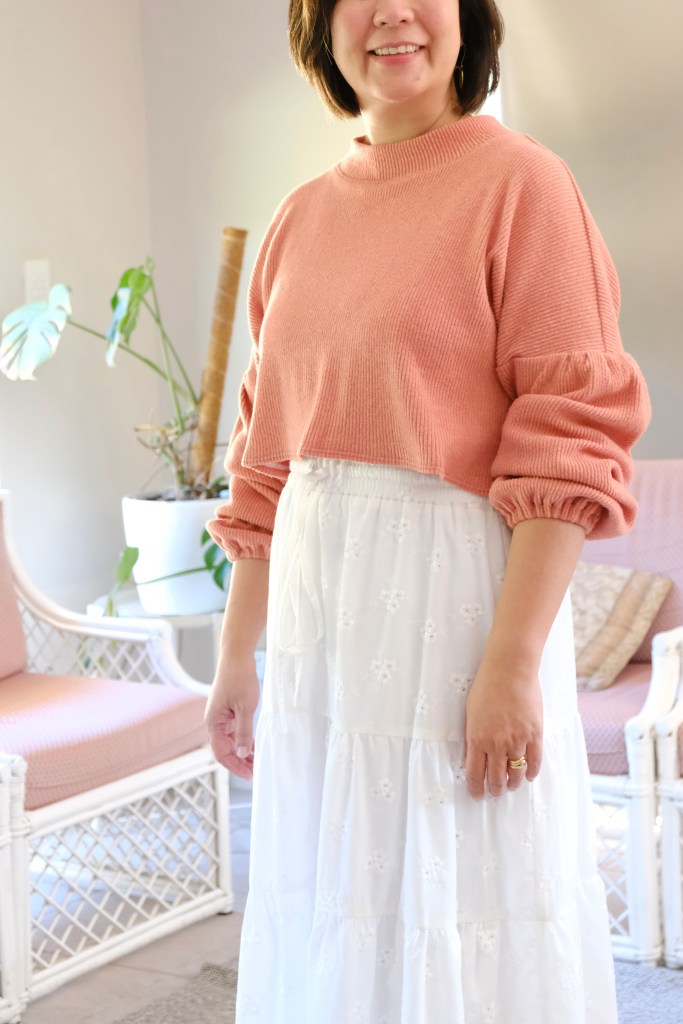
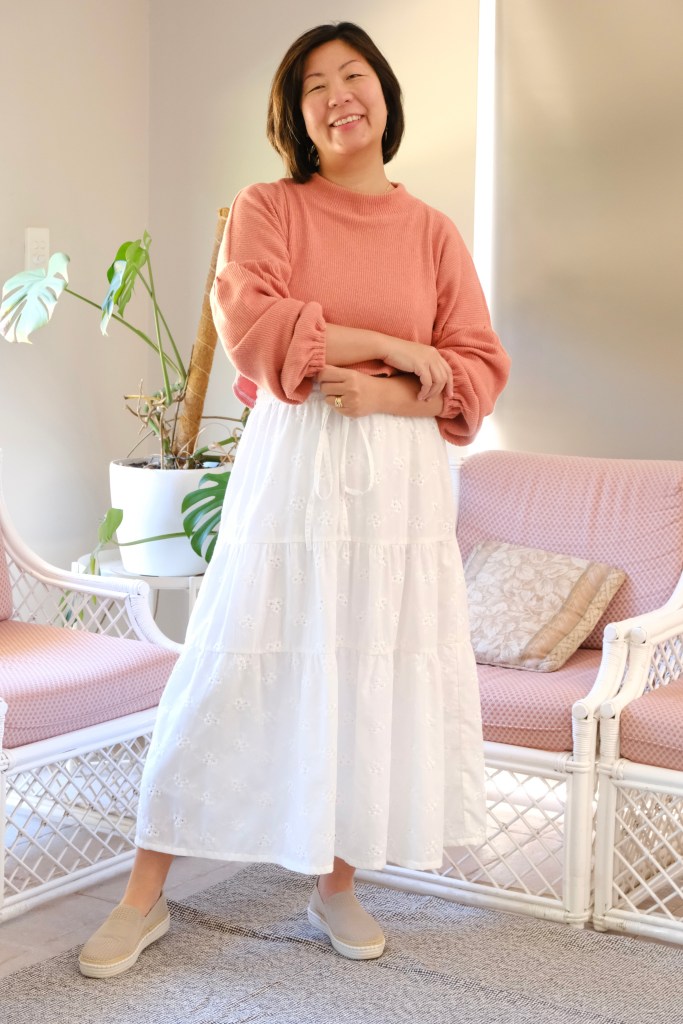
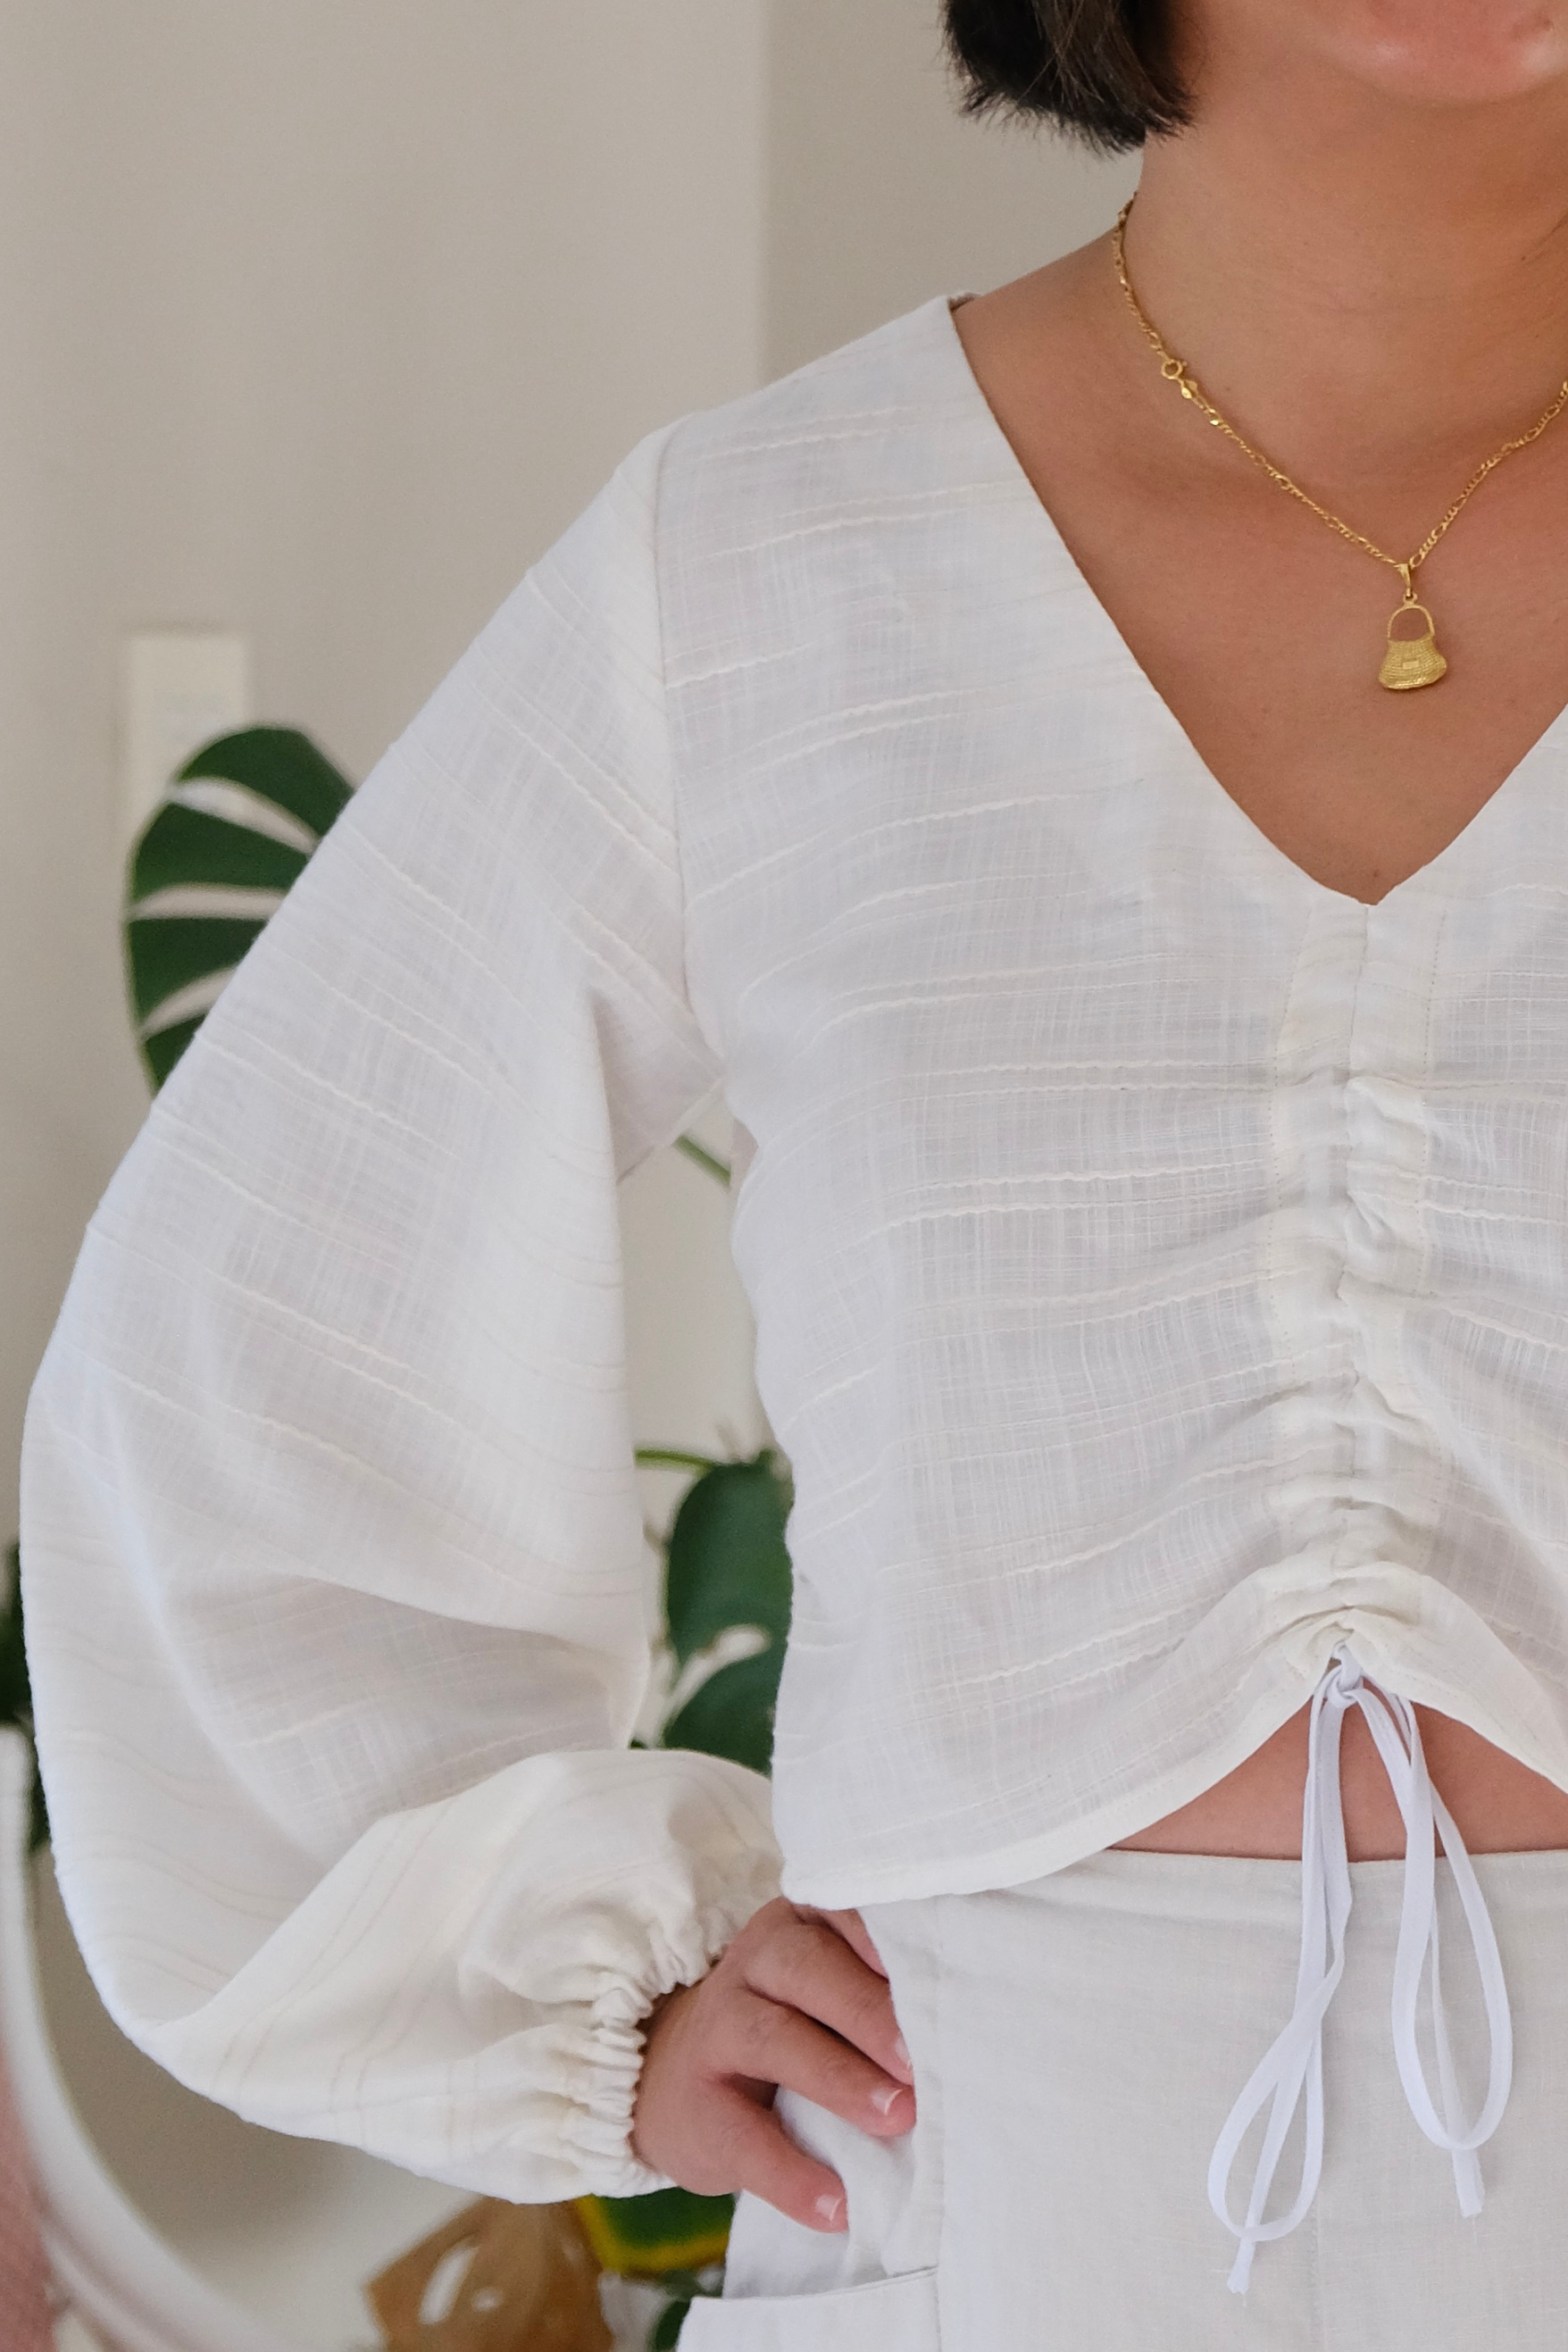
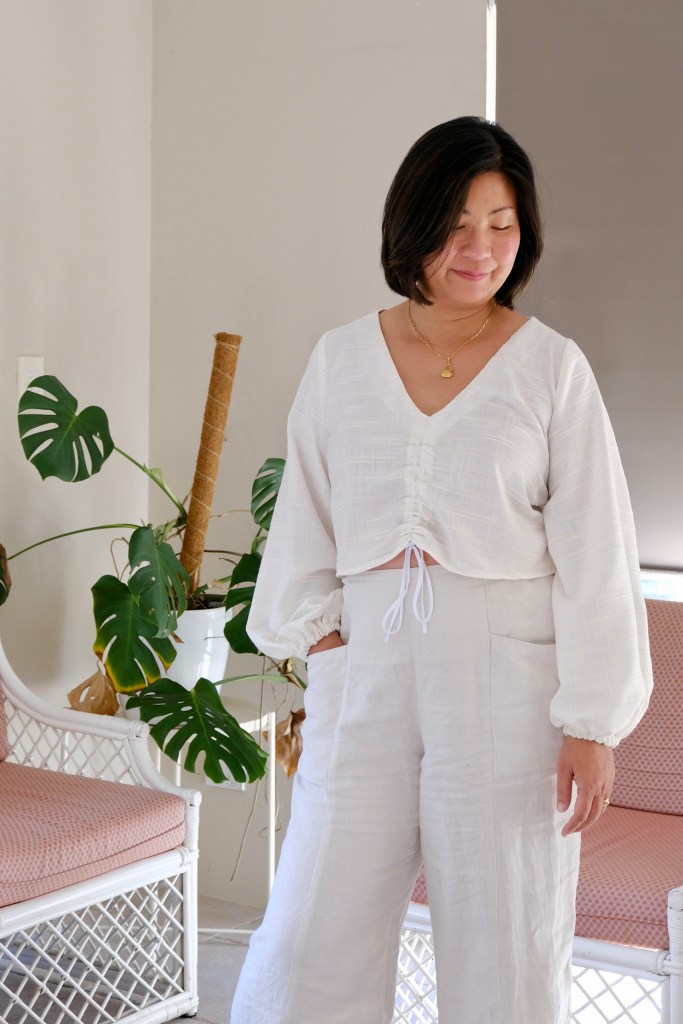
So, have you ever made something thinking it might not exactly be your style and it ends up being something you absolutely love? This is the Andi Top from the Swimstyle Andi set. I was curious about the design, which is what made me apply to be a Swimstyle Ambassador in the first place. It has a certain style and flair that is so unique and when you see the drafting, you’ll know what I mean.
My version of the Andi Top has these billowy long sleeves that are attached to a bodice with a deep V and these ties that can be adjusted. I have quite a modest amount of tummy showing but the main idea is that it gives shape to the bust area without needing darts. It’s a very flattering top. I’m positively happy about the ruching created by these ties and the channels in the front.
For my measurements of 35-inch high bust, 38-inch full bust and 33-inch waist, I’ve made the Size L. It’s a great fit but it’s quite cropped so next time, I would lengthen by an inch. For this top, I sewed a narrow hem or a cheat’s rolled hem by sewing a straight stitch ¼ inch from the bottom of the hem and then pressing the hem up twice.
If you’re like me and can’t work a loop turner for all the money in the world, you could use some bias binding to make the tie for the blouse. It really saved my sanity. I know everyone has their special tool or technique, but it really stresses me out when I have to make a narrow rouleau. I simply folded the long edge to the middle and then folded over again in half and edge sewed the tie.
The Andi Top is made for woven fabric. My fabric is a sheer lightweight textured cotton. I had this on my Make Nine 2024 list where I wanted to use up nine pieces of fabric from my stash. I thought it was a perfect pairing because it’s very easy to gather this fabric. I also love the subtle texture woven into the fabric. The top probably appears quite white, but it is more of a soft beige.
I will definitely be sewing the matching skirt to this Andi Set. It’s been such an enjoyable sew. I noticed that Swimstyle Patterns have some unique features like the tabs that make it so easy and accurate to match up the pieces. I was grateful for this because my fabric did not really have a right side or a wrong side, so these tabs made it easy to tell where the pieces needed to be attached. The comprehensive illustrations helped there as well!
Last week, I received the very exciting news that I was part of the Swimstyle Patterns Ambassador Program! For my first pattern, I thought I would get onto sewing some resort wear for my upcoming holiday. The cutest pairing popped into my mind with the Tallulah Tie Top and the Tamarama Pants, the latter being part of its own set. I’m focussing this review on the Tallulah Top and will save the Tamarama for its own review.
The Tallulah Top is a boxy shaped top with a deep tie. It can be worn with the tie in the back or in the front. It has grown on sleeves, and it is finished with biased binding which can be ready made or there’s very detailed instructions on how to make your own. This time, I’ve chosen to save time and fabric by using ready-made.
I was quite nervous cutting into my fabric because I’ve not sewn Swimstyle Patterns before, so I was wondering about the accuracy of sizing. There was no need to worry as it was spot on for me. For my measurements of 35-inch-high bust, 38-inch full bust and 33-inch waist, the closest fit was the size L according to the sizing chart. I feel very comfortable with the fit. I decided that I’m more comfortable with the tie in the back and it falls in the perfect position to cover my bra strap.
Fabric choice is something I’m still learning about, so I was really happy that Swimstyle Patterns include an extensive list of specific suggestions. The pattern is made for woven fabrics, and it suits something lightweight and with fluid drape. I had a stash of rayon fabrics from East Coast Textiles which I had bought in anticipation of sewing something for the humid weather I’ll be travelling to. I decided it would be fun to use the Banana Leaves in Green.
The instructions printed with the PDF pattern, and I was worried that they would be too brief for me because there weren’t many pages. However, the patterns instructions are well set out with excellent illustrations that accompany the instructions in a clear and logical way. There were also photographic instructions that I could access which are a great additional reference. The pattern pieces were marvellously drafted. It felt quite architectural, and I was amazed at how everything came together. It was so enjoyable to sew something drafted in such a unique way. You can tell that this is drafted by someone who has had many year of experience in pattern drafting.
I’m looking forward exploring more of this unique drafting with my collaboration with Swimstyle Patterns.