Dewey Dress

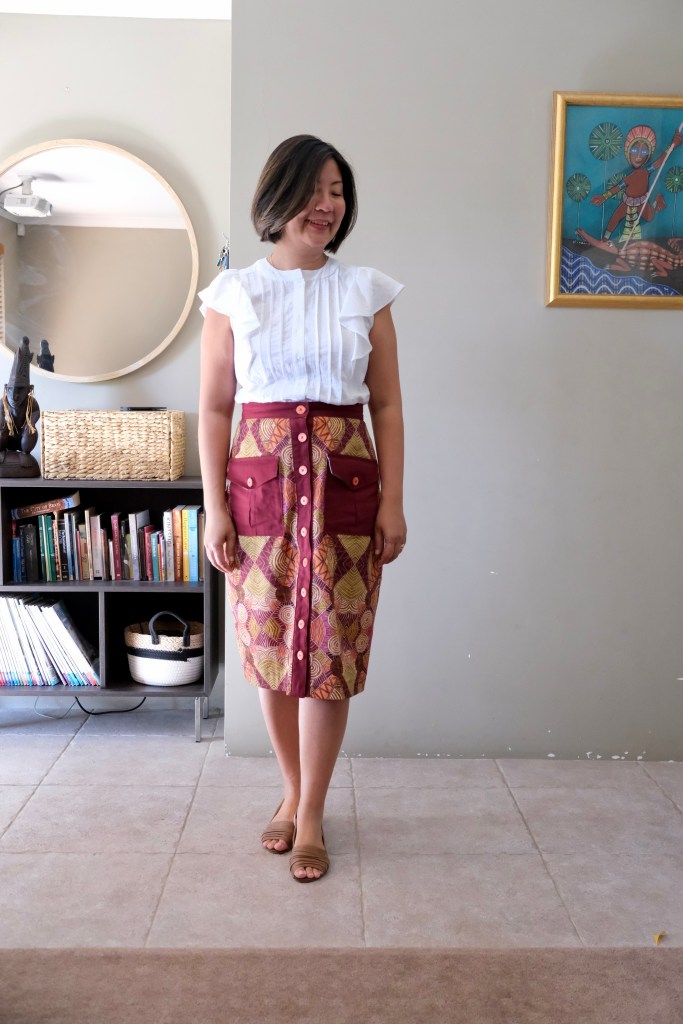
The Dewey Dress is the pattern of the month December for Cashmerette Club. I’ve received my membership due to a previous collaboration, but all opinions remain my own and there was no obligation to sew this. I feel very lucky to have been gifted this Club Membership as it feels like I’ve really learnt a lot and have been able to develop my skills. I’m self-taught so I really do rely on good instructions and tutorials when I sew.

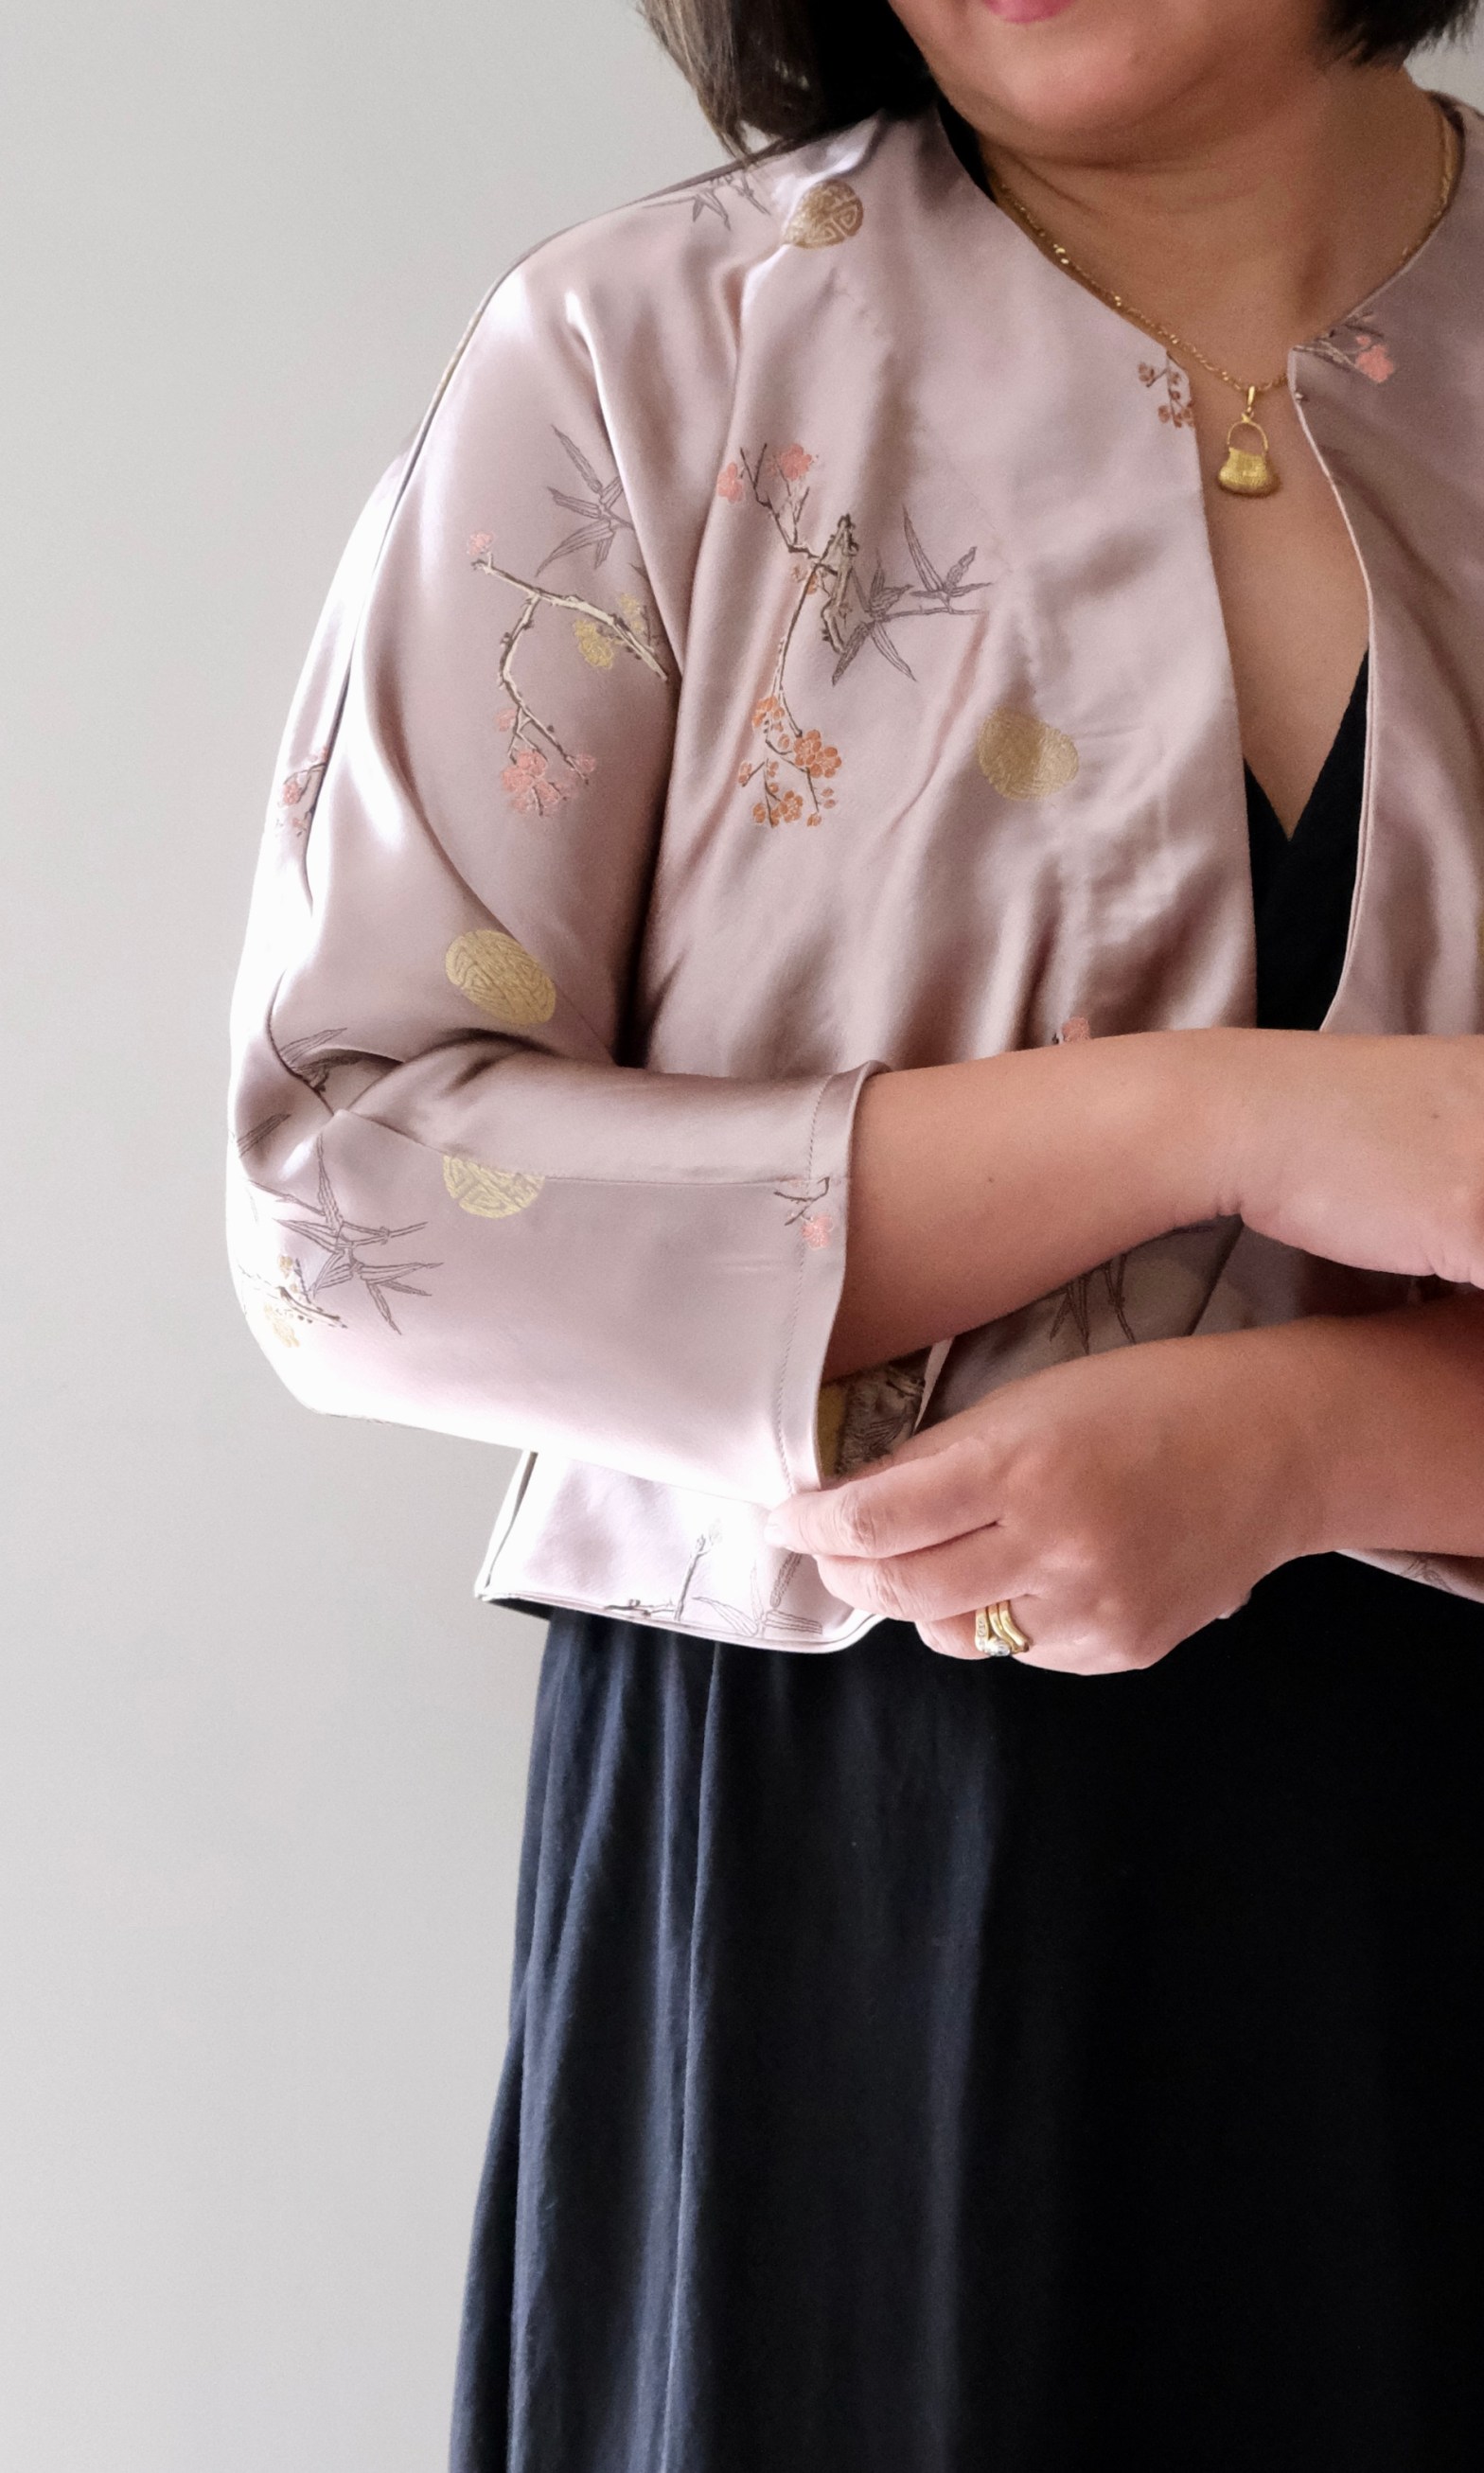
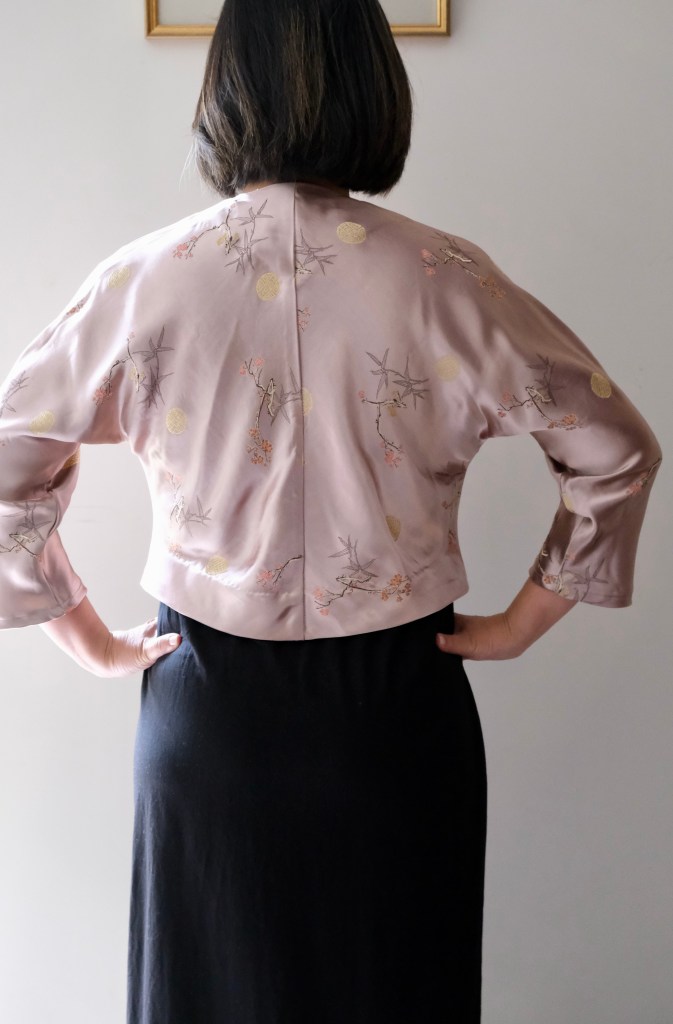
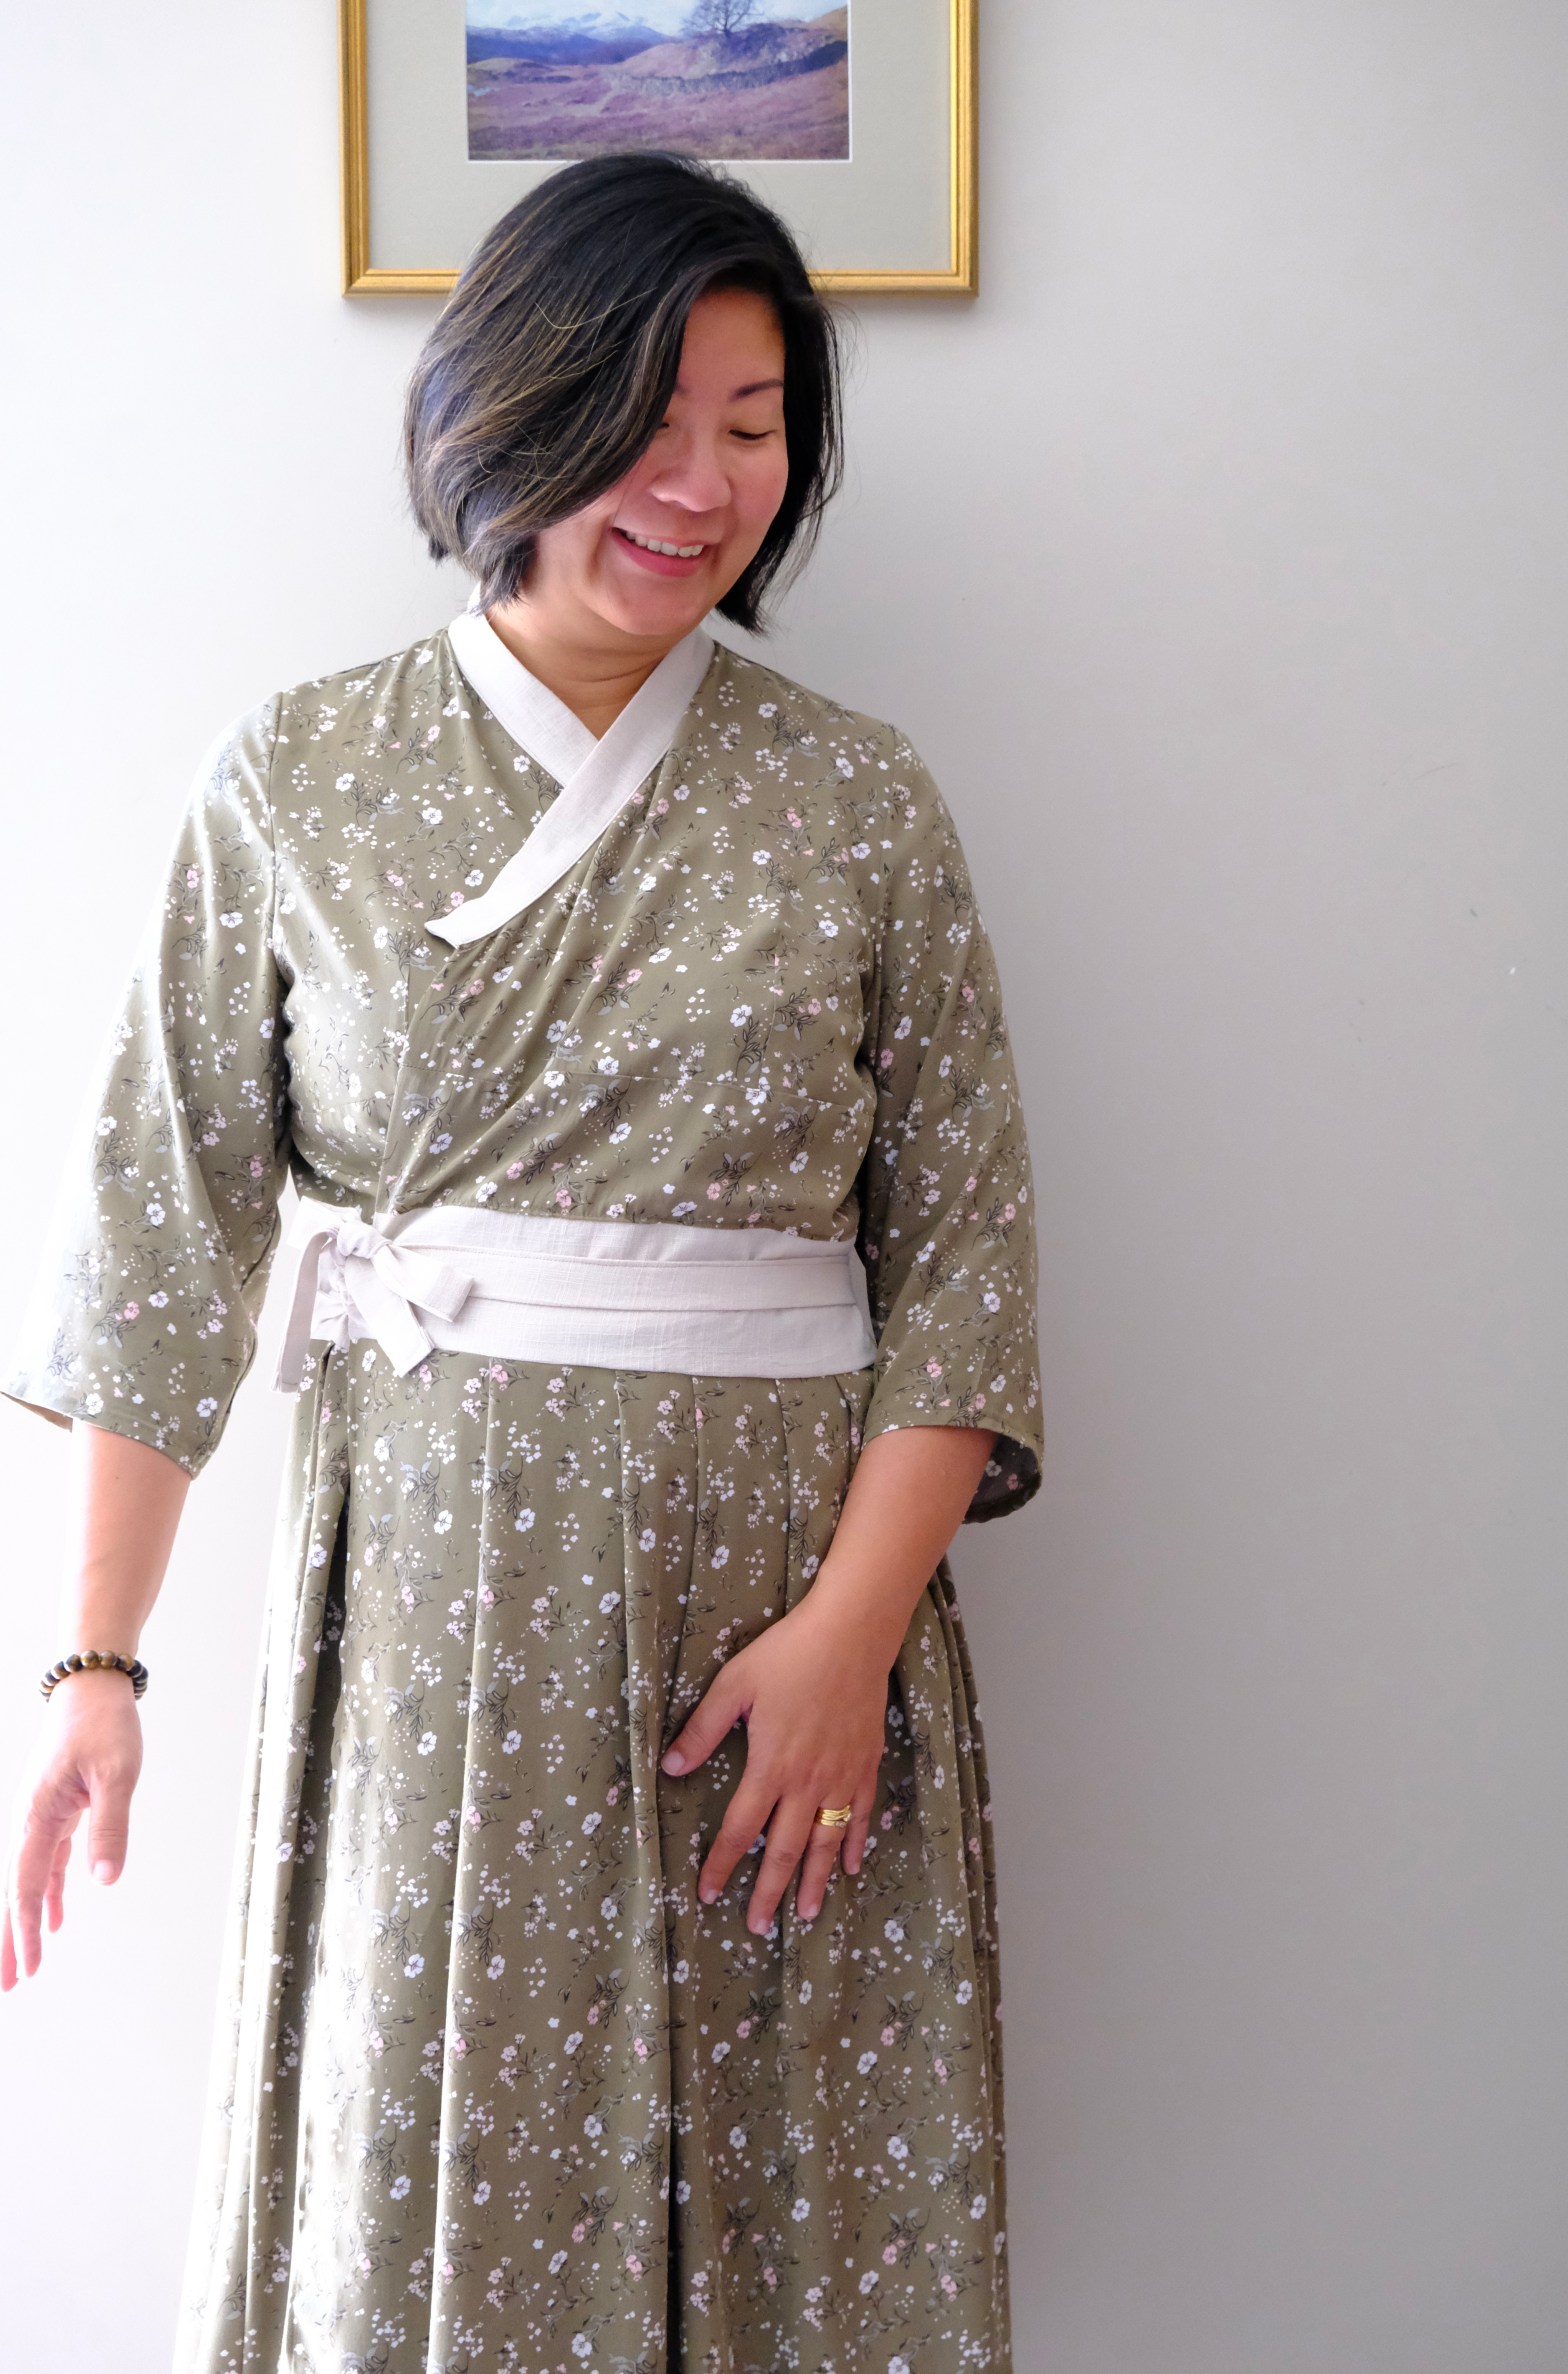
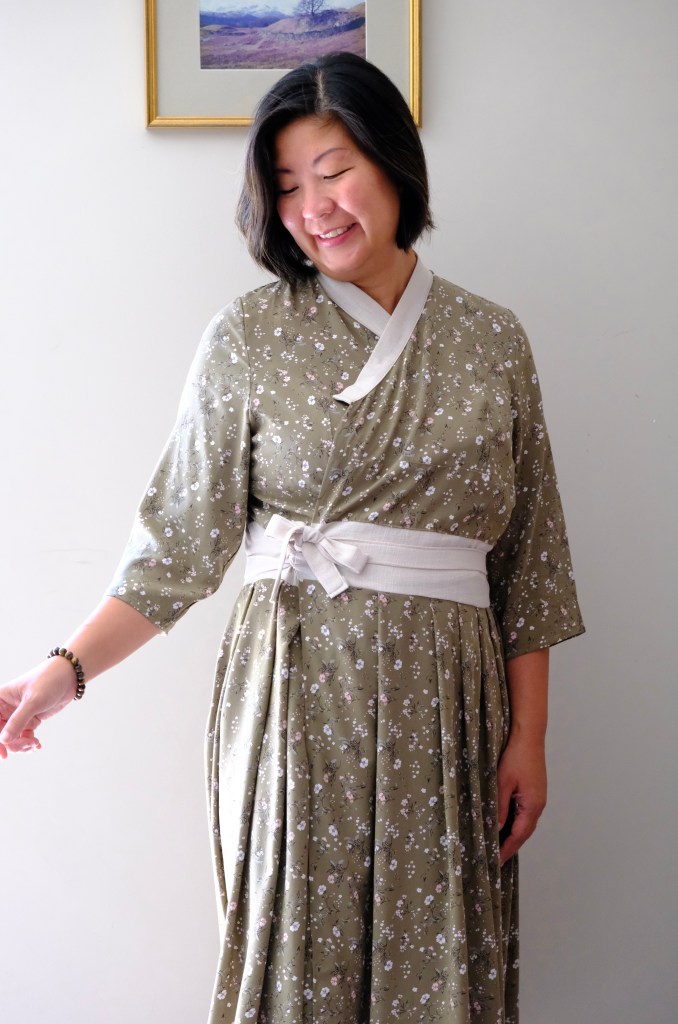
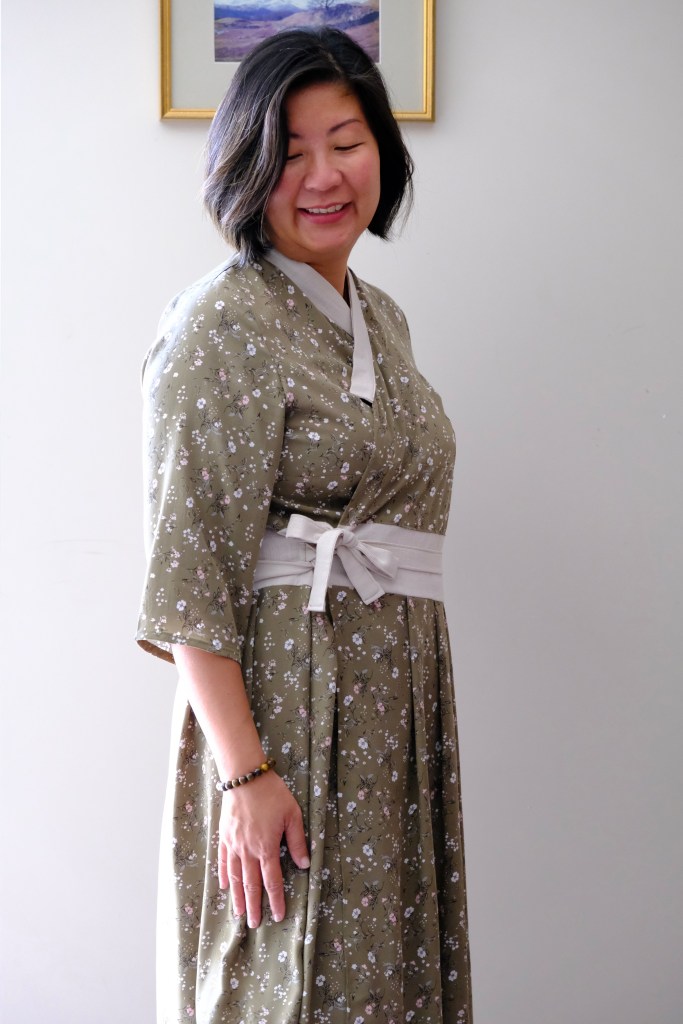
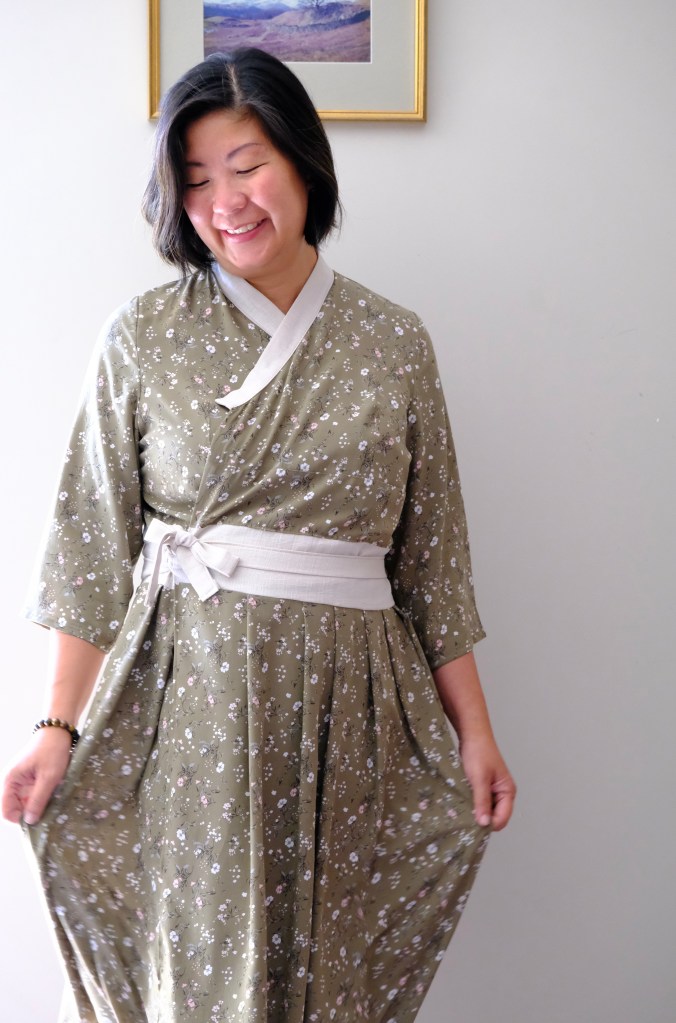
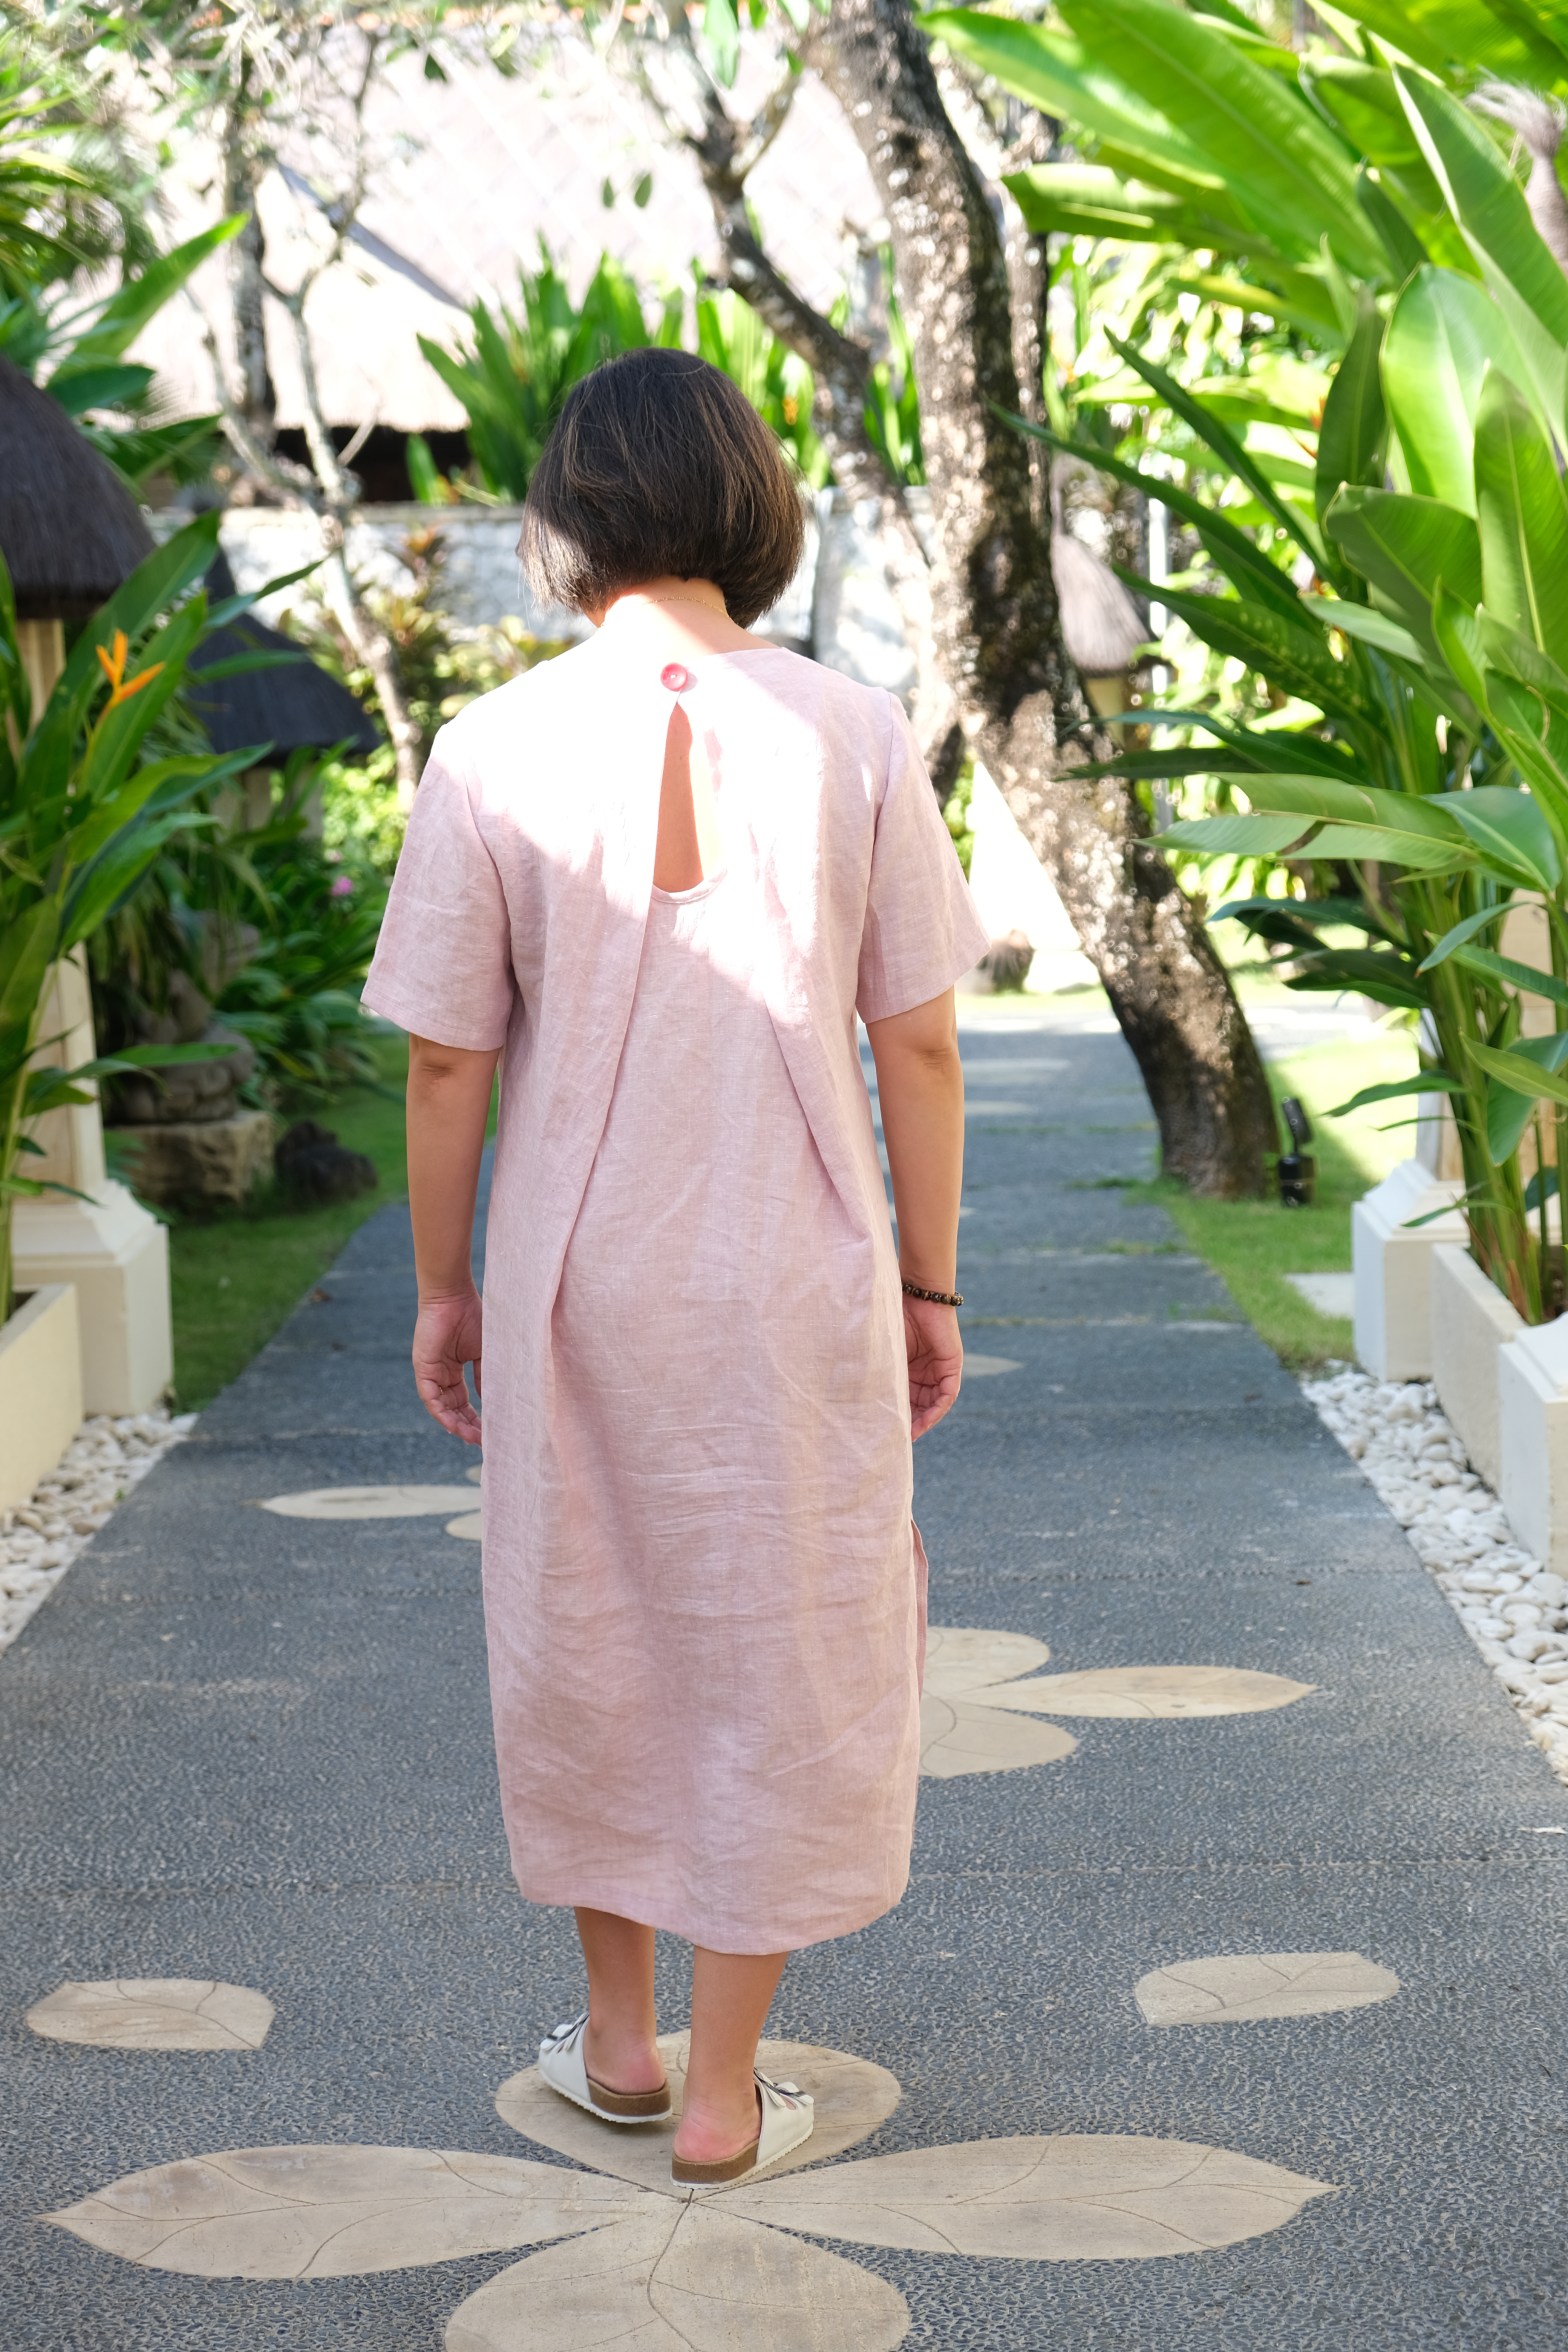
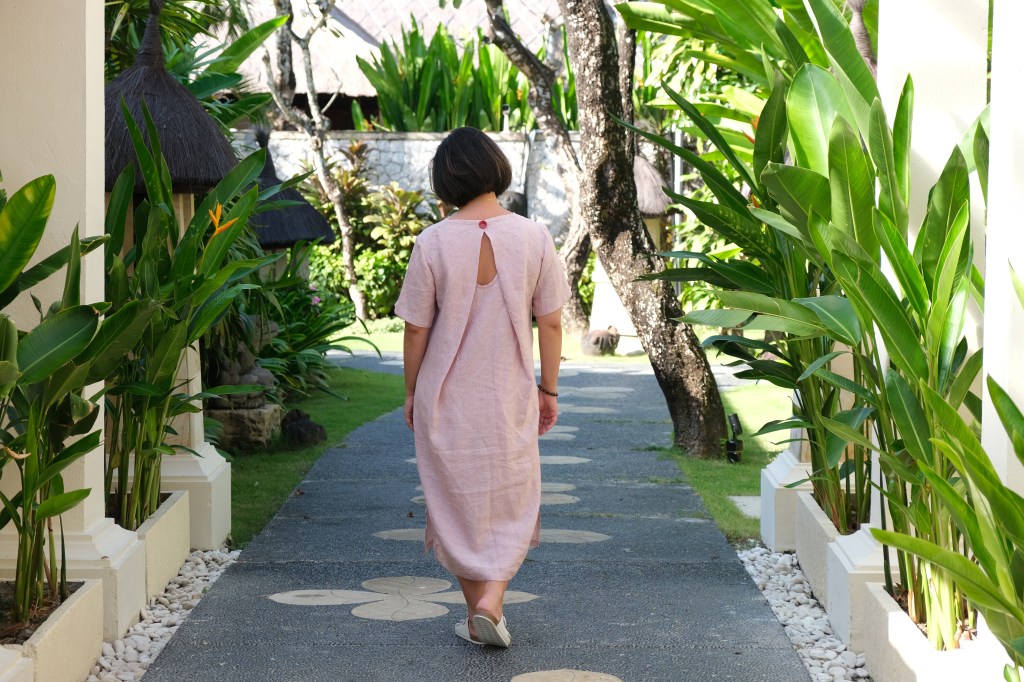
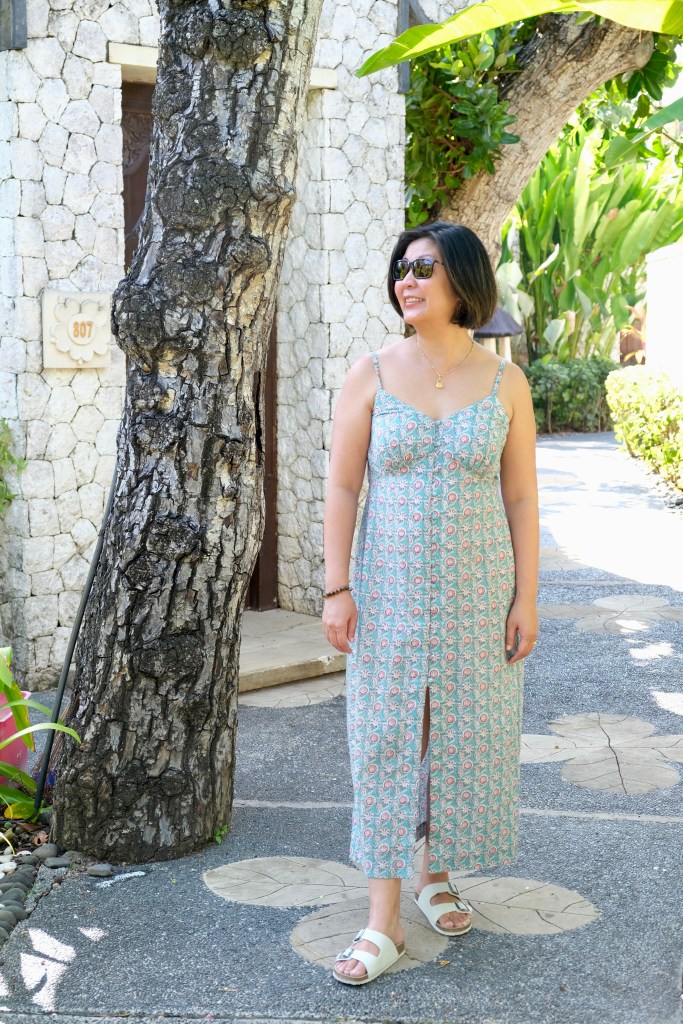
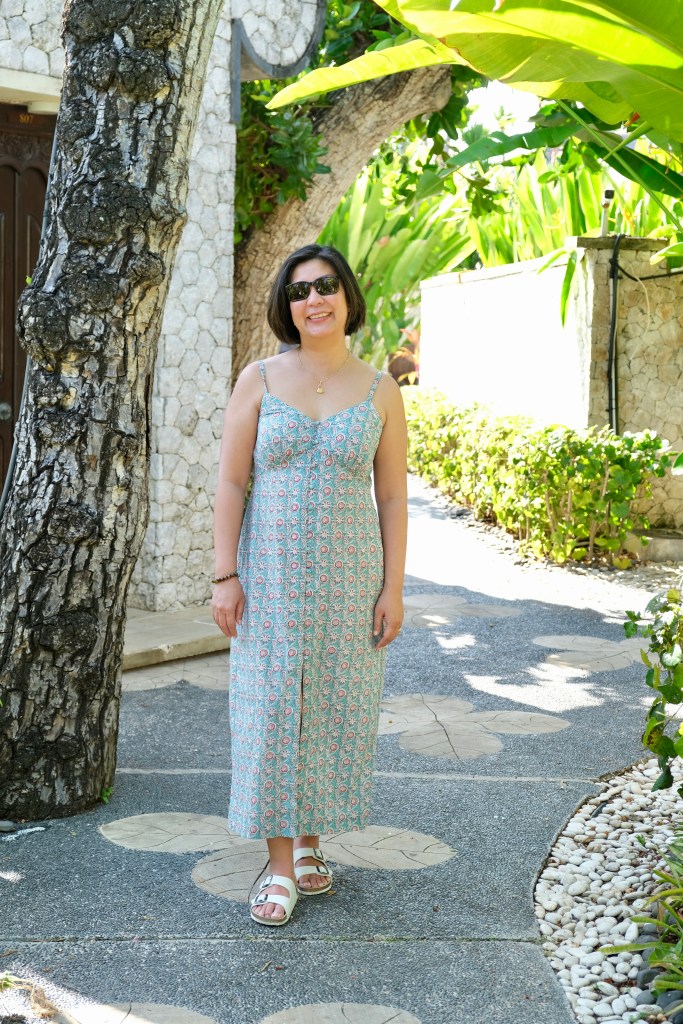
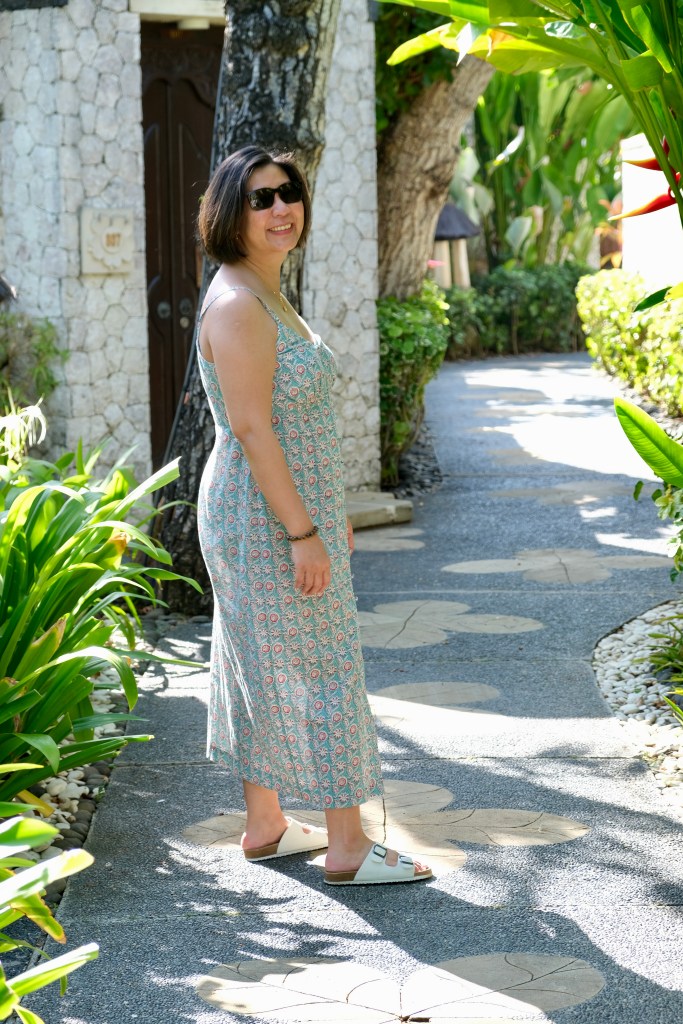
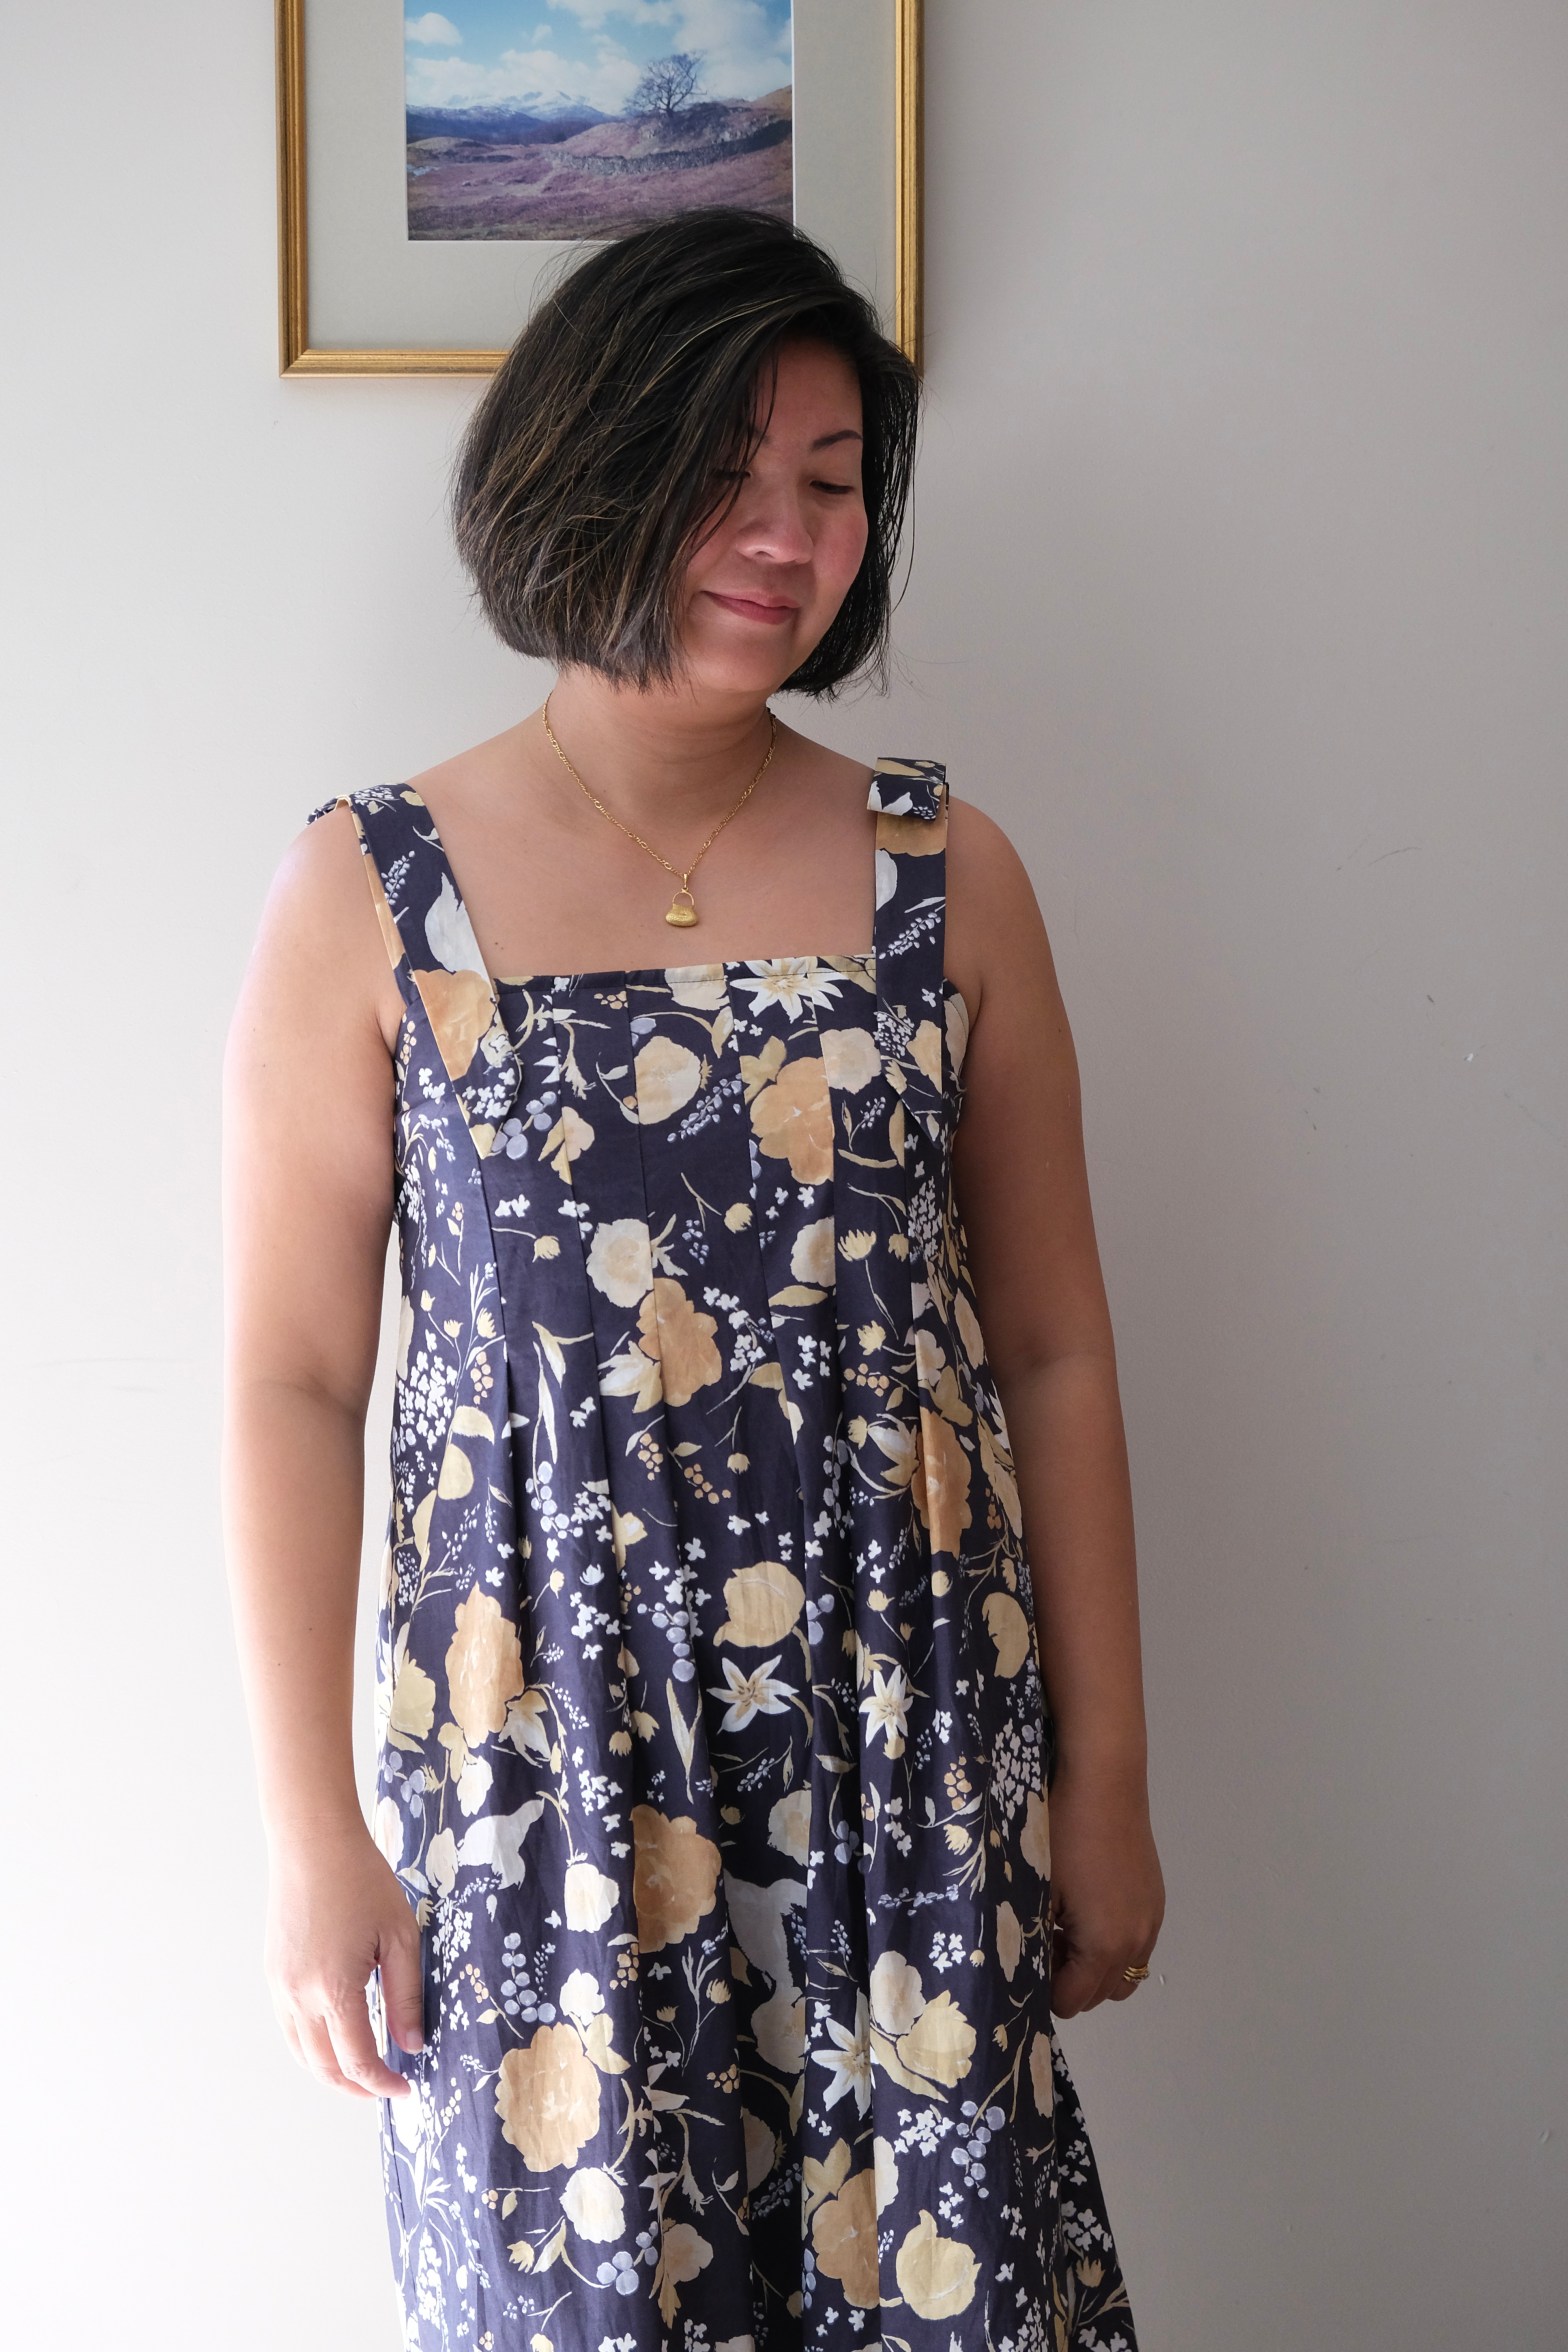
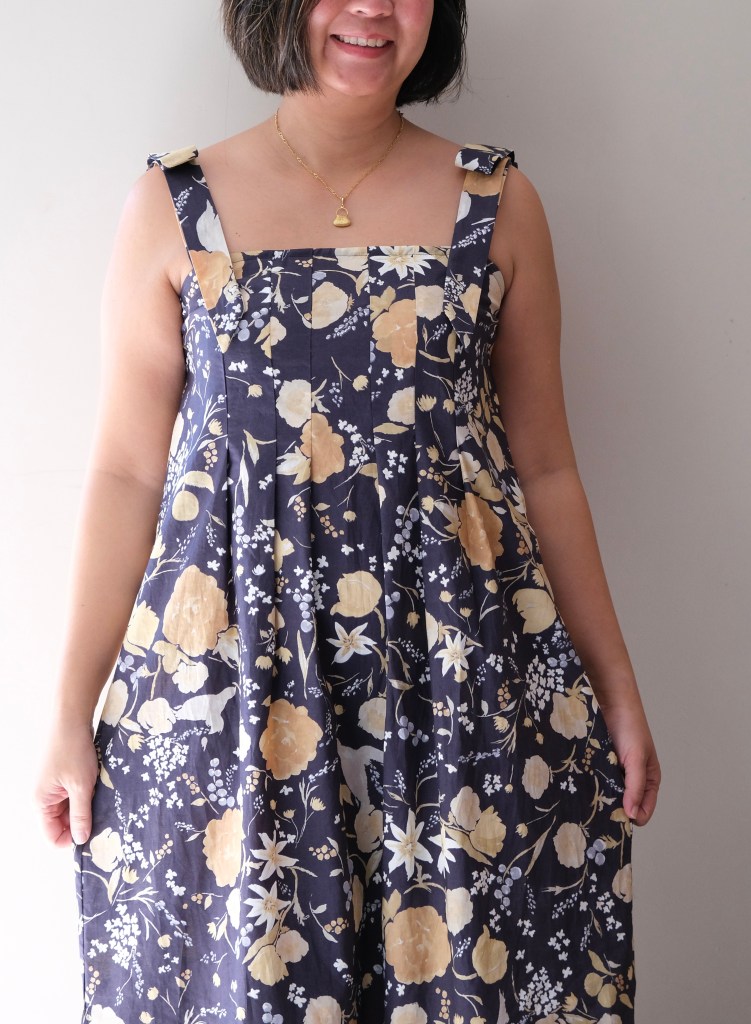
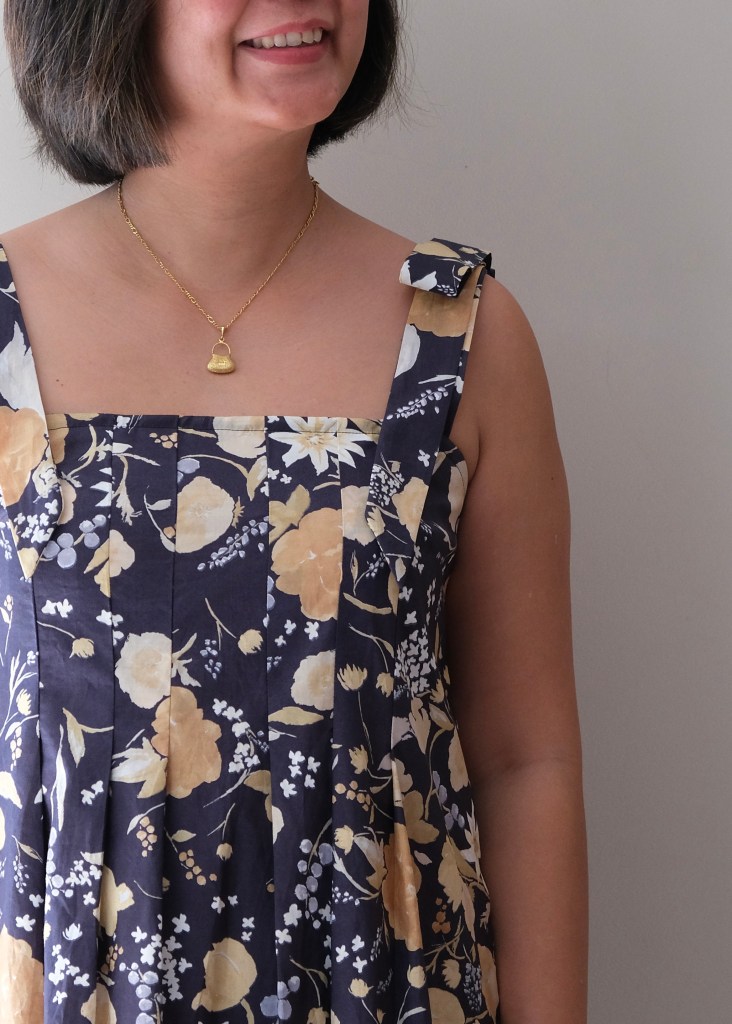
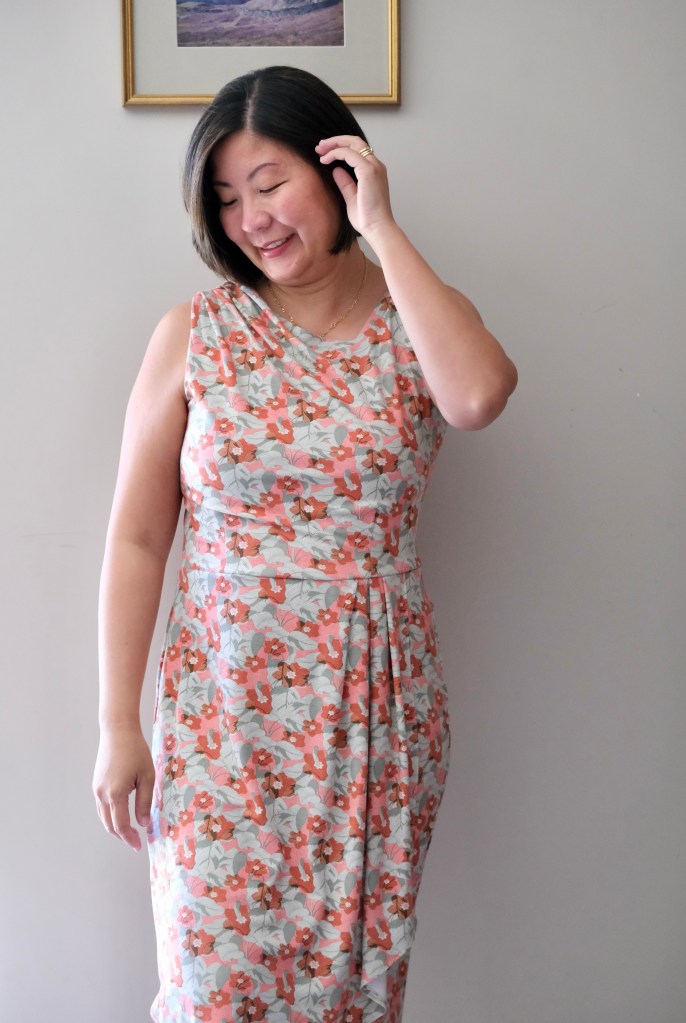
With the holiday season in full swing, I was on the lookout for a dress and when the Dewey Dress popped up, it fit the bill perfectly. It’s a knit fabric dress with a unique asymmetrical neckline which is carried through to the pleating on one shoulder and pleating the opposite overlay. The tulip skirt is fully enclosed with the overlay creating a faux wrap look. It’s sleeveless but I’ve seen a few other makers combining the Dewey pattern with elements from the Grafton, which is a mix and match pack, to add sleeves to their dresses.

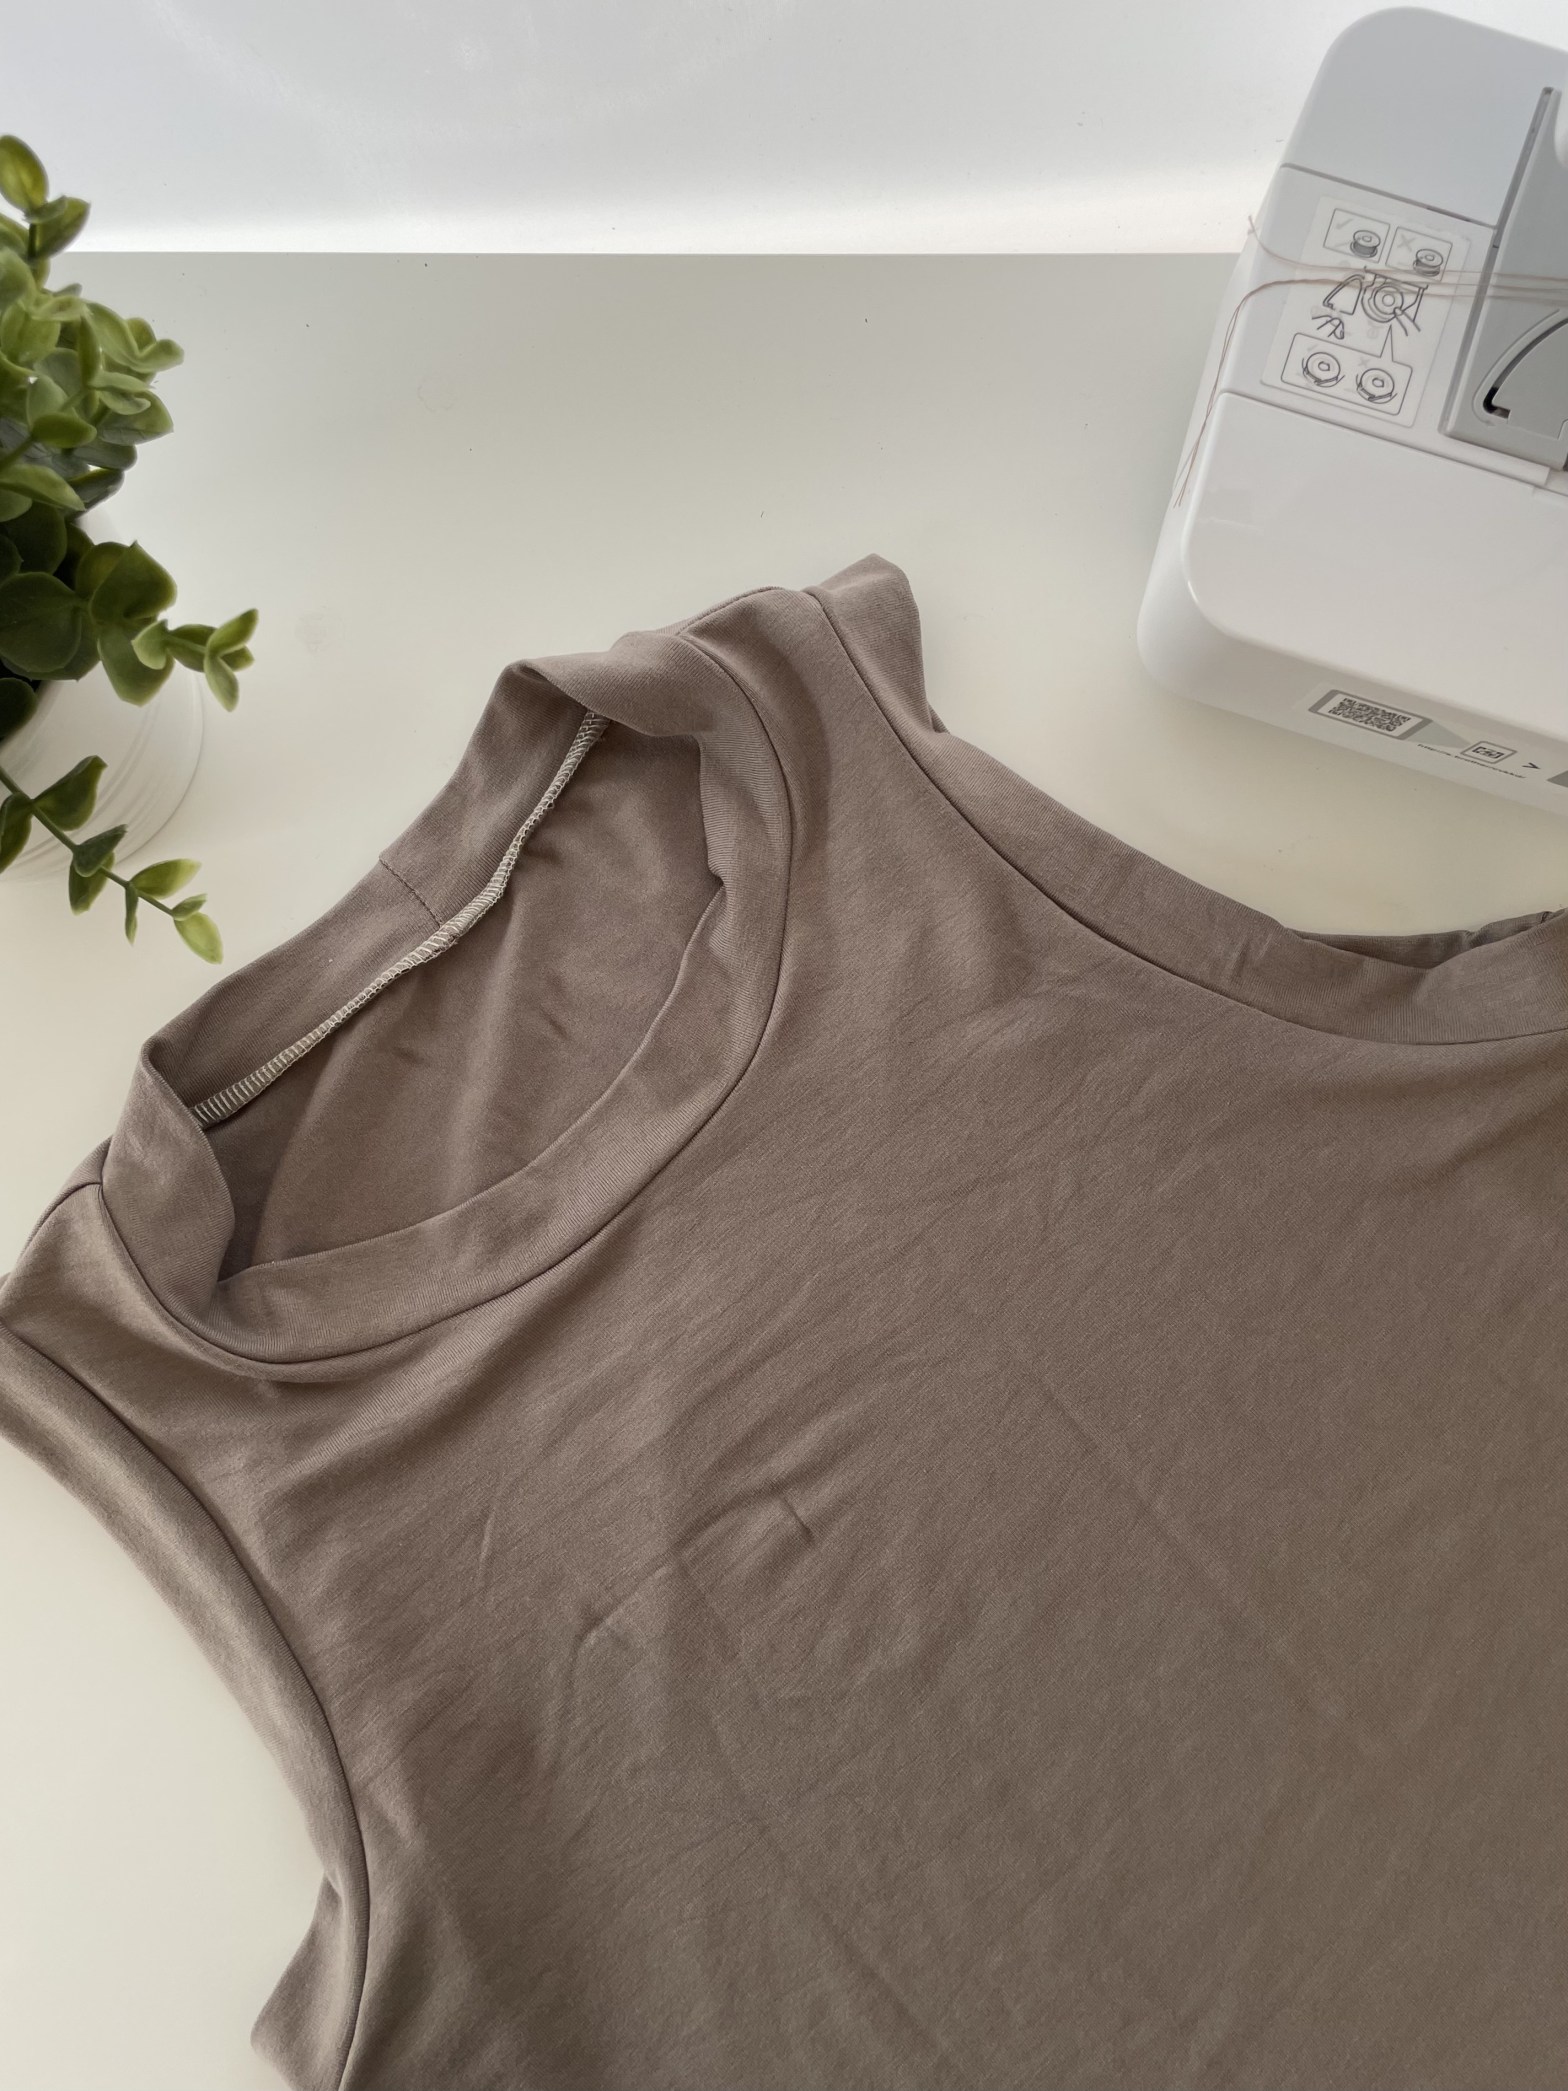
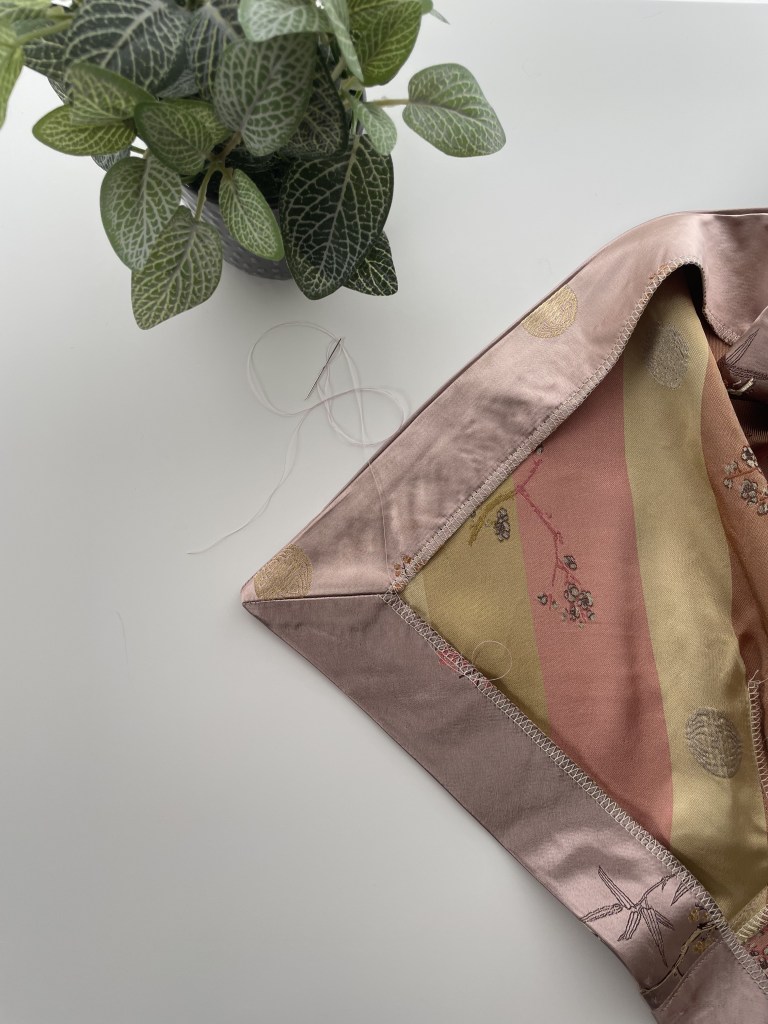
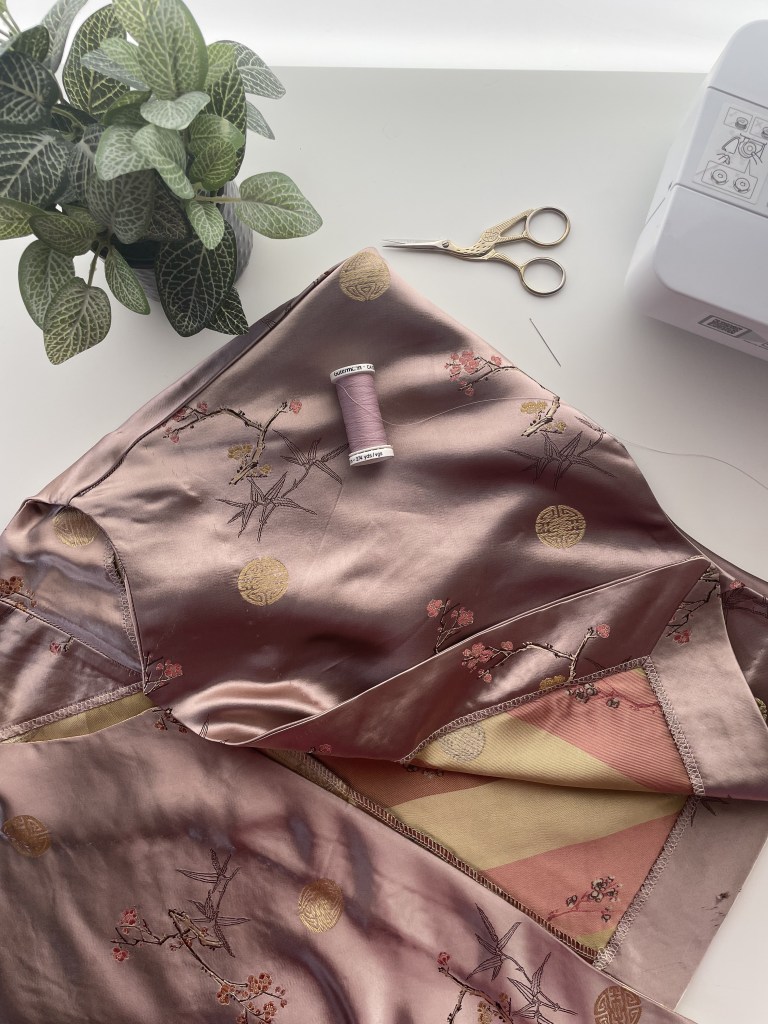
I don’t have a great amount of experience sewing with knit fabric but I’m feeling more confident as I practise. My knit fabric was bought two years back in the Christmas sales. It’s a stable cotton jersey (like t-shirt material). One day, I’d love to try it in a fabulously glamourous metallic lamé. I had about 5 meters available, so I used the same fabric for lining the bodice. I had a little freak out when I cut the fabric because I had cut from the right side facing up like I usually would but reading the instructions more carefully, it did say to cut from the wrong side facing up. I thought that I would have to restart with another fabric but because I was consistent with cutting from the right side, it was fine. The only visible consequence is the reversal of which side the pleats sit on and my pleats face the wrong way. 

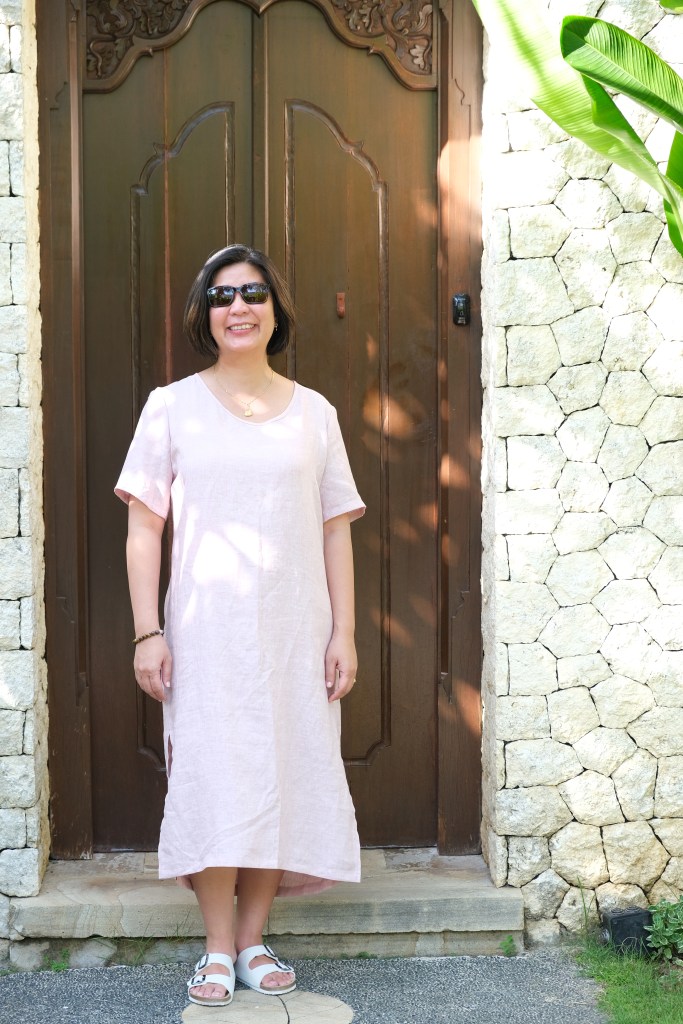
For sizing, I made the size 10 without any modifications for my measurements of 35HB:38FB:33W:40H (inches). I used the C Cup bodice. I think the fit was great. There is a great sizing calculator that is available for all Cashmerette patterns, so I often refer to it to check. I decided not to grade as this is a knit fabric garment. 

The process I enjoyed the most with this pattern was using the burrito method to finish the armholes. There’s no visible stitching from the outside. The whole construction process went smoothly because the instructions are always very comprehensive and there are great illustrations accompanying the instructions. I did also appreciate the YouTube tutorial by @SewSewLive. It’s always great to see someone else’s process when they sew.

There will be a few more items I hope to finish before the end of the year but I’m doubtful about accomplishing anything as I have a lot of spring cleaning that I’ve neglected. Sewing is always more fun right? I have also discovered Diary of a Vampire. It’s a teen drama but I have been binge watching as the last day to watch it is 31 December on Netflix and there are 8 seasons! Oh and of course, getting everything ready for Christmas. I’m sorry if I haven’t been able to get back to everyone’s messages but I really appreciate your readership.

Thanks for reading and happy sewing!

X Em

Can I Sew It In One Hour

It’s getting to that time of year where time is a scarce commodity. I came across the Blomma Tank, a free pattern from Paradise Patterns, a few months ago and have been meaning to sew it up but things just kept popping up. I saw that other makers have said that it only takes a short time to sew. So, last weekend, I thought that I’d give myself an hour and I’ll see how far I get. For a laugh, I recorded my time. It was a surprise to me that I got as far as I did! I ended up making the whole thing in under two hours. So, no. I can’t sew it in one hour, but it was motivating to try!

The Blomma Tank is a core piece for the wardrobe. Great for layering in winter and just so comfortable on its own in summer. I didn’t toile the pattern as other makers had commented that the sizing was quite accurate. My sizing of 35-inch high-bust, 37-inch bust, and 33-inch waist sat between the size E and F in the B Cup. I decided to sew size F without any modifications. It is a close-fitting top so there is negative ease in the stretch fabric. I’ve used a bamboo stretch jersey which is very soft. I hadn’t realised that I needed bias binding, so I used the same fabric which was ok.

Knit fabric sewing is still unfamiliar to me. I think this has been the year where I’ve sewn the most with knits. I do love how comfortable wearing those knit fabric makes are so I’m going to persevere with it. You’ll see on my Blomma Tank that my neckband is a bit floppy which is showing my lack of skill. I deviated from the pattern instruction and attached the neckband and armhole bands with the overlocker as I’ve done in the past. I thought it would be fine but you can see that I don’t have the more sporty look as intended by the design of the pattern.

For anyone wanting to join in!

Back to the sewing challenge! I decided to start the Can I Sew It In One Hour hashtag (#CanISewItInOneHour) to keep myself motivated. I’m an over thinker and sometimes my need for perfection stops me from just giving something a go. It’s also that time of year when everyone is short on time and motivation so I thought it would be a fun way to connect with others who are feeling the same way. I’m excited to see what patterns others might suggest for me or what everyone will try. I hope to make it a safe space for anyone wanting to join in. It’s not a serious challenge with a hundred rules and there are no prizes apart from the joy of sewing. It’s a place for connection and support. I hope it inspires a lot of joyful sewing and laughter.

Thanks for reading and happy sewing! 

X Em

Blair Skirt

Another pattern test under my belt! This time it’s for True Bias and the pattern is the Blair Skirt which is a woven skirt that’s fitted through the waist and hips. It’s also got these cool pockets with inverted pleats. It is fastened by buttons down the centre front and there is an option to make your own belt. I’ve chosen to sew the midi length version but also comes in mini and maxi lengths. 

When I had my first look at the pattern illustration, I pictured a khaki-coloured skirt to match the utilitarian feel of the pockets and belt. However, I found a cotton drill in a beautiful design called, “Warlukurlangu Snake Vine Dreaming”, in earthy red, yellow, and ochre tones. This fabric is a design by Ingrid Napangardi Williams who is from the Northern Territory and who began painting with the Warlukurlangu Artists Aboriginal Corporation, an Aboriginal owned and governed art centre located in Yuendumu, in 1999. I was so drawn to the dynamic forms and the beautiful display of colours. The cotton drill was the perfect medium weight woven being a heavier twill weave for the skirt but still lightweight enough to be worn comfortably.

So, this change in direction with my fabric meant that I had to think carefully about pattern placement. It was important to match the two front panels. The amount of fabric required does increase with pattern matching so I ended up with 2.5 meters of the main fabric. The pattern is quite dynamic and distinct so I decided that stacking the same fabric for pockets, button placket and waistband would make everything “too busy” for the eyes, so I’ve paired the fabric with a plain wine-coloured drill. I used a bit under half a meter of this to make a border with the waistband and button placket, and of course, the pair of matching pockets with those cool inverted pleats.

There were some minor tweaks of the sizing during testing, but I can confidently sew the size 12 again for my measurements of 33-inch waist and 40-inch hips. I would measure your waist and hips in sitting as well, this is something I’ve picked up from working with Cashmerette patterns and I use it when I know that a pattern is close fitting like the Blair Skirt. There is about 1” ease in the pattern.

True Bias instructions are always comprehensive with glossary, printing instructions, fabric layouts, and illustrations to match the steps in the construction. I especially enjoyed installing the button placket. Amazingly, I found the perfect buttons for the skirt. The semi circles remind me of the Aboriginal symbol for a person and the circle of these are symbolic of a campfire. It was a random find but so perfect for the fabric! Love comes in many forms with the skirt from finding the perfect fabric to the design of the skirt. It’s been fun to stretch my sewing skills by participating in another pattern test. Hopefully there will be more to come in the future.

Thanks for reading and happy sewing!

X Em

Catskills Jacket

My latest make is the Cashmerette Catskills Jacket. They collaborated with Julie Eilber to design this lovely bias-cut jacket. The inspiration came from the designs of Claire McCardell who was famous for her ready to wear outfits in post war America. She is credited with creating American Sportswear and was famous for her matching sets.

The Catskills Jacket is the perfect cropped jacket with grown-on sleeves. The bias cut makes it drape beautifully and I love the roomy feeling under the arms. I can throw this on over a dress and it will be perfect as a layering piece in the warmer months. I don’t deal with the cold well and that includes the air-conditioning that everyone ramps up in the summer!

This beautiful fabric was given to me by a lady who was gifted it about thirty years ago. She heard that I did some sewing and she wanted me to have it. We think it might be silk satin but can’t be a hundred percent sure. Unfortunately, there had been some damage to the fabric due to its time in storage. Some of the threads had pulled on something so there were patches which I had to cut around. It was also very narrow at 90cm. She thought that perhaps the fabric might have been good for cushion covers but I felt I could use it for the Catskills Jacket. Due to the bounciness and thickness of the fabric, I couldn’t use the French seam instructions but instead finished the seams with an overlocker. I also had to do a fair bit of hand sewing to finish the facing.

Sizing of the jacket was very accurate. I made the size 10 for my measurements of 37-inch bust and 33-inch waist. I’ve chosen to sew the ¾ sleeves as it will be used in the warmer months. The pattern allows for a choice between five buttons with thread loops or eight hooks and eyes. I had some red frog fastenings but after some discussion on my Instagram, I decided the colour was a mismatch for the fabric. I’ve decided to leave off any closures as I’m not likely to need to do up the jacket when worn. I choose to reserve judgement but with the fabric it’s easier to attach buttons later than remove them.

I can’t wait to share my make with the lady who gifted me this beautiful fabric. I am blown away that it could turn into something so gorgeous. It has also made me more determined to sew up my fabric stash and make the most of them while they are in good condition as I’m in the habit of storing my “special” fabrics rather than sewing them up.

Thanks for reading and happy sewing!

X Em

True Bias Dani Pants

When I first started sewing, I jumped in headfirst into sewing the Flint Pants from Megan Nielsen Pattern. It turned out quite badly, I got the sizing wrong, had no idea about grading a pattern and ended up recycling the whole thing. A sewing friend consoled me, and she said that sewing trousers is something you should work up to. So, I’m really thrilled that I’ve completed something like the Dani Pants. I feel like I’ve learnt a lot from making this pattern.

There are a few versions of the Dani. It can be made as shorts or pants and it can be fully elasticated or have a zip front. I opted for the zip front because I really want to practice this for making jeans. I still have a lot of room for improvement when it comes to installing the zip fly. The zip front is still a bit of a puzzle because my zip guard doesn’t completely match my fly shield and left front. Luckily my waistband still fits but I will need to revise and hopefully my next attempt at this works out better.

My sizing was spot on. No modifications or grading were needed. I sewed the size 12 for my waist measurement of 33 inches and hip measurement of 40 inches. I did have to shorten the hem by 4 inches for my height of 5 foot 7 (167cm). I love a partial elasticated waist as the fit is a bit forgiving. 

The pattern calls for medium weight woven fabrics. I found this beautiful brown linen/cotton blend. It’s very soft and not as stiff as pure linen. I find that brown is such a great neutral for me. I’m hoping to build a bit more of a capsule around these colours. I’m going to attempt another version of these because they are so comfortable, I can already tell that I’ll be constantly reaching for these. I also want to sew them again because I don’t feel that I’ve really mastered the pattern. 

The written instructions and the illustrations are excellent in the pattern. I also used the sew along photos on the blog. I think my struggle with the pattern was that I was unfamiliar with how a zip fly should look at the end. I did end up inspecting one of my husband’s old trousers and don’t tell him, but I did unpick the fly shield a little bit to see where the zip should sit. I tend to install a lot of invisible zips, so I think that I installed my zip too far forward. I can’t quite figure where the zip teeth should be placed. Still confused to be honest.

The rest of the sew was smooth sailing. I love how the side seam pockets have a facing and I thought the method for installation were the best I’ve ever done. It’s so neat that none of the pocket bag shows when you sit down. The whole pattern is full of professional tips and techniques. I’m so impressed by the end result. I can’t quite believe that I’ve come so far in my sewing. The memory of that first pair of pants I made still makes me giggle. 

Oh! Just a side note, do not inspect my buttonholes too closely. My machine usually does the whole thing automatically once it’s set but on that day, my thread broke a few times which meant that I had to rethread but then the machine has lost it’s place in the process. I prefer to do them manually but haven’t figured out a way to do that. It was a very frustrating and a lot of colourful language was used in the process!

Thanks for reading and happy sewing!

X Em

Sewing Therapy Hanbok Dress

When Sara from Sewing Therapy put out the call for testers to help with her inaugural pattern launch, I was so excited for her and put my hand up to help. Sara has designed a modern version of the Hanbok Dress which is the traditional dress of Korea. It’s in a style of a wrap dress with a full skirt cinched by a waistband. It’s beautifully elegant and I love the style.

This pattern is for woven fabric. The pattern test was done in a short time frame, so luckily, I already had three meters of rayon in my stash. To help accentuate the features of the dress, I contrasted with beige linen for the neckband and the waistband. The construction of the wrap and the full skirt is more suited to lightweight or mediumweight woven fabrics such as linen, rayon, silk, or cotton. The pattern is geared towards creativity so the use of contrasting fabric and the fullness of the skirt can be altered depending on preference.

My Sewing Therapy Hanbok Dress is a tester piece, so a few changes have already been made for the final pattern release. I made the size L which fits my measurements of 37-inch bust, 33-inch waist and 40-inch hips. Wrap dresses are very forgiving with fit so often, grading isn’t needed. To choose the size, I mainly used my bust measurement.

I thought that wearing a Hanbok Dress would be like wearing any other dress but there is a big difference in the way the bodice sits. The high neckline means that there is never a chance for a gaping neckline. It makes it so comfortable to wear. Also, the skirt overlaps very well over the front so there’s little chance of exposure with a strong gust of wind.

Finally, the outer tie is secured over the waistband in the style of an obi belt (I’m sure there’s a Korean term for it which I haven’t yet found in my research). This is a flattering feature as it helps to define the waistline and helps to hold the weight of the skirt portion of the dress. Excitingly, there is also a way to tie the waist ties for a more relaxed fit.

The pattern includes an instruction booklet and a layered PDF pattern which is standard for most patterns however, this pattern has the added bonus of video sewalongs. The pattern is geared towards a confident beginner and an intermediate sewer. The instruction booklet is quite concise and does not have illustrations, but it would be fine to follow if you have enough sewing experience. Sewing Therapy is a YouTube Channel with lots of sewing content and the videos are high quality. Sara from Sewing Therapy has a background as a sewing instructor, and I’ve referenced many of her videos when I’ve needed help with my sewing. 

It’s been a while since I’ve done a pattern test. This has been an enjoyable process. I’m always a bit stressed if given a deadline but it’s also fun to challenge myself once in a while. 

Thanks for reading and happy sewing!

X Em

Tropical Holiday Dresses

Bali is one of our favourite holiday destinations. It’s not just the warm climate that I enjoy but one of my grandmothers was born in Indonesia, so it has echoes of a homecoming. I enjoy the beautiful hospitality of the Balinese people and the chance to practice speaking Bahasa. I was planning to share some content during my stay but after a day of spa, eating and sea-side lounging, I was so relaxed that I didn’t pick up my phone until I was leaving. 

My lovely husband did manage a few snaps of some of the dresses I packed for the trip so I thought I would share those. Bali is tropical but August is dry season so it’s not too humid. There is always a sea breeze blowing with a temperature range between 24 degrees to 30 degrees which is so comfortable. I love packing dresses for holidays as it’s a great space saver. Also, with the right fabric and design, dresses can easily transition from day to evening wear.

Most worn was the Celestia Dress from Papercut Patterns. This dress was so versatile and so comfortable as it can be worn braless! I also love the roomy fit as there was a lot of local cuisine to enjoy like satay lilit, bebek betutu, urab and all often accompanied with a side of sambal matah.

Tide Dress from Papercut Patterns was another dress I packed. I probably did not wear this dress as much as the others as I found that the linen was very crushed, and I didn’t have ironing facilities. Also, I find linen a bit scratchy when it’s newly made, and it needs a bit of seasoning with a few washes and wears to soften.

I did wear it for a very interesting Balinese Opera Show, Dramatari Arja. The whole drama was sung by a chorus of about 15 singers which had a very hypnotic effect with the narration by a solo performer singing an operatic soliloquy. Worth it if you visit Bali.

The most comfortable fabric was this Nani Iro cotton-silk blend from DIY district that I used for my Patternscout Studio’s Flora Dress. It was so soft and cool to wear. Just a little mistake I had made was sewing the straps too far out and I found that the strap kept falling down my shoulders. I’ll need to unpick and move the straps closer as I think my shoulders have a narrower profile. Apart from that, the design allows for the dress to be pulled over the head which was so easy to wear. 

Lora Dress from True Bias was a real favourite for the sunny days.

It’s a perfect summer dress and matched the beautiful gardens!

It was an easy style to wear and kept me cool in the midday sun. It’s been a gloriously relaxing holiday with a lot of lounging and uninterrupted reading. Feeling refreshed and looking forward to a bit of summer sewing.

Thanks for reading and happy sewing!

X Em

Tide Dress

Another beautiful design from Papercut Patterns. The Tide Dress looks like a simple shift dress from the front, but my favourite feature is in the back of the dress with the keyhole neckline that is overlapped by long pleats joined by the button.

I’ve had this pattern in my stash since it’s release but haven’t had a chance to sew this up. It’s on the “Make Nine List” which is my attempt to plan my sewing at the start of the year. Usually, the list consists of makes that gives me an added skill or has a feature that intrigues me like the back of the Tide Dress. I love the shape of the dress and it really fits into the style of my wardrobe.

The sizing of the dress is quite flexible. My measurements (37B: 33W: 38H) sit between the size 4 and size 5. Looking at the finished garment measurements, I felt secure that I could sew the size 4 without needing to grade as there is a lot of ease in the waist and hip so I could base my dress on my bust measurements. The dress variation stops about mid-calf in length with slits along the side seams. 

When I was selecting fabric for this sew, I was hoping to use a piece of check linen that I’d had in my stash from a time when Megan Nielsen still had her shop open. I had bought two meters of this beautiful fabric and was waiting for a pattern like this to match it with. Unfortunately, even though the fabric is a wide 150cm in width, I still did not have enough of it because the back piece of the pattern requires quite a bit of fabric. I tried every combination and played pattern piece Jenga for quite a while before succumbing to the fact that it just wasn’t going to fit. Going back on the search for the right fabric, I came across this lightweight pink linen. I bought three meters this time and the pattern fitted without a hitch. 

Most Indy patterns come with greatly detailed pattern instructions but there’s just an added layer to Papercut Patterns which make them so interesting to sew. I love how there’s always a twist to the pattern which gives you the pleasure of working out a puzzle. In this case, it was the pleating for the back of the dress. It felt like I was folding a bit of origami and as I was following the instructions, my mind was uncertain about the outcome but the surprise of the reveal hits you at completion! I love that element of surprise in a pattern. The other element that I appreciate in Indy patterns is the cultivation of learning. With this pattern, I learned a different way of attaching a sleeve. I’m used to sewing my sleeve with the sleeve piece top side, but the instructions explained that stitching with the sleeve on the underside will allow the differential feed to work in any ease on the sleeve. It was so much easier and faster too.

It’s still winter here in the Southern Hemisphere but I’m adding this dress to my holiday capsule which is coming up. It’s going to be a staple in summer too!

Thanks for reading and happy sewing!

X Em

Milla Dress

Featuring Cotton Lawn from DIY District

The bohemian style of the Milla Dress from Slow Morning Studios caught my eye with the interestingly lined bodice panel surrounded by gathered sleeves and skirt pieces. It’s honestly the biggest sleeves I’ve ever sewn. This is a pull-over-your-head dress, so no zips or buttons needed. I’ve used the beautiful floral liberty-style cotton lawn sent to me by DIY District and I’m so happy with the combination. The cotton lawn is a non-stretch lightweight woven which suits this pattern. In fact, with the size of those sleeves and the amount of gathering, I would choose an even lighter fabric next time but for this make, I’m love the vintage vibes with this lovely liberty design.

The pattern comes with simple instructions for construction. I like that there is some assumed knowledge in the instructions. Nothing important is left out and all the illustrations are clear. This can be seen with the construction of the neckline. The neckline is not exactly a V-neck but has a V-keyhole feature and there is an option to add ties which I’ve done. The instructions are to match the bodice outer shell to the lining and then to sew and turn inside out to finish. The assumed knowledge is the sewing into a V-neck. The added instructions would be to mark the midline, then baste the seamline to the mark on both sides to the point of the V. This will act as a stitching guide for the neck seamline. Once stitch, it’s important to cut into the V stopping at the stitch line then trim to the point of the V. I love how so much detail and technique it can take to make something like a V-neck look sharp. If you don’t sew, you never appreciate the skill and knowledge it takes to make something look so seamless!

The dress is a lovely loose fit. There’s obviously a lot of ease in the pattern so sizing is straightforward. My measurements of 37-inch bust, 33-inch waist and 38-inch hips fit between the size38 and size 40 so I made the size 38. I’m comfortable with the fit. The pattern comes as a dress but also a blouse and has long or shorter sleeve options. I’ve chosen the longer sleeve option which has elasticised sleeve hems.

Talking sleeves, I have to mention that I cut the sleeves crossgrain. Cross grain runs at a 90degree angle to the fabric. The width of the fabric was narrow at 110cm so the fullness of the gathered sleeve pattern would not fit. Cutting crossgrain was my only option. I think for sleeves, cutting crossgrain is fine as there isn’t much strain on the fabric but I would be wary of doing this on a pair of trousers as the fabric is weaker. If you tug at the fabric that is cut on a crosswise grain, it will have more “give” than one that is cut straight of grain.

The liberty style cotton lawn is an easy fabric to sew as it’s a stable woven fabric. I’ve used a 75/11 size machine needle. It would also be okay to sew with a universal needle. I have chosen to finish all the seams with overlocking which is nice and quick. In fact, the whole sewing process was quick. It’s a great project if you need a dress quickly as it can be done in an afternoon. I’m definitely squeezing another one in but next time I’m going to shorten it for a beach dress and make it with super lightweight fabric. With this heavier cotton lawn, I’m wearing it more as a winter dress and it’ll also be great for the in-between seasons. I would style it with a denim jacket and boots to make it cosy to wear.

Here are some Australian winter beach photos!

Thanks for reading and happy sewing!

X Em

Flora Dress

Featuring Nani IRO Rakuen silk and cotton in black

The Flora Dress is a new release from Pattern Scout. I was excited when I saw the release because she had detailed this dress on her YouTube channel last year. It was just made from rectangles of fabric with pleats. The simplicity of the dress is exactly the style that I love Pattern Scout patterns for. With the pattern release, the rectangle fabric concept is still there with a bit more refinement in the neckline but still retaining the wide tucks to fit the bodice.

The dress is made for lightweight woven fabrics that do not have any stretch. It was so lucky that I had the Nani IRO Rakuen fabric from DIY District. This fabric is a blend of silk and cotton with a composition of 70 percent cotton and 30 percent silk. It’s beautifully soft and lightweight at approximately 129gsm (a bit under 5oz). “Rakuen” translates to “paradise” which is depicted by the flowers and birds in a garden in what the description describes as a black background but, I would say that it’s more of a midnight blue background. I’m not disappointed as I prefer this colour.

Construction begins with sewing these pleats or tucks in the front and back pieces. It was a very satisfying exercise once you get into the rhythm of matching the notches of the tucks, folding, and marking the lines for the length of the tucks, sewing, and pressing the tucks and then repeating the whole process until the fabric was shaped into a fitted bodice that flared out into a flowy skirt. I guess the process reminds me of origami which is quite meditative and rhythmic when forming the shapes with the process of folding. It also requires the accuracy of origami, so I made sure that I measured the distance of the top and bottom of each tuck.

My sizing fell between the size 12 and 14 with a full bust B Cup. I did a toile of the size 12 because looking at the final measurements, there is a fair amount of ease in the waist and hips. I prioritised the bust measurements in choosing my size which worked out perfectly. To make the toile, I cut the tank top pattern pieces only which saves fabric. I used some of the remnant cotton lawn pieces from various previous makes. When making a toile, I find it’s important to use similar fabric. I’ve learnt this the hard way in the past!

Sewing with the beautiful Nani IRO cotton/silk fabric was lovely. Again, due to the fine nature of this fabric, I sewed with a 75/11 needle to make sure the fabric wouldn’t catch when sewn. I also pre-washed my fabric with an organic detergent (no enzymes) in a cold wash and air dried it. I remember shrinking some rayon once because I thought I would cheat and skip the pre-washing. Bad mistake! It shrunk so significantly that I couldn’t wear the top. That was in my first year of sewing and I’ve not made that mistake again. The other tip I can give regarding sewing with this fabric is to be careful when pinning the fabric. I used my quilters clips at times rather than making holes with my pins. I need to invest in some finer pins like what they use for bridal dressmaking, and I need to sort the blunt pins from the pincushion.

Amazingly, I did not use my overlocker in this make. Pattern Scout is great for their instructions for French seams. I decided to follow those instructions and I’m getting more skilled using French seams. It’s a satisfyingly neat finish. The neckline is finished with bias tape which there are also great instructions if you want to make your own. I used some pre-made black bias tape which saved me a bit of time and fabric. 

As you can see from the photos, I’ve sewn the long midi version of the dress with wide straps, and I left out the pockets. I know everybody loves pockets but with the finer fabric, I did not want to risk the outline of pockets and to be honest, I never use pockets in a dress because I’ll always have a bag. It’s a great inclusion in a pattern but I decided to skip it which made the construction even easier. The last thing to point out is the side slits of the dress. Slits are an important inclusion if you want to stride out or ascend stairs with a natural gait!

The Nani IRO fabric is another beautiful gift from DIY Fabric. This is another item sewn for my holiday capsule. I’m looking forward to wearing the beautifully soft and breezy fabric in the heat. It will be good for the evenings where I’ll need something a bit dressier for dinner but will remain cool to wear. There is also a light sheen from the silk in the fabric which probably hasn’t been captured in the photos. It gives the dress a luxurious quality and feels amazing. I can’t say enough how beautiful this fabric is to sew and wear.

Thanks for reading and happy sewing!

X Em