A Trio of Dani Pants

Me Made May has gone by in a flash this year! This year, I decided to record what I was wearing every day in a one take video which I shared to my Instagram Stories and saved in my Highlights. It is a very successful exercise which I use to review what I’m making every year. I realised that even though I am drawn to making dresses, my daily wear mainly consists of pants and shirts. Of all the pants that I was wearing, I found that I liked the True Bias Dani Pants for the style and the fit the best. So, for my upcoming travels, I decided to make three pairs. One in denim, one in a stretch drill and one in linen using Version D of the pattern.

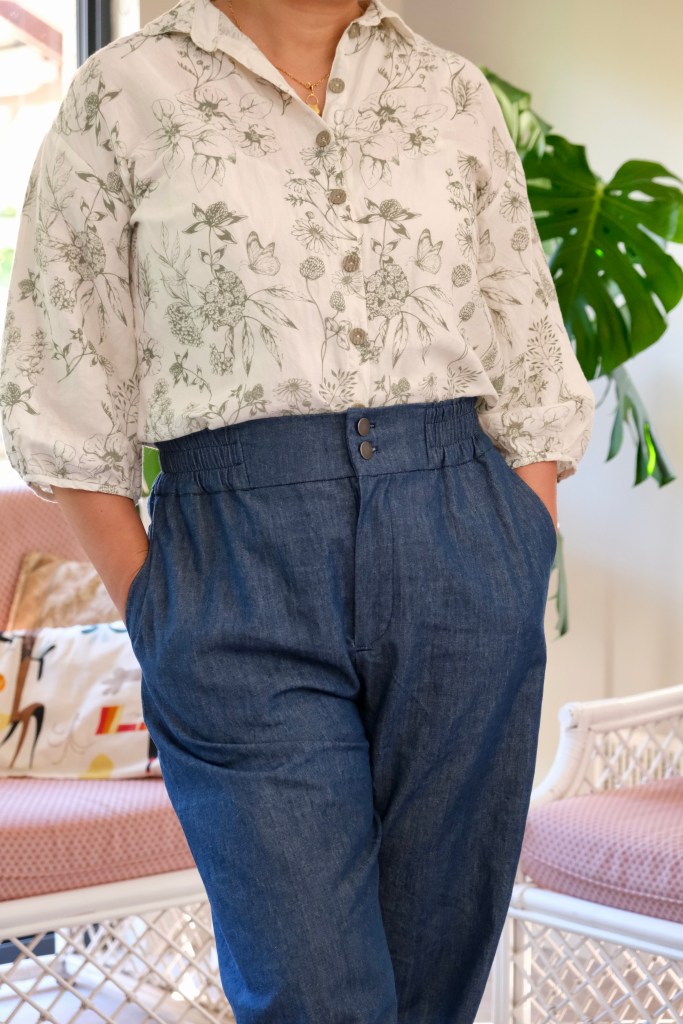
My very first pair which I made a couple of years ago was a linen version. I’ve worn it so much, but I felt that the linen I used was not the right weight and I can see some wear around the zip and seat area. This time, using version B again, I went for a 9oz weight denim which is lightweight enough to cope with the elasticised waistband but gave good structure to withstand the zip and button front. The buttons are jean buttons that were leftovers from making my Dawn Jeans.

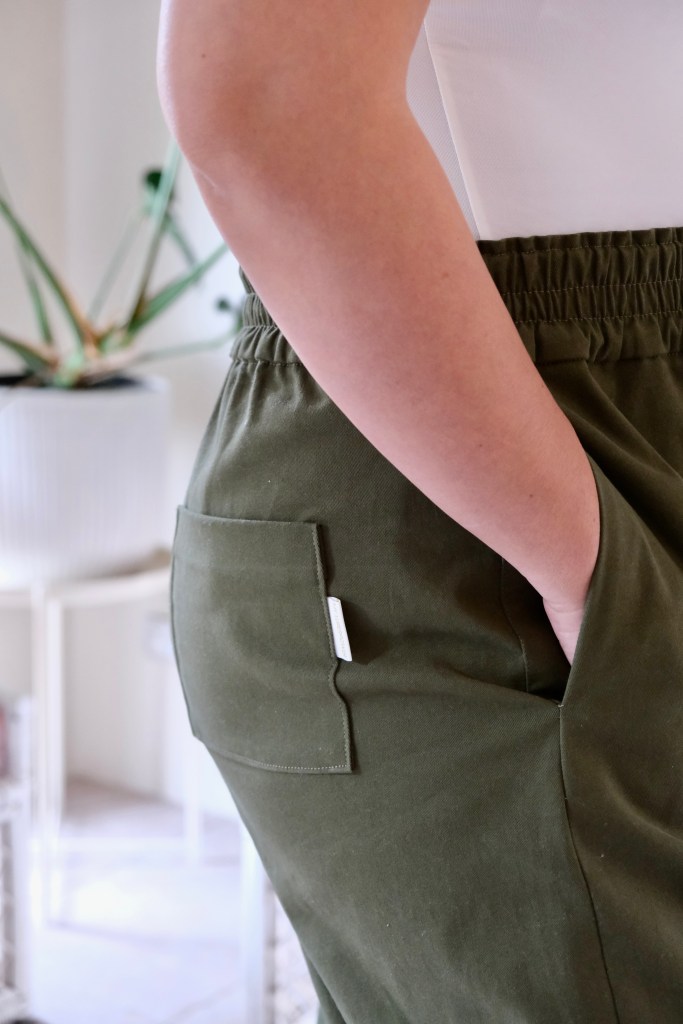
This was also why I chose a khaki stretch drill for the second version. I love how soft this stretch drill feels. It was a real bargain find at my local spotlight store with only $10 per meter, the fabric only cost $30 which is pretty good for a pair of pants these days. Something I didn’t do with the stretch drill which might be a bit controversial is that I didn’t wash it before sewing. I only washed it after. I felt that the stretch in the drill, even though light, made the fabric less structured. I didn’t want to change the sizing for the pants, and I knew that I would be throwing these into the dryer with washing, so I didn’t mind if the fit was on a slight looser side to begin with. I’m not saying that it was a whole size bigger, but it was a loose size 12 and after washing and putting in the dryer, it has stiffened up to the perfect fit for me.

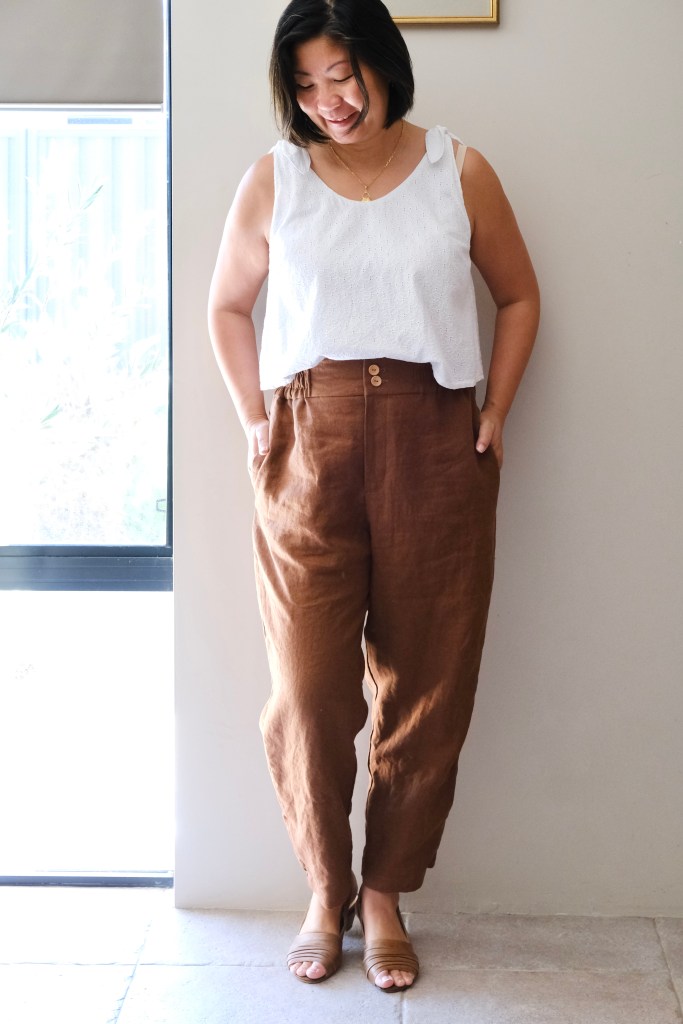
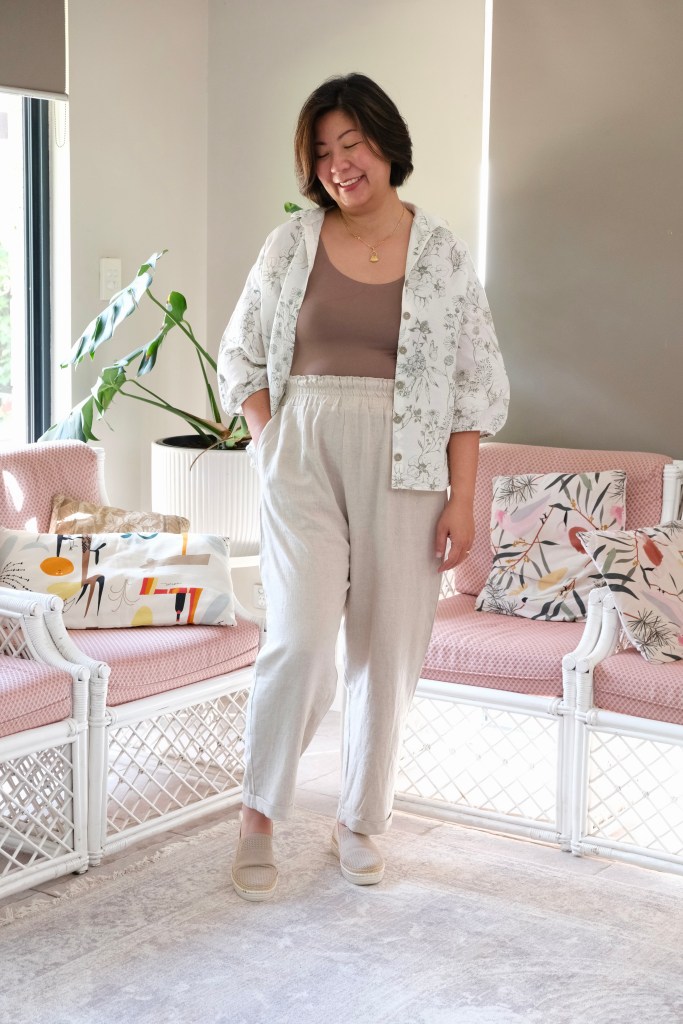
The final version was made with a drapey linen. This time I did wash the linen and popped it in the dryer before sewing. It really softened up the linen beautifully. I decided to make Version D which eliminates the button fly and zip. It has a full elasticated waistband. I thought that with travelling, it’s always good to have something you can pull on quickly that still looks smart. I loved adding the cuff and pockets to this. 

When I first made the Dani Pants, I found the zip fly quite difficult. It’s nice to come back to a pattern after two years to find that I can now confidently install a zipper and the zip fly easily. I could understand the instructions a lot better now that I’ve had more experience sewing. Slowly and without me realising, my sewing skills have been improving. It’s a happy discovery. I feel so grateful to pattern makers like True Bias who have put so much detail and effort into their patterns which have helped self-taught sewers like me to gain these skills.

There’s nothing like a bit of last-minute sewing to add to the excitement for an upcoming trip. It’s funny how packing for a trip now includes a bit of last-minute makes. I should also mention that all my pants were made in the size 12, shortened by 2 inches for my measurements of 33-inch waist, 40-inch hips and 164cm height.

Thanks for reading and happy sewing!

X Em

True Bias Blair Skirt

A while back, I was part of the testing team for this skirt. I really love the look. It was released for their autumn collection, but I think it looks great all year round. As part of a paid collaboration for Instagram, I was asked if I could make another version of the True Bias Blair Skirt

The skirt comes in three lengths, mini, midi and maxi. I’ve made the midi again because it’s versatile seasonally and I know I’ll reach for it many times. The general design is a skirt that is fitted over the waist and hips which then goes straight down to the hem. It has a front button placket and comes with the option of adding pockets with an inverted pleat, belt loops and a belt. I added all the extras! 

My sizing fell into the Size 12 range with my measurements of 33-inch waist and 40-inch hips and 167cm height. I didn’t feel that I needed to make any modifications. I think that the main watch point for fitting is the hip measurement because there is limited ease in the pattern. It’s true to say that I found the pattern true to size.

Fabric choice is quite straightforward for this pattern. Anything medium to heavy weight woven would be the way to go with the main fabric so I chose a light-coloured denim. This beige denim suits my style, and I wanted this skirt to be a staple in my wardrobe. I love colour and pattern but against a backdrop of something that is neutral. There is a bit of lining fabric needed for inner side of the waistband and the pockets. I used some beautiful scraps from Melco Fabric. It’s worth saving all the scraps from your sewing projects!

My skirt needed nine buttons for the button placket and two for the pockets. I feel I’m making some progress with button installation. I like how the pattern includes a guide for the buttonholes and button placement. It helps to take the guesswork out of the equation. I am tempted to get the button measuring gauge but wonder how useful it is. I’m starting to get quite a collection of useful sewing tools. Unfortunately, my buckles ordered from Amazon have not arrived at this time. When it finally arrives, I’ll be making the matching belt to go with the skirt. I’m quite keen to make my first proper belt!

Sewing the True Bias Blair Skirt was a pleasure. I’ve made many True Bias patterns and so glad I came across their patterns as a novice self-taught sewist. I learn so much from Indi patterns like these. No hiccups but also, I am learning that it’s important to go back and sew the patterns a few times. I feel that I could understand the pattern better and made some decisions of my own for my version. Simple things like using a blind hem stitch for the skirt hem, reversing the instalment of the button placket so I could stitch in the ditch because I preferred to minimise my stitch lines. My next version could be the complete opposite where I use top stitching to highlight all the stitching. The point is, sewing is such a superpower because we can customise what we’re making.

Thanks for reading and happy sewing!

X Em

Full Disclosure: Paid collaboration with True Bias for Instagram but all opinions remain my own.

Darla Jumpsuit 

Featuring Fibers to Fabric Hand-blocked Cambric Cotton 

It was so exciting to receive this beautiful hand-blocked cambric cotton from Fibers to Fabric for a review. The first thing I had to find out was, what was cambric cotton? It’s sometimes known as batiste and it’s a beautifully sheer fabric that’s great for summer. It reminds me of the handkerchiefs my grandmother used to hand embroider. It’s a natural fabric and usually made from either linen or in this case, cotton. It’s popular because it can be dyed easily so it’s perfect for the Fibers to Fabric hand-block.

My first challenge was narrowing down what I was going to make with it. The fabric width is 42” (107 cm) and I had 3 meters. The design of the hand-block was non-directional. I narrowed it down to the True Bias Darla Jumpsuit because I wanted to maximise the use of every square inch of this fabric. With a bit of creative cutting and use of a white muslin for the liner, I managed to cut the maxi with classic bodice version of the Darla. Gloriously, this included the pockets!

To prepare the fabric, I overlocked both cut ends of the fabric before soaking and washing it in cold water. Once out of the wash, I air-dried it then finished with a warm iron. The benefit of cambric cotton over plain cotton is the tighter weave which makes it more resilient with frequent laundering. It’s stands up better to being washed without compromise to the lightness of the fabric.

While my fabric was drying, I gathered my supplies for my Darla Jumpsuit. There are four versions of this pattern. It can actually be sewn as a dress and comes as a maxi or mini. There are two bodice options. One is a tie back or the classic with the invisible zip. I decided on the classic, so I needed an invisible zip. When I was at Spotlight, I also bought the invisible zipper foot. The pattern calls for lining which can be from the same fabric. I used a white muslin and interfacing which was already in my stash. To prepare my machine, I changed my needle to a new size 10/70 needle which is great for lightweight fabrics.

Now, I’m not brave when it comes to cutting straight into “good” fabric with a new pattern. I toiled the Darla bodice with a remnant thin cotton and had to make some adjustments. I recommend this especially since the Darla has a fitted bodice. For my measurements of 35” HB:37.5” FB:33” W:40”H, I made the size 12 and I did have to adjust the bust. It says in the pattern that it is drafted for a C Cup so my measurements would put me between the B Cup and C Cup. The structure of the bust is made from two darts, one from the side (underarm) and one from bottom (under bust). Without going into too much of the math, the dart can be adjusted to be narrower for a smaller cup or wider for a fuller cup. I adjusted the side seam to compensate for the adjustment and I only adjusted the underarm dart. The main message is to toile, and I always adjust on my body and then measure. I’m terrible at doing it the proper way which would be more accurate. I find the Darla pattern true to size.

This hand stamped floral block print was a dream to work with. It’s very stable to sew and easy to handle. I used an overlocker to finish the seams which worked fine. Some finer fabric would need French seams, but the cambric cotton tolerated the overlocking. True Bias instructions and order of construction is excellent. It was a joy to bring together this pattern and the fabric. I just need a bit of sunshine and heat to wear it. Is it okay to book a tropical getaway so you can wear an outfit? Asking for a friend. 

Thanks for reading and happy sewing!

X Em

Full disclosure: Fabric was gifted for a review but all opinions remain my own.

Blair Skirt

Another pattern test under my belt! This time it’s for True Bias and the pattern is the Blair Skirt which is a woven skirt that’s fitted through the waist and hips. It’s also got these cool pockets with inverted pleats. It is fastened by buttons down the centre front and there is an option to make your own belt. I’ve chosen to sew the midi length version but also comes in mini and maxi lengths. 

When I had my first look at the pattern illustration, I pictured a khaki-coloured skirt to match the utilitarian feel of the pockets and belt. However, I found a cotton drill in a beautiful design called, “Warlukurlangu Snake Vine Dreaming”, in earthy red, yellow, and ochre tones. This fabric is a design by Ingrid Napangardi Williams who is from the Northern Territory and who began painting with the Warlukurlangu Artists Aboriginal Corporation, an Aboriginal owned and governed art centre located in Yuendumu, in 1999. I was so drawn to the dynamic forms and the beautiful display of colours. The cotton drill was the perfect medium weight woven being a heavier twill weave for the skirt but still lightweight enough to be worn comfortably.

So, this change in direction with my fabric meant that I had to think carefully about pattern placement. It was important to match the two front panels. The amount of fabric required does increase with pattern matching so I ended up with 2.5 meters of the main fabric. The pattern is quite dynamic and distinct so I decided that stacking the same fabric for pockets, button placket and waistband would make everything “too busy” for the eyes, so I’ve paired the fabric with a plain wine-coloured drill. I used a bit under half a meter of this to make a border with the waistband and button placket, and of course, the pair of matching pockets with those cool inverted pleats.

There were some minor tweaks of the sizing during testing, but I can confidently sew the size 12 again for my measurements of 33-inch waist and 40-inch hips. I would measure your waist and hips in sitting as well, this is something I’ve picked up from working with Cashmerette patterns and I use it when I know that a pattern is close fitting like the Blair Skirt. There is about 1” ease in the pattern.

True Bias instructions are always comprehensive with glossary, printing instructions, fabric layouts, and illustrations to match the steps in the construction. I especially enjoyed installing the button placket. Amazingly, I found the perfect buttons for the skirt. The semi circles remind me of the Aboriginal symbol for a person and the circle of these are symbolic of a campfire. It was a random find but so perfect for the fabric! Love comes in many forms with the skirt from finding the perfect fabric to the design of the skirt. It’s been fun to stretch my sewing skills by participating in another pattern test. Hopefully there will be more to come in the future.

Thanks for reading and happy sewing!

X Em

Lora Dress

Even though we are approaching cold weather here in the Southern Hemisphere, I really appreciate this new dress pattern from True Bias because we are planning a tropical getaway at the end of winter. The Lora Dress from True Bias * is a really flattering empire waist dress and can be sewn in two lengths. I’ve chosen the longer length here but I’m also keen to sew the knee length version. The dress has buttons all the way down the centre front which stops just above the knees. My version of the dress has the spaghetti straps but there is also a full sleeved version. All views are lined at the bodice which have underbust gathers.

Before cutting into my fabric, I toiled the bodice up to the hips because this dress is fitted through the waist and hip area and the bodice should finish snugly under the bust area. My measurements of 35-inch high bust, 37-inch full bust, 33-inch waist and 40-inch hips sat between the size 10 and size 12 on the Size Chart. I was also considering if I needed a small bust adjustment (SBA) as the cup size for the dress is a C-Cup which is a three-inch difference between the high bust and full bust. I ended up adjusting the bodice from a size 10 to a size 12 waist/skirt and shortened the spaghetti straps by 1 inch. I didn’t end up with an SBA as I felt the cups sat comfortably.

The pattern recommends light to medium woven fabric. I was grateful to be able to have a good chat to Kelli who is the lovely Director of True Bias. We discussed how the gathers of the underbust meant that the fabric would need to be lightweight like under 5oz, but it was also good to choose a fabric that had some structure like a linen or cotton. If choosing a rayon, then the dress lining would need to have some stabilising qualities like a cotton lawn as rayon can “grow” and stretch out. I had wondered about Tencel twill as well especially for the sleeved version but thought that Tencel can be quite thick and heavy which might affect the gathers. In the end, I found the perfect Hand-block/Batik Fabric which is lightweight. It’s 100 percent cotton which will be so breathable and easy to wear in hot weather. I’ve chosen to line the bodice with white muslin fabric which will not interrupt any of the gathers under the bust.

This pattern also calls for 12 shank buttons as there are twelve loop buttons along the centre front. I had made buttons before in a previous project, so I was keen to try again. In my previous attempt, I had a very easy “press-in” technique version, but I was disappointed that the cap kept falling off whenever I used the buttons so this time, I searched for a better kit to use. I found a “sewn-in” kit which I would highly recommend because the caps stay firmly in place once made. Of course, there are shank buttons that have been listed on the True Bias website or you can also use normal buttons which have been covered in a tutorial by True Bias.

I have sewn quite a few patterns from True Bias and the instructions are always logical and easy to follow. I also find that the techniques are educational, and I often refer back to True Bias patterns. Sewing and construction went very smoothly. I especially loved sewing the button loops and I also loved constructing the bodice and found it very satisfying to hand sew the bodice lining. It’s all the details that really make the pattern so unique.

Counting down now to enjoying this dress in the tropics! 

Thanks for reading and happy sewing!

X Em

*Full Disclosure, this was a Paid Collaboration for Instagram Posts with True Bias Patterns but all opinions remain my own. There was no expectation to write a Blog Post.

Mave Skirt

Sewing the Mave Skirt from True Bias is on my 2023 Make Nine Plans. I’ve never been able to sew everything on my Make Nine list but I’m quite hopeful on achieving it this year as I check another make off my list! The Mave Skirt is an elastic waist skirt with lots of options. I’ve sewn the maxi, three-tiered ruffle version. 

With the seasons changing, the maxi skirt is such an easy item to wear when the weather is still so unpredictably hot or cool. I find it to be a good piece in the wardrobe for the autumn or spring months. I used to avoid maxi skirts because I felt it made me look too frumpy, but I think there is a general rule for avoiding that and that is the rule of thirds. Because the skirt is so long, it’s a good idea to wear it with a top that is shorter like a crop top or something that can be tucked in. I feel that this has made it work for my proportions.

The Mave Skirt Pattern is made for woven fabrics. I’ve made a fuller version using broderie anglaise fabric which I fully lined. The instructions for adding the lining are also included in the pattern. This pattern can be sewn in no less that eight versions! Basically, once you have this pattern, there is no need to buy any other elastic skirt pattern. 

I made the size 12 for my measurements of 33-inch waist and 41-inch hips (seated). There is obviously a lot of ease in the fit of the hips, so I mainly used my waist measurements to pick the right size. The construction was easy and very beginner friendly. Sometimes sewing something simple is exactly what you need for a relaxing sew. True Bias patterns always come with comprehensive instruction and illustrations. You never have to puzzle over the instructions.

I should mention that the elasticised waistband was a bit challenging for me. Not the fault of the pattern but my own skill levels. The waistband had to be stitched at regular intervals in four lines to even out the gathers and flatten the waistband. I had traced the lines for these elongated stitches, but I wish I had just used my machines seam guides. I think I would have achieved much straighter lines. It’s probably not anything anyone would notice unless I bother to tell them and it’s a detail I’ll soon forget as I enjoy wearing my lovely maxi skirt.

Thanks for reading and happy sewing!

X Em

Marlo Sweater

My daughter and I fell in love with the Marlo Sweater by True Bias at first sight. I always find it amusing that to my daughter’s generation, the 90s are regarded as “retro” which of course it is now but the 90s are still so fresh in my mind and the years of my youth! This pattern paired with the argyle patterned fabric that I found conjures images of the outfits that Cher Horowitz wears in the movie, “Clueless”. I love the bond that my daughter and I have formed over sewing. My daughter’s textile course in her final years of school was the catalyst to my sewing obsession. 

So, back to the Marlo Sweater, I decided to make the cropped version. My daughter was happy with a very oversized sweater, so I made it to my sizing which was the size 8.  My closet is often raided by her so it’s understood between us that my sweater will eventually be worn by her. Hence, why she is modelling it as well.

The instructions for construction were very comprehensive and easy to follow. I’ve sewn True Bias a few times now and the patterns are always well thought out and logical. Everything went smoothly. I started by pattern matching the argyle pattern of the fabric. To match the fabric, I had to cut the pattern piece individually instead of two paired pieces. 

The next step was to cut the ribbing. The width that the black ribbing came in did not allow me to cut the bottom ribbing piece in one length. Instead, I cut one length for the back then two equal pieces for the front. These three pieces were sewn together before attaching to the body of the sweater.

My second-hand overlocker has been the best bargain buy of my sewing journey. It’s been such a worthy investment. It allows me to sew directly onto knit fabric without having to zig-zag sew on a sewing machine. This makes it so fast to put together a knitted outfit.

My real challenge (and the one that stalled this project) was the installation of buttonholes. There is a piece of interfacing that is already attached to the inner side of the front ribbing however, when I attempted to sew a buttonhole on a tester piece, the ribbing kept getting caught in the teeth of the machine. This meant that the fabric could not move forward. It was a test to my patience as well as my sewing skills.

After a couple of days of frustration, it occurred to me that the brain bank on Instagram could help me, and they did come to the rescue! The consensus was to line the back and if needed, the front of the ribbing with tear away interfacing or freezer paper. I promptly tested it and it does work well. However, after consulting my daughter, she said she preferred it without the buttons so after all that, I have left the buttons off.

I’ll definitely be making Version B which is the longer cardigan with patch pockets. My preference will be to put buttons on that!

Thanks for reading and happy sewing!

X Em

Roscoe Dress

It is traditional to wear red to the family reunion dinner when celebrating the Lunar New Year. Red is considered a lucky colour, so I was excited when Maai Design started to stock Storrs London Fabric, and I came across the Hermia design in red. I love the big flowers drawn across a background of red with pops of highlighter blue-green and hot pink leaves. I knew it would match well with a boho inspired style dress which immediately brought to my mind the Roscoe Dress from True Bias. The dress has a gathered neckline with raglan sleeves. It also has a centre slit with neck ties. It’s truly such a pretty design. On the practical side, it’s lovely and cool to wear in summer when matched with the Hermia Storrs London fabric. The superfine 100% Egyptian cotton is billowy, loose, and cool to wear.

I made the size 8 for my measurements of 37-inch bust, 33-inch waist and 38-inch hips. Bohemian dresses are loose and made with freedom of movement in mind. The finished dress for my size was 48 inches around the chest which gives you some idea of the ease in the fit. There are three versions of the pattern, the first is a blouse which I’ll definitely be returning to sew, a tunic or short dress version and a midi version. I chose the short version which still falls just above my knees. I’m 5 foot 7, to give you some idea about the length of the dress.

Construction was very easy which was a relief because I was sewing to a deadline. The date of the Lunar New Year changes each year according to the cycles of the moon. It came around a lot earlier this year. The sewing went well, and it was a relief that it was so beginner friendly. I love to be challenged with my sewing but now was not the time! 

No modifications were needed however, initially I had made the bottom ruffle pieces slightly longer thinking that I wanted to cover my knees. I found myself shortening them to the original length promptly. It was only an inch and a half but it really threw off the balance of the design. It was interesting that such a small detail could detract from the beauty of a design. I guess that’s why they say that, “…the devil is in the details”.

Nothing much more to add except that it felt special to wear a dress that I had made and it was a great hit. I think I mentioned on my Instagram Post that I need to hide this next time my mum comes over or I might be missing a dress. It was lovely and cool to wear and sewing it with such special fabric elevated the dress from casual to special occasion wear.

Thanks for reading and happy sewing!

X Em