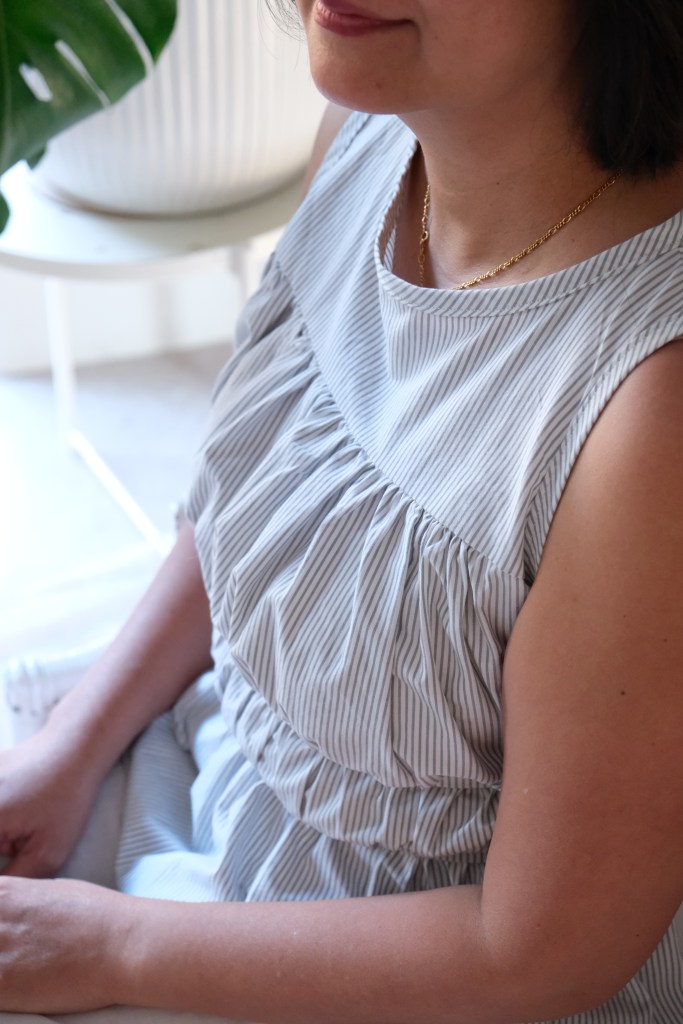
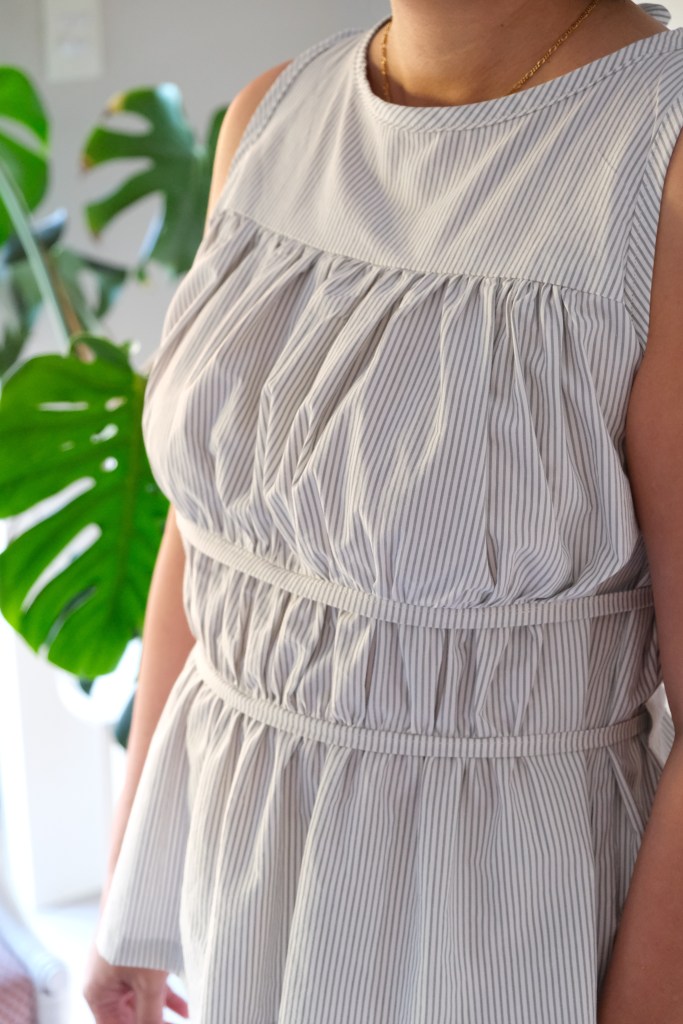
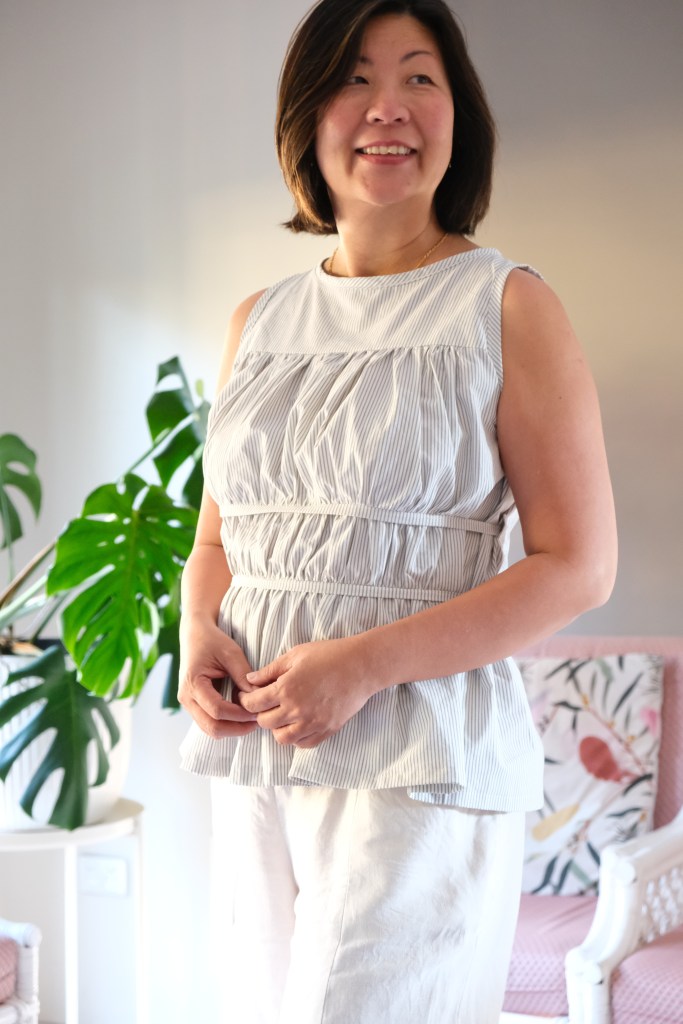
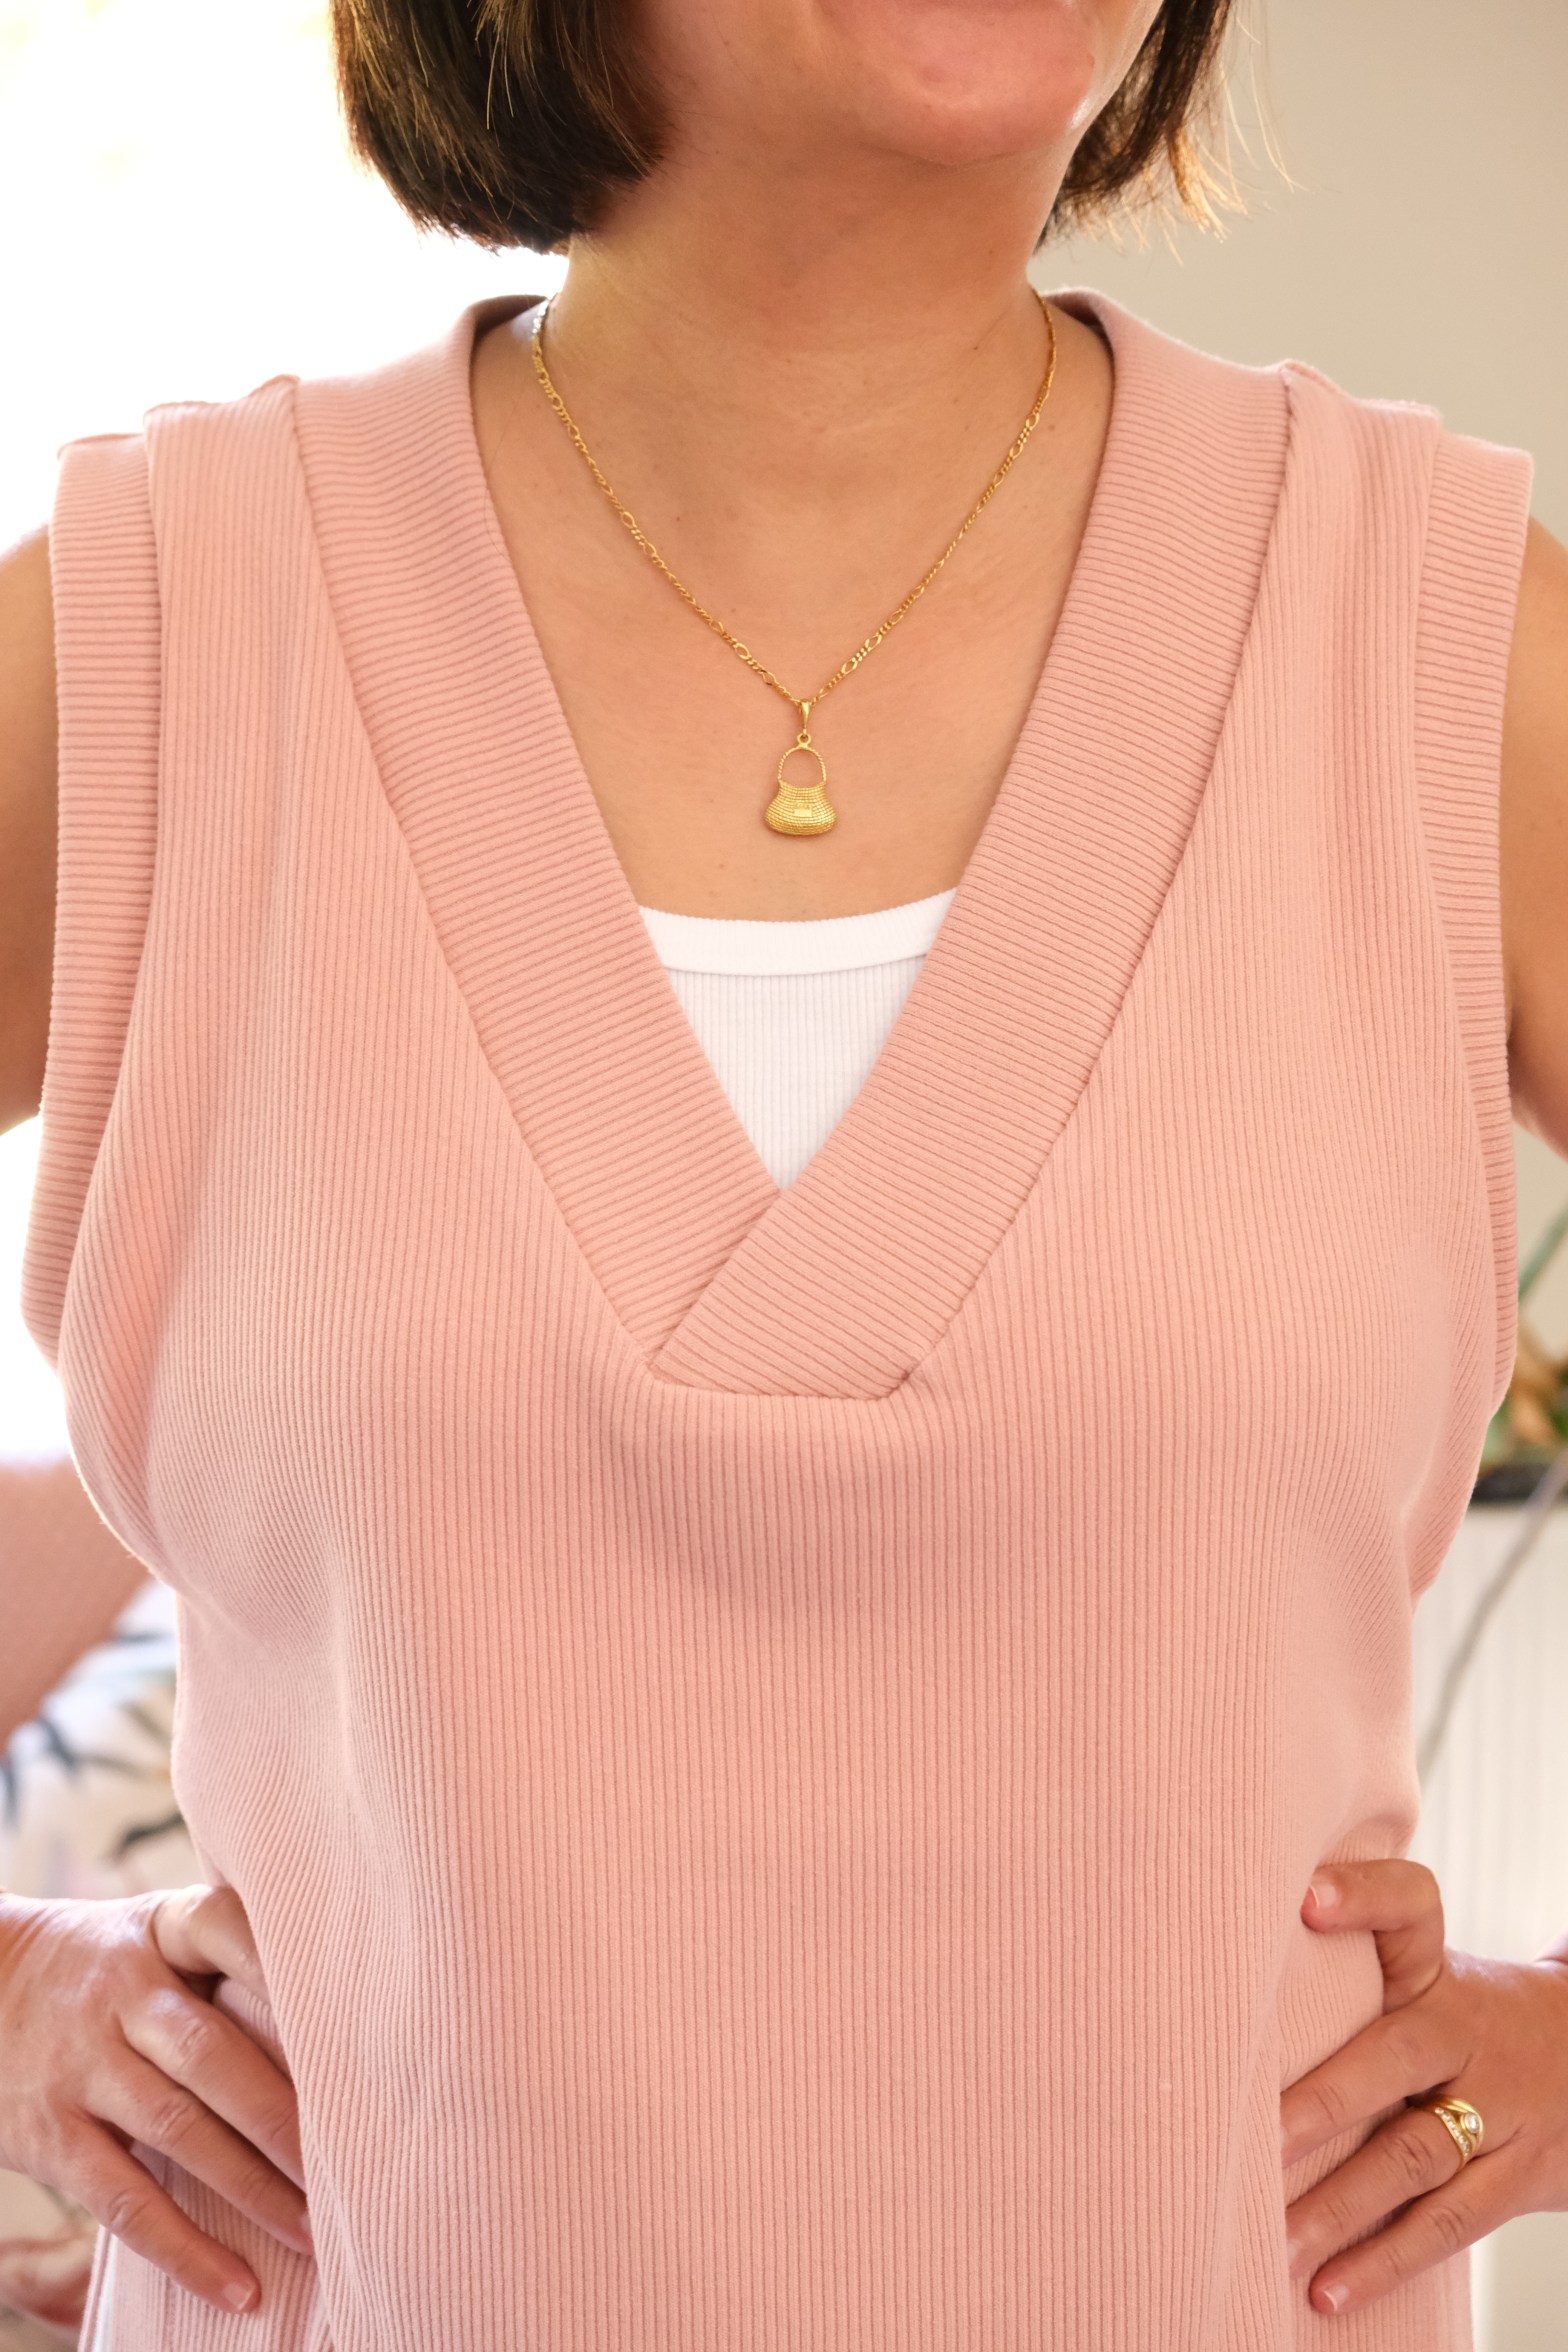
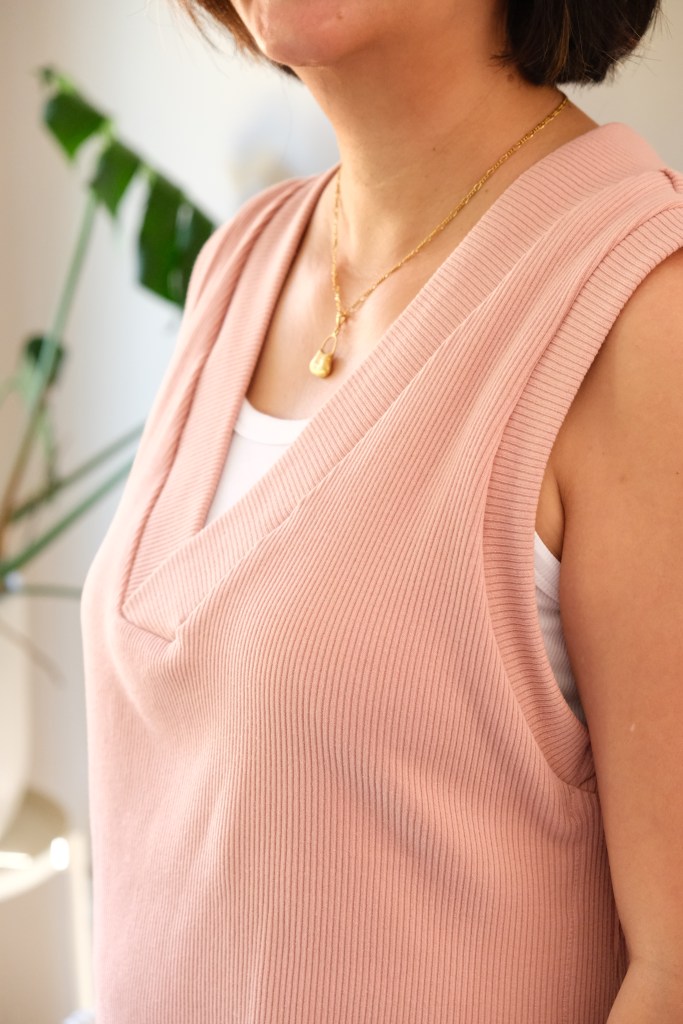
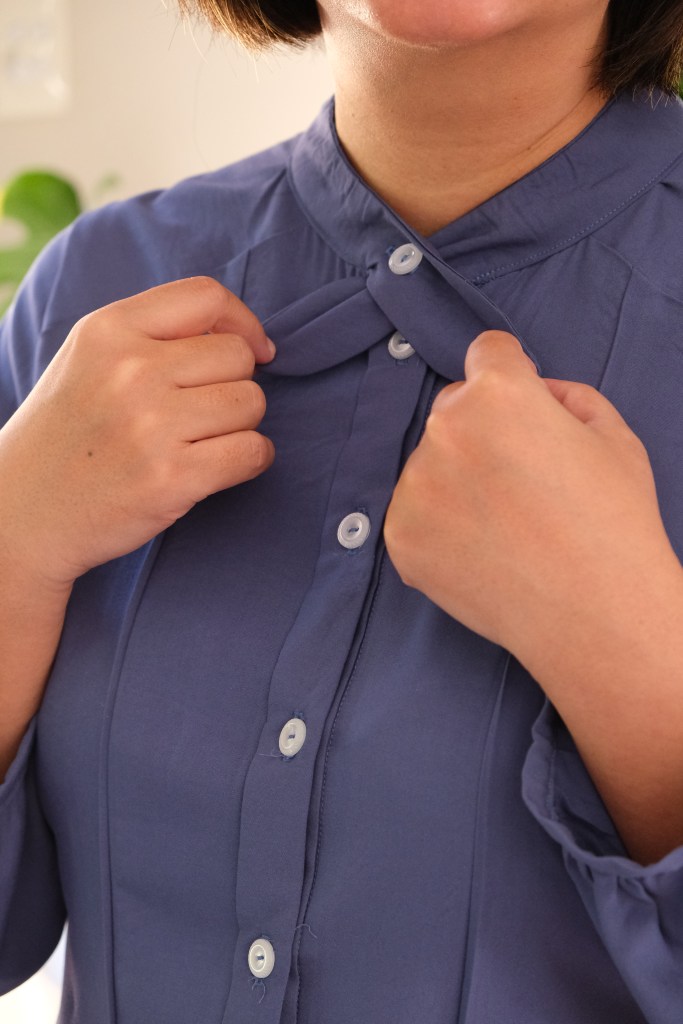
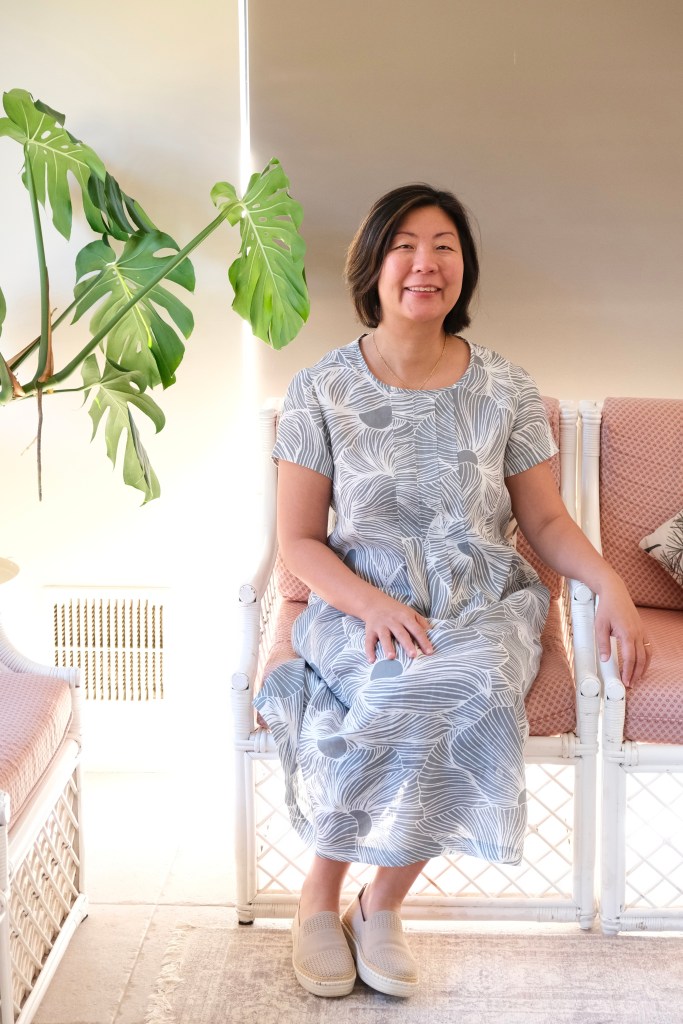
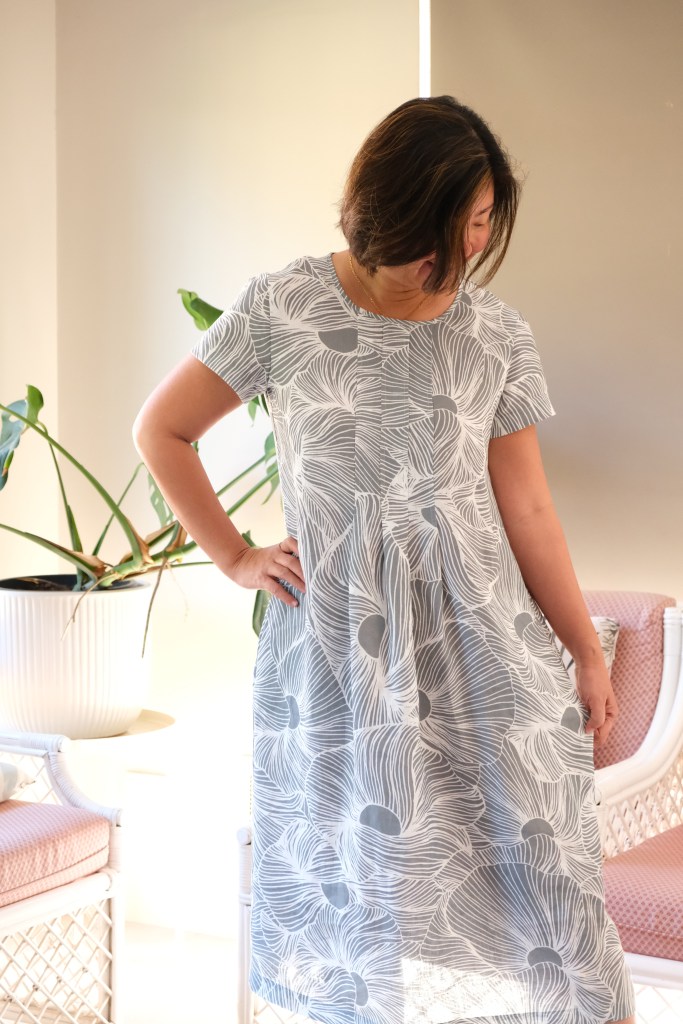
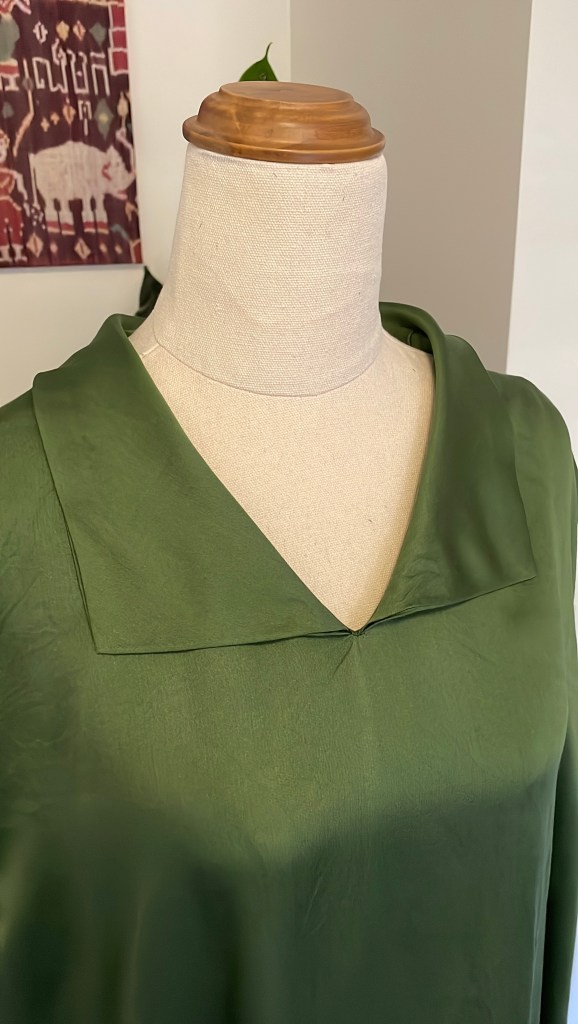
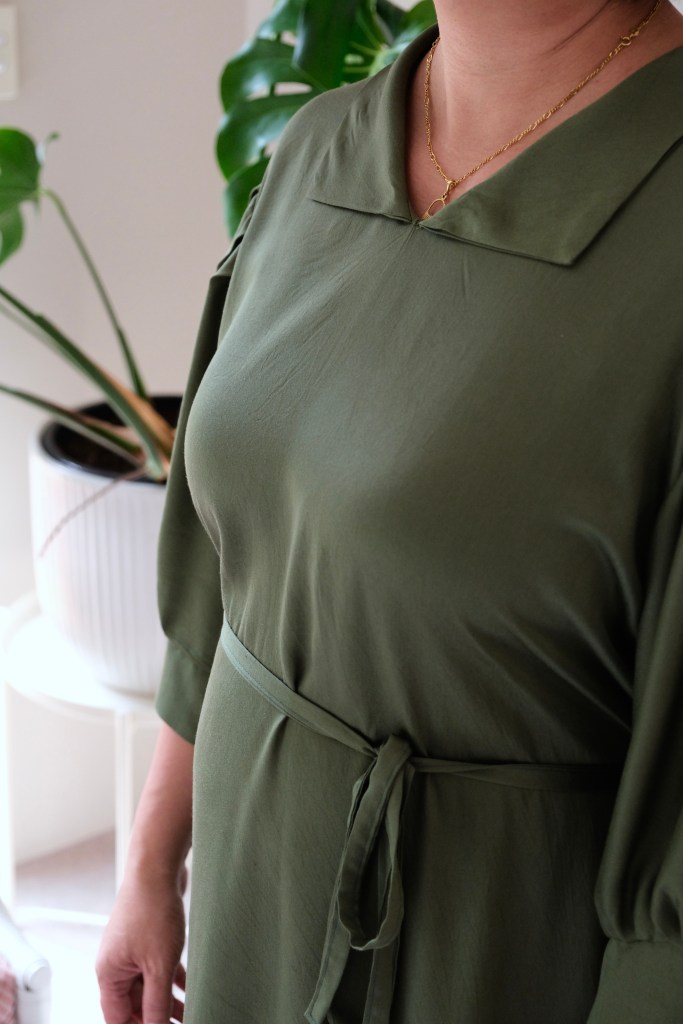
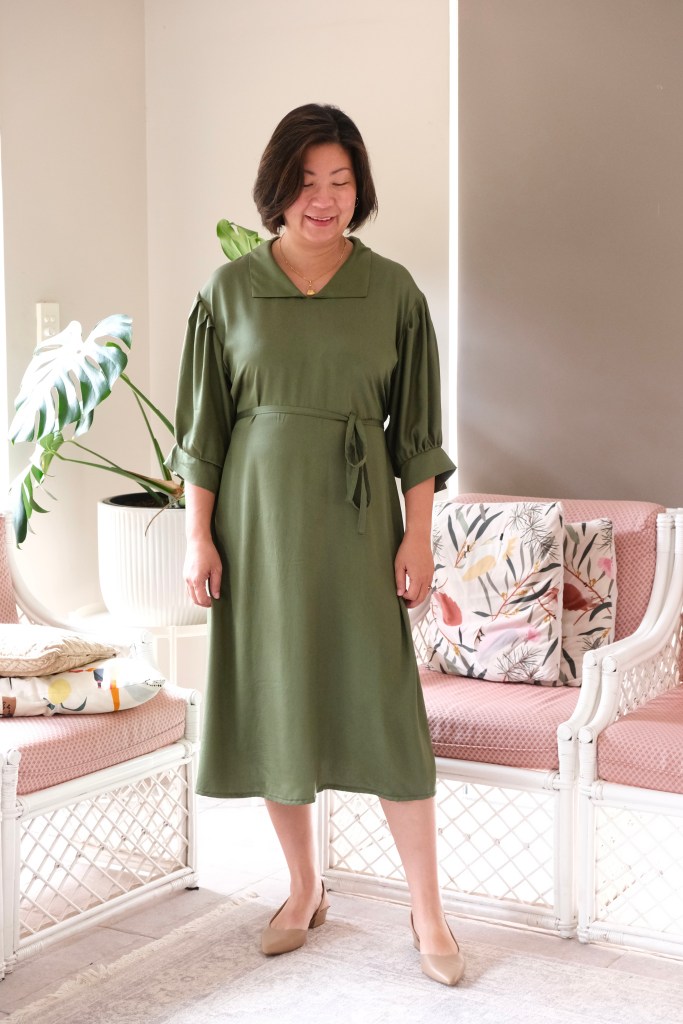
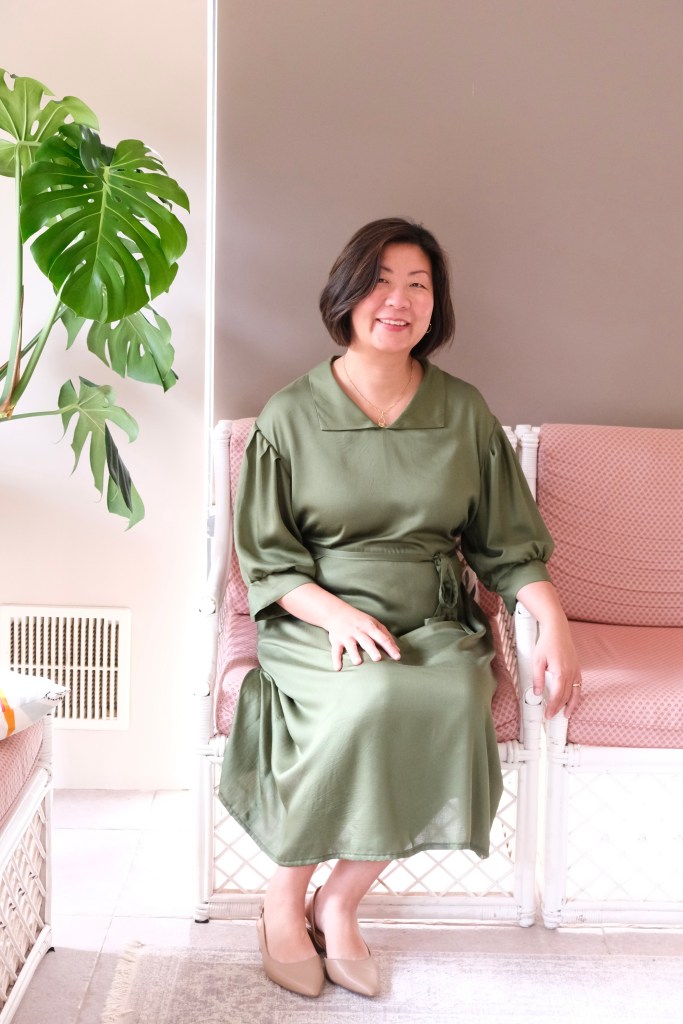
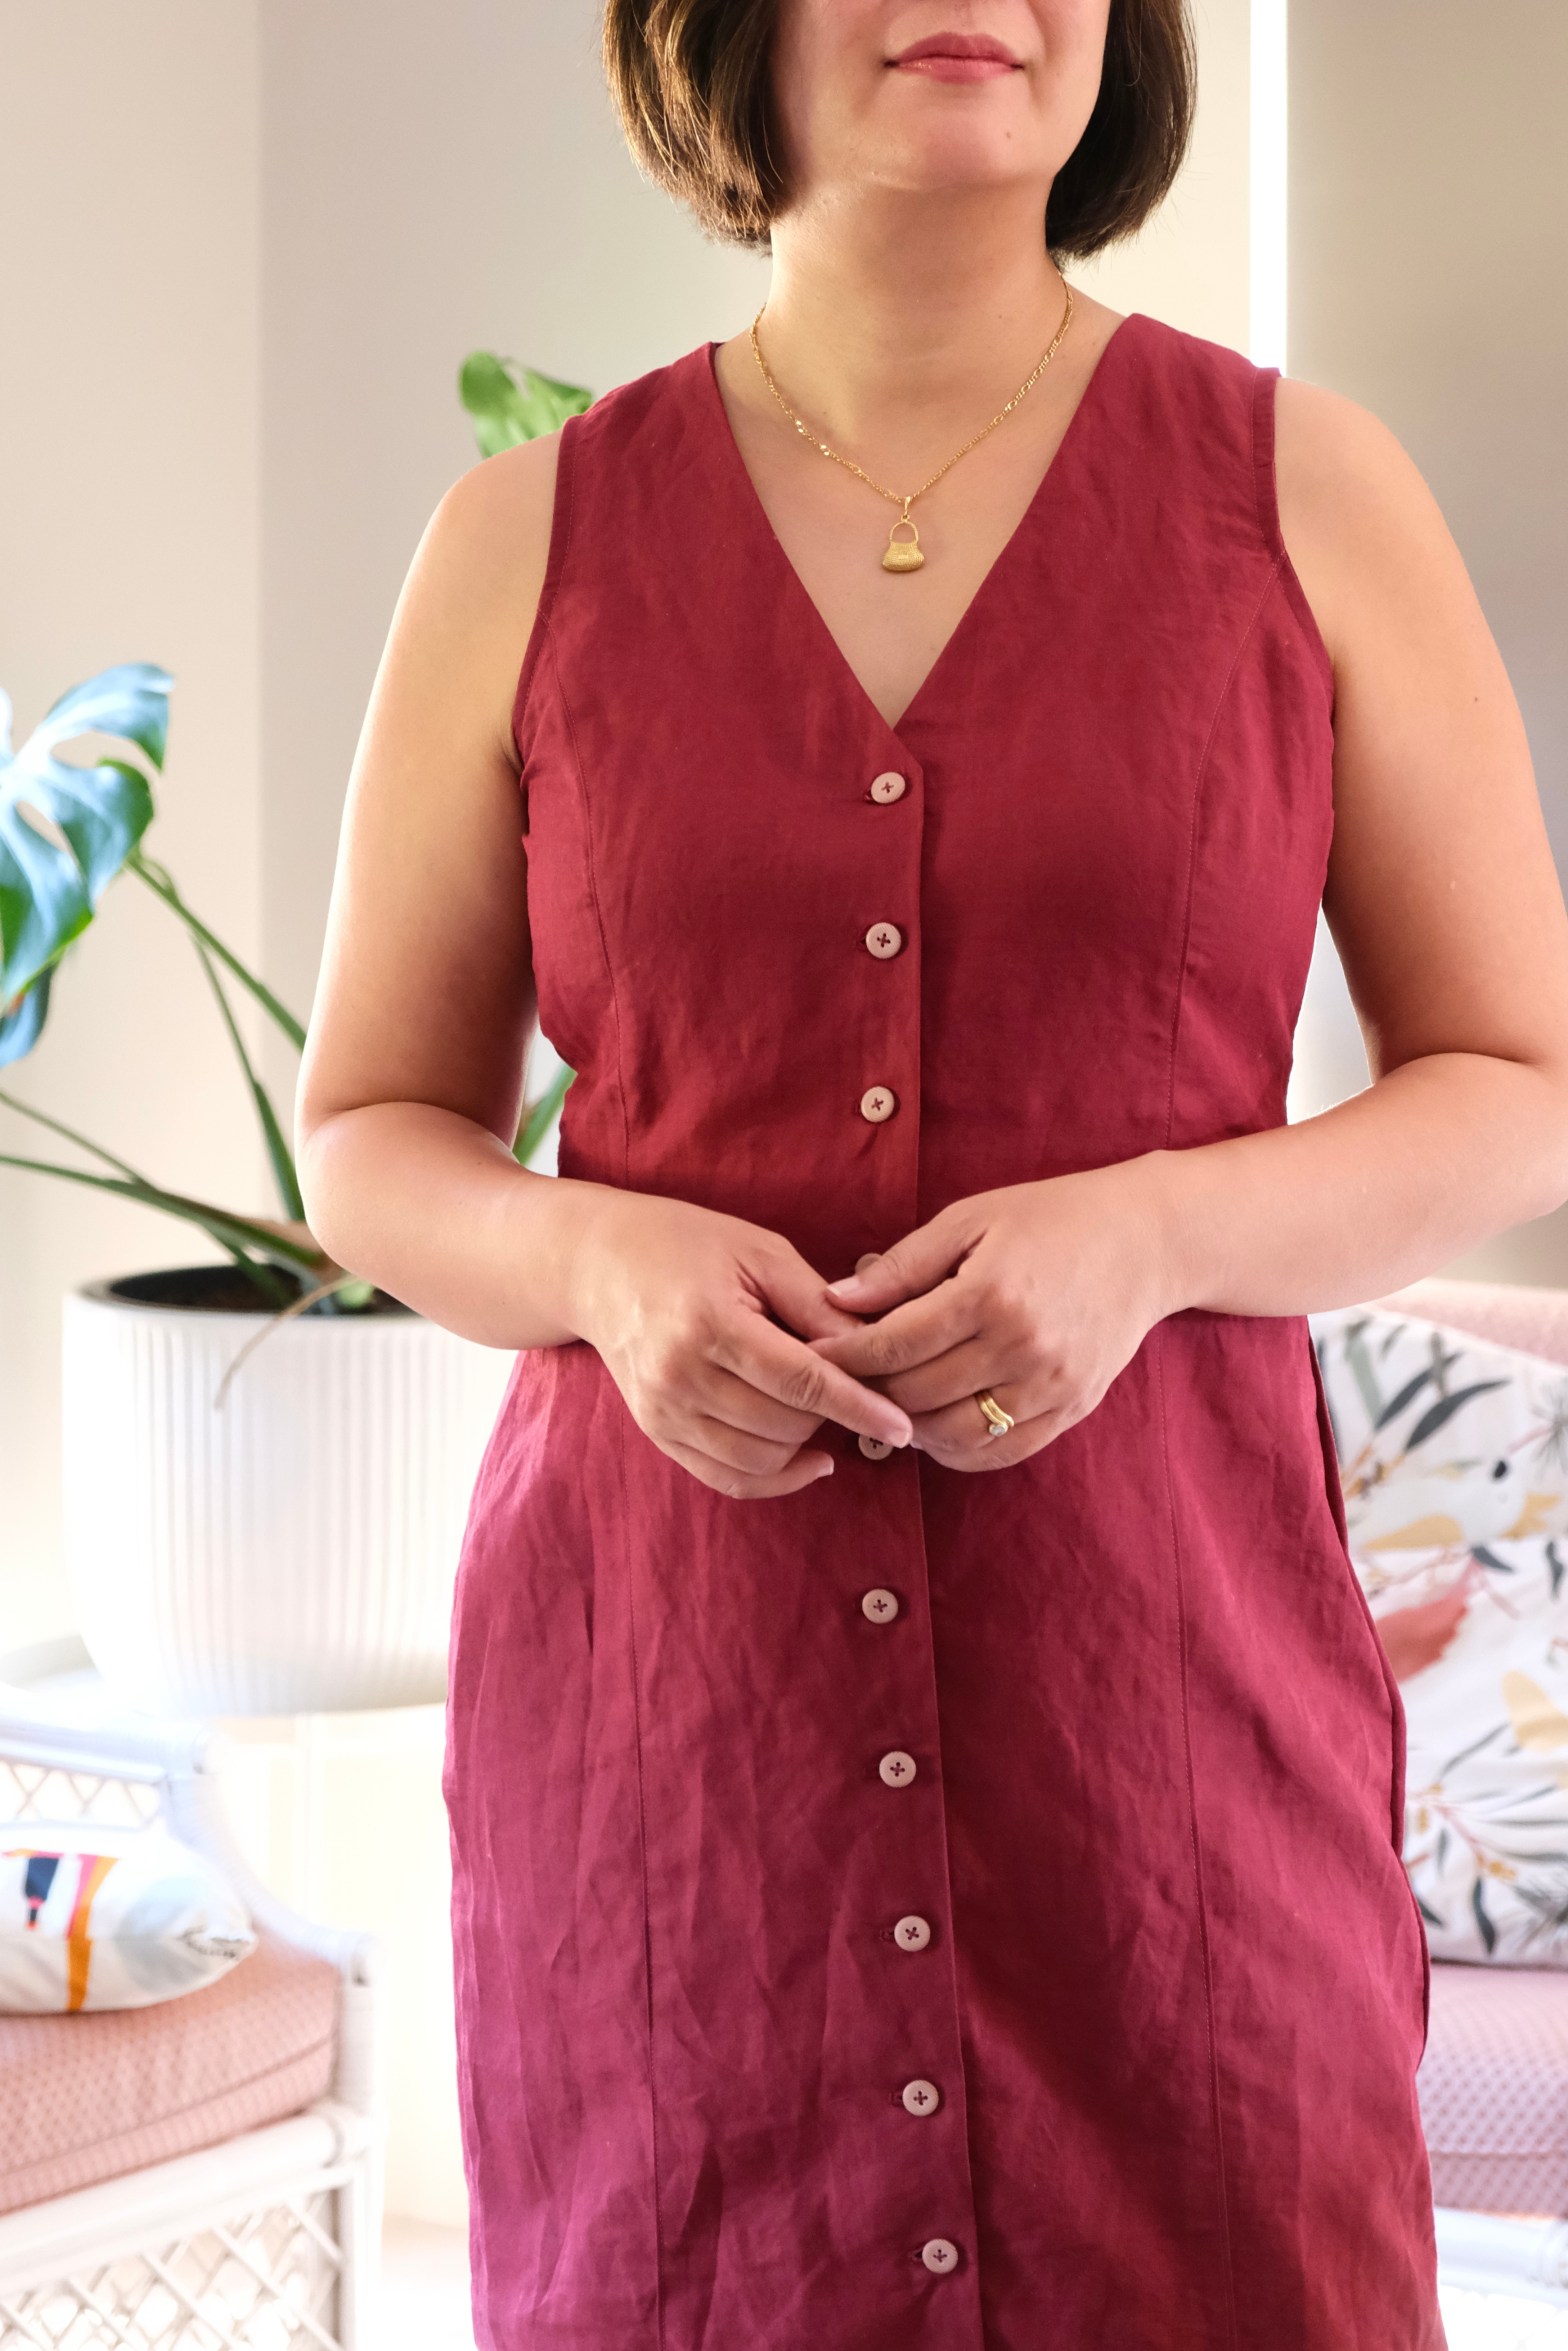
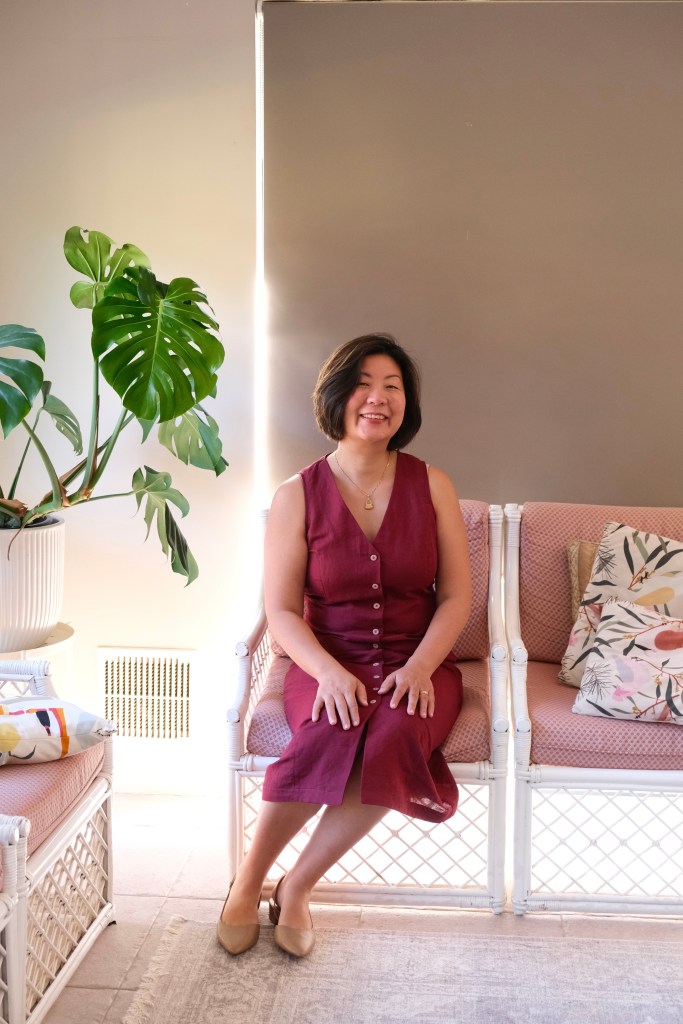
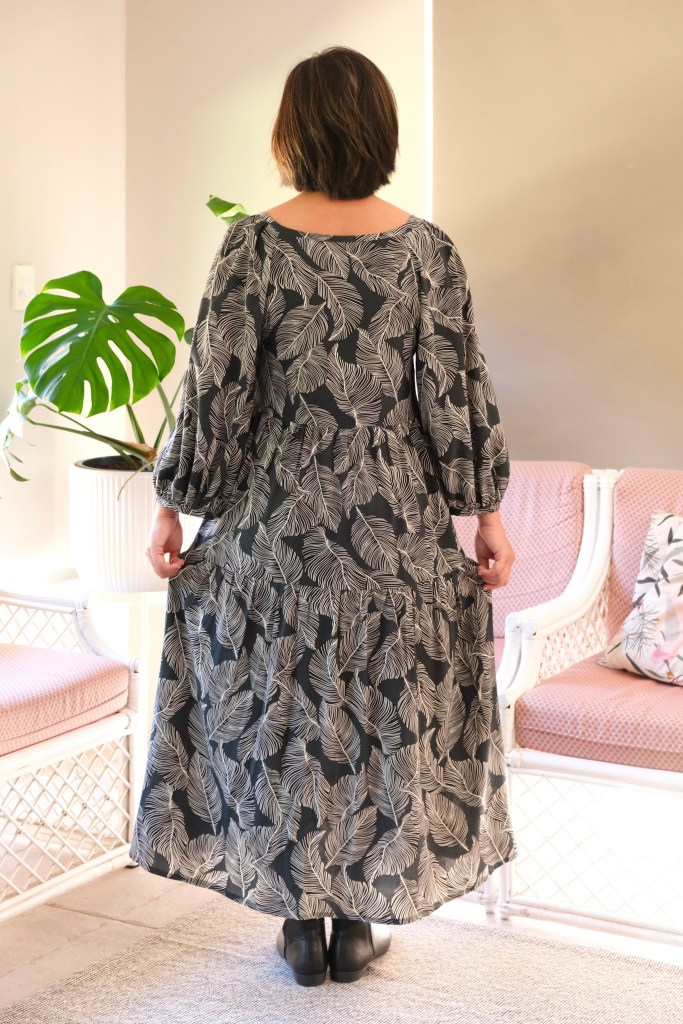
So excited to get into the testing pool for the newly released Swimstyle Patterns Paloma Top. I just loved the unique style and design immediately. The top features two ties that are sewn down at the front and are threaded through the back. These ties can be left loose, or they can be used to cinch in under the bust and waist to feature a peplum. It also features a yoke and gathering with biased binding to finish the neckline and arm openings.
This pattern is designed for woven fabric. I used a medium weight cotton that I extracted from an old doona cover. It was nice how the cotton gave it some structure but in my next version, I would use a lighter weight fabric. I have thrifted some old Saris and would been keen to experiment with that. The Saris are made from georgette fabric so it would be super lightweight and drapey. This version is my tester version so it’s not perfect but I was so excited to share it.
My sizing is always consistent with Swimstyle Patterns. My measurements of 38-inch bust, 33-inch waist and 40-inch hips sat within the Size L so that is what I tested. It was pretty much spot on. There was one adjustment that all the testers agreed on, and it was quickly adjusted and remedied. Apart from that, I didn’t find any other adjustments were needed.
There was some suggestion of making a dress version of this top which I had thought of when I was making it. I think this would make such a pretty dress! I have matched this top with quite a few items already in my closet, so I know that I’ll be getting a lot of wear out of it.
I’ve been so lucky to test quite a few patterns this year. It’s an enjoyable process to help in a small way, bring a pattern to life. Testing for Swimstyle was enjoyable and stress free. I liked the testing period, and the Facebook group was helpful and communication was orderly. Looking forward to making the Paloma Top again.
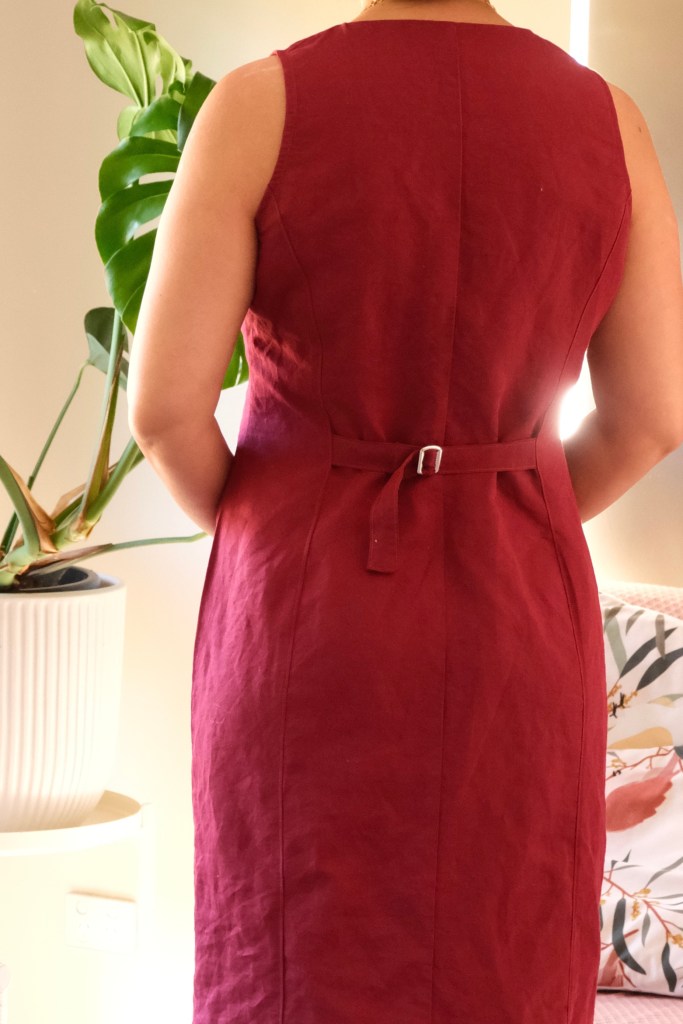
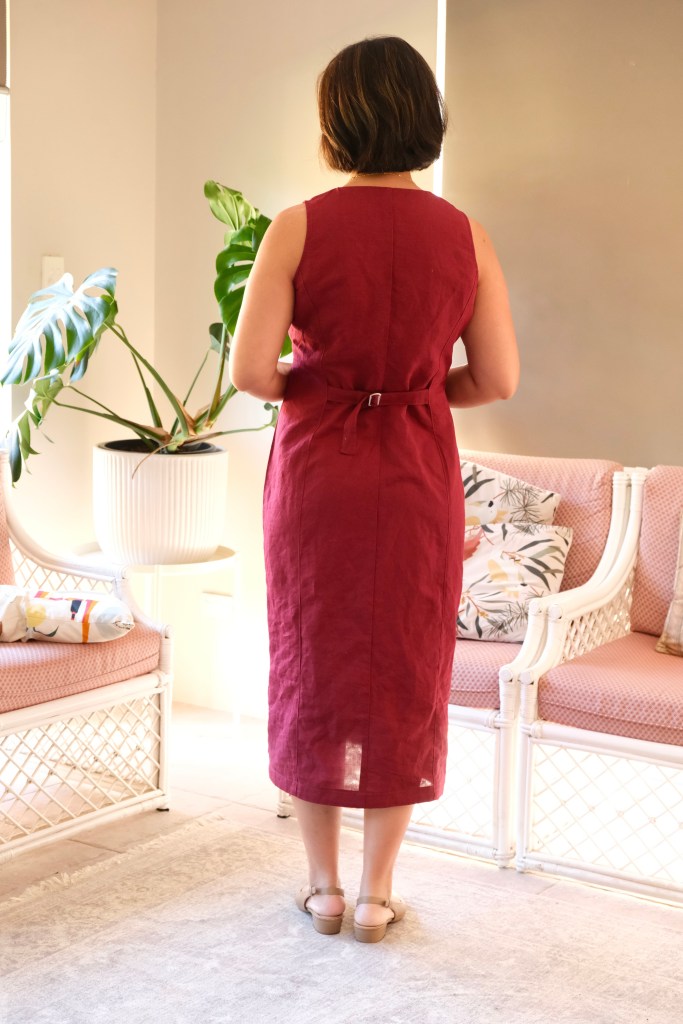
The La Ciotat Skirt stands out as a unique wrap skirt design, offering both style and practicality. Unlike standard wrap skirts, this one features a double front wrap, eliminating any concerns about wardrobe malfunctions. The addition of a flattering waist panel contributes to its elegant silhouette, and the two ties ensure that the skirt stays securely in place.
After purchasing the pattern, I spent some time searching for the perfect fabric. Eventually, I realised that the ideal choice was already in my fabric stash: two and a half metres of Tencel fabric adorned with a Christie Williams print. This fabric had been with me for about three years, cherished for its beautiful colours and its reflection of the distinctive Australian landscape. This project finally provided the perfect opportunity to use it.
Christie Williams Design Tencel
The La Ciotat Skirt pattern is comprised of rectangles for the main body and curved pieces for the waist panel. It offers flexibility, allowing sewists to either print the pattern or cut pieces directly from the measurements provided. I selected size L, which suited my measurements of a 33-inch waist and 40-inch hips. The finished skirt ends just at the top of my ankles, which I find to be a flattering length. I did not need to make any modifications to the pattern.
This pattern is straightforward to sew, featuring pieces that fit together logically and a flexible skirt style that eliminates the need for a toile. Beginners will find Sewing Therapy’s YouTube tutorials especially helpful, while the written instructions are clear and beneficial for more experienced sewists. I personally enjoy watching Sara’s videos while sewing; her teaching style is both relaxing and informative.
Every time I work with a Sewing Therapy pattern or watch one of Sara’s videos, I pick up a new tip or technique. For this project, I tried her suggested method for creating gathers. Rather than using the traditional double line of long stitches, I increased the stitch length and tension, as advised. This approach produced beautiful gathers, but I would recommend leaving very long thread tails for adjustments. I nearly ran out of thread tail, but fortunately, it all worked out in the end.
My spring–summer handmade wardrobe is growing, and I’m becoming more confident in my creations. I’m looking forward to wearing my skirt on windy days and sunny days! I’m so excited to be getting around to using some of my “good” fabric.
Some patterns I sew are real skill builders and the Viola Vest is one of these. I have a few things to work out with this pattern, and I considered not sharing until I made a version that I was one hundred percent happy with, but this blog has always been a journal for my sewing whether successful or not. I decided that I should jot a few notes down and come back to it.
Swimstyle Patterns has been my go-to for elegant, elevated core wardrobe items. The Viola Vest is drafted for knit fabric and has a wide V-Neck with angled, overlapped side seams. It has an oversized relaxed fit. I bought this for that relaxed oversized look.
My measurements of 38-inch bust, 33-inch waist and 40-inch hips fit into the L size range so that was the pattern size that I cut. Generally, this was great. I like how the pattern also included how to choose the right fabric with what stretch and recovery was needed. I found a ribbed knit that was suitable, but I didn’t consider how bulky the ribbed knit would get. I do have a very basic home sewing machine which might have also affected my ability to deal with the bulkiness of my fabric.
The part I thought I would struggle with was the V-Neck. It actually worked very well and was easy with the excellent instructions provided. I felt that I skilled up by sewing this neckline. The part that I couldn’t work with was the angled and overlapped side seam. The side seams are neatly folded and finished before being angled to sew together about 4 layers. The folded seams provided a great finish to the vest. However, with 4 layers, I had problems getting the angle and the bulk made it hard to stitch the seam as instructed. In the end, I had to sew it with a straight stitch.
Another thing is the hem which is sewn and prepared all in one before joining the side seams. The bottom is a bit wavy so I must have pulled the fabric a bit when sewing. I’m a bit of a perfectionist and I considered unpicking and retaking the photos but I decided to leave it and try again with another fabric. I need to give myself more grace when it comes to my sewing.
So, I’m not sure if the armhole sits too low because of my modified stitching or whether this was part of the design. I need to find slightly thinner fabric to make it again but I’m not sure if I should size down. This is why I like stalking a pattern on Instagram because it’s handy to see items on other people (regardless of size).
I would have always worn this vest with a shirt or tank top underneath anyway, so I still feel this is a good addition to my closet. I’ll be trying to find another knit for this vest because I love the look so much.
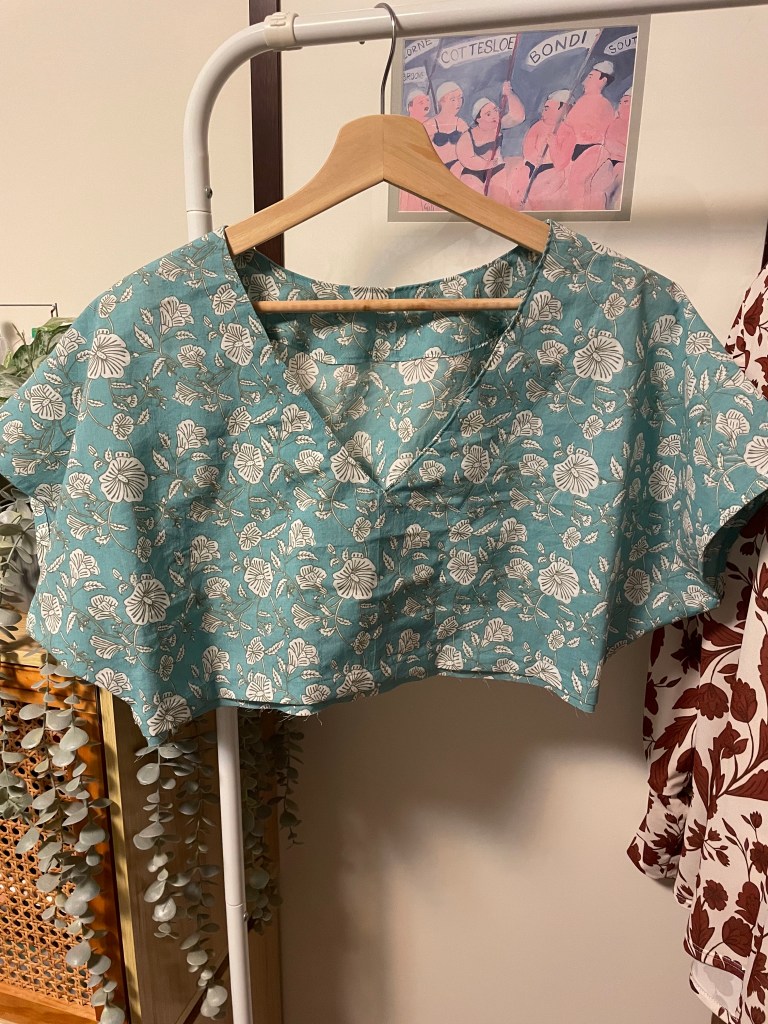
Earlier this year, I entered The Cloth Edit sewing challenge called Sew April Blouse, and I won a PDF pattern from Monsterfabriken. I was so excited to win the pattern amongst all the beautiful entries and was also excited to discover a new designer. The thing I admire most about Monsterfabriken is their philosophy of making their sizing adjustable to ensure that once sewn, those garments will last therefore helping to reduce clothing waste.
My entry for Sew April Blouse
It was hard to choose a pattern from their beautiful library of patterns but in the end, I settled on the Vanja Dress which is a V-neck dress or top. It has an adjustable waist with ties, or it can also be sewn with a wide belt. I made the dress version which stops at mid-calf. There are slits on the side and of course, pockets! I jumped straight into the dress version, but I do love patterns that include a version that can be toiled. I didn’t make a toile because I thought that the sizing system was so good.
Talking about the sizing system, here is where Monsterfabriken is unique. Instead of the traditional sizing system which can vary from brand to brand, they base their sizing on primary measurements of the body. The tops are then based on the chest measurements, and the bottoms are based on the hip measurements. All the other measurements are secondary. It’s all very comprehensive and in the end, you’ll end up with a garment that fits the way you want it to. Once all the measurements are done, it’s an easy process to print the only size you need and there is an option to include seamlines. I chose to print without because I have confused myself before when it was an option and ended up cutting the wrong lines.
I did hesitate a little when I had finished sewing the bodice. It was fine once I had attached the skirt and does fall at the natural waistline. This always seems to be the point where I worry the most when I’m sewing something new.
The fabric is drafted for woven fabric. I had a Jamuna vegetable dyed handblocked cotton from Spotlight which was perfect for this dress. It’s beautifully lightweight and it’s great for hot weather. I am drawn towards the cooler colours for summer with blues, greens and whites. I’ve have found picking colours for the season helpful when putting together my sewing plans.
The Vanja sewing instructions were fantastic and the illustrations also helpful. It’s important to note that Monsterfabriken is a Swedish company and I was using the English translated instructions. The layout of the instructions is logical and excellent. I also downloaded the extra instructions which you’re given a passcode for however, I didn’t need to use them because the instructions that came with the pattern bundle was sufficient.
Neck FacingBodiceTies
There was one point of the instructions that did confuse me. It was in the construction of the slit. I wondered if the original pattern might have had a seam allowance of 2cm but was changed to 1cm without changing the instructions. In the end, it was easy to modify. I just continued the overlocking down the side seam. This was then turned twice to finish the slit.
I love the design of the Vanja Dress. In this version, I made matching ties for the dress. I would love to make the wide belt version and have contrasting fabric for the neckline and hem. The best past is knowing that any small size changes will be easily accommodated because of the clever design by Monsterfabriken.
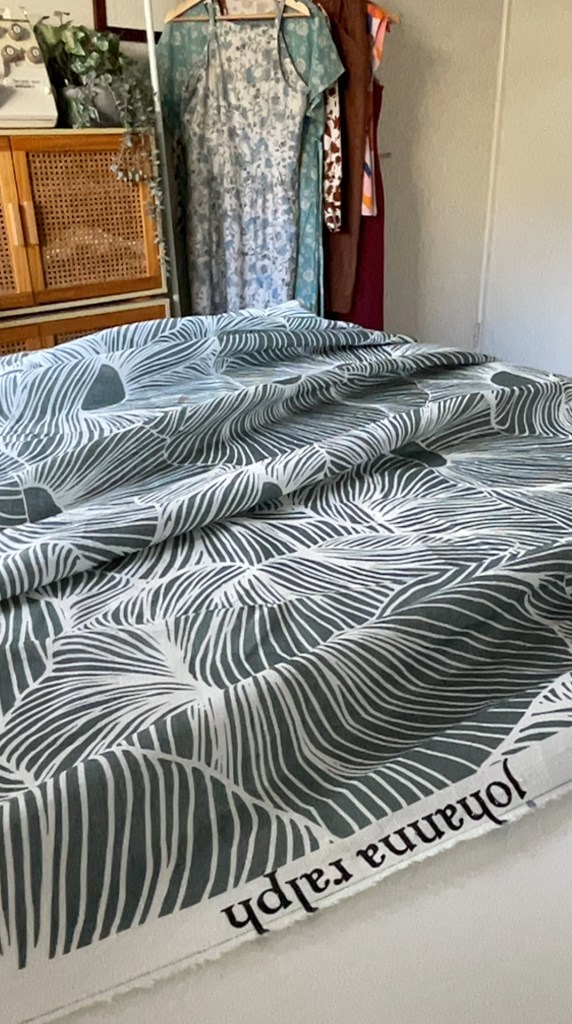
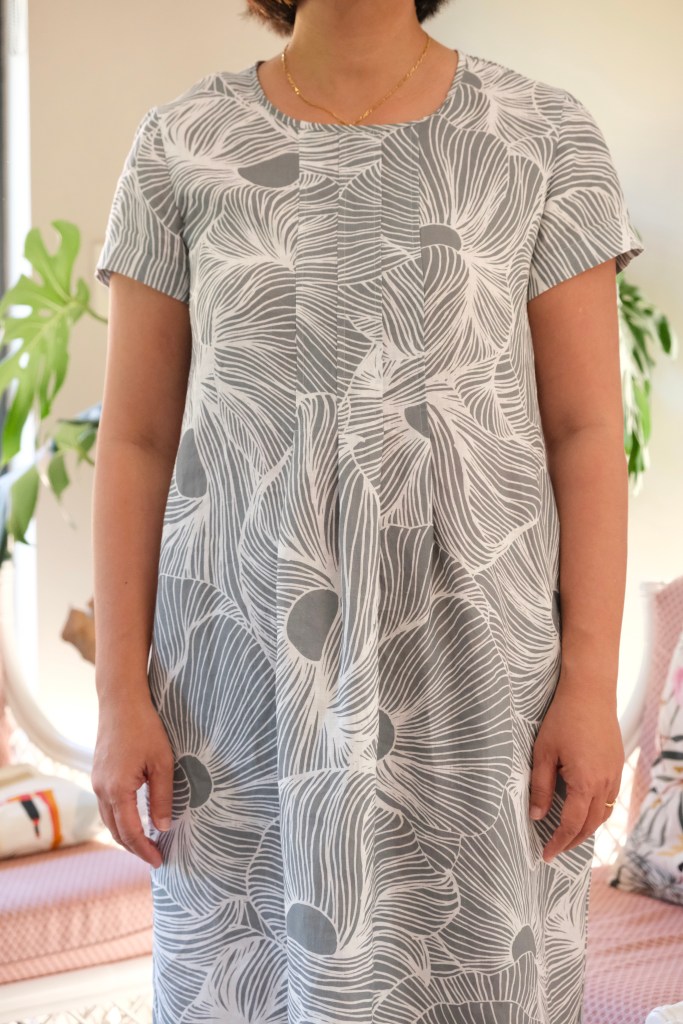
Maaidesign is launching a new fabric brand called Johanna Ralph* and I was super excited to receive a preview of the Silent Bloom print. It’s a beautiful abstract graphic married with elegance. I chose to preview the linen, but the print comes in other substrates. When this luxurious linen arrived, quite a few patterns sprang to mind. I settled on the Milenda Dress because I thought that the linen would feature the linen beautifully. Linen is great for items needing structure.
Silent Bloom – Johanna Ralph Collection
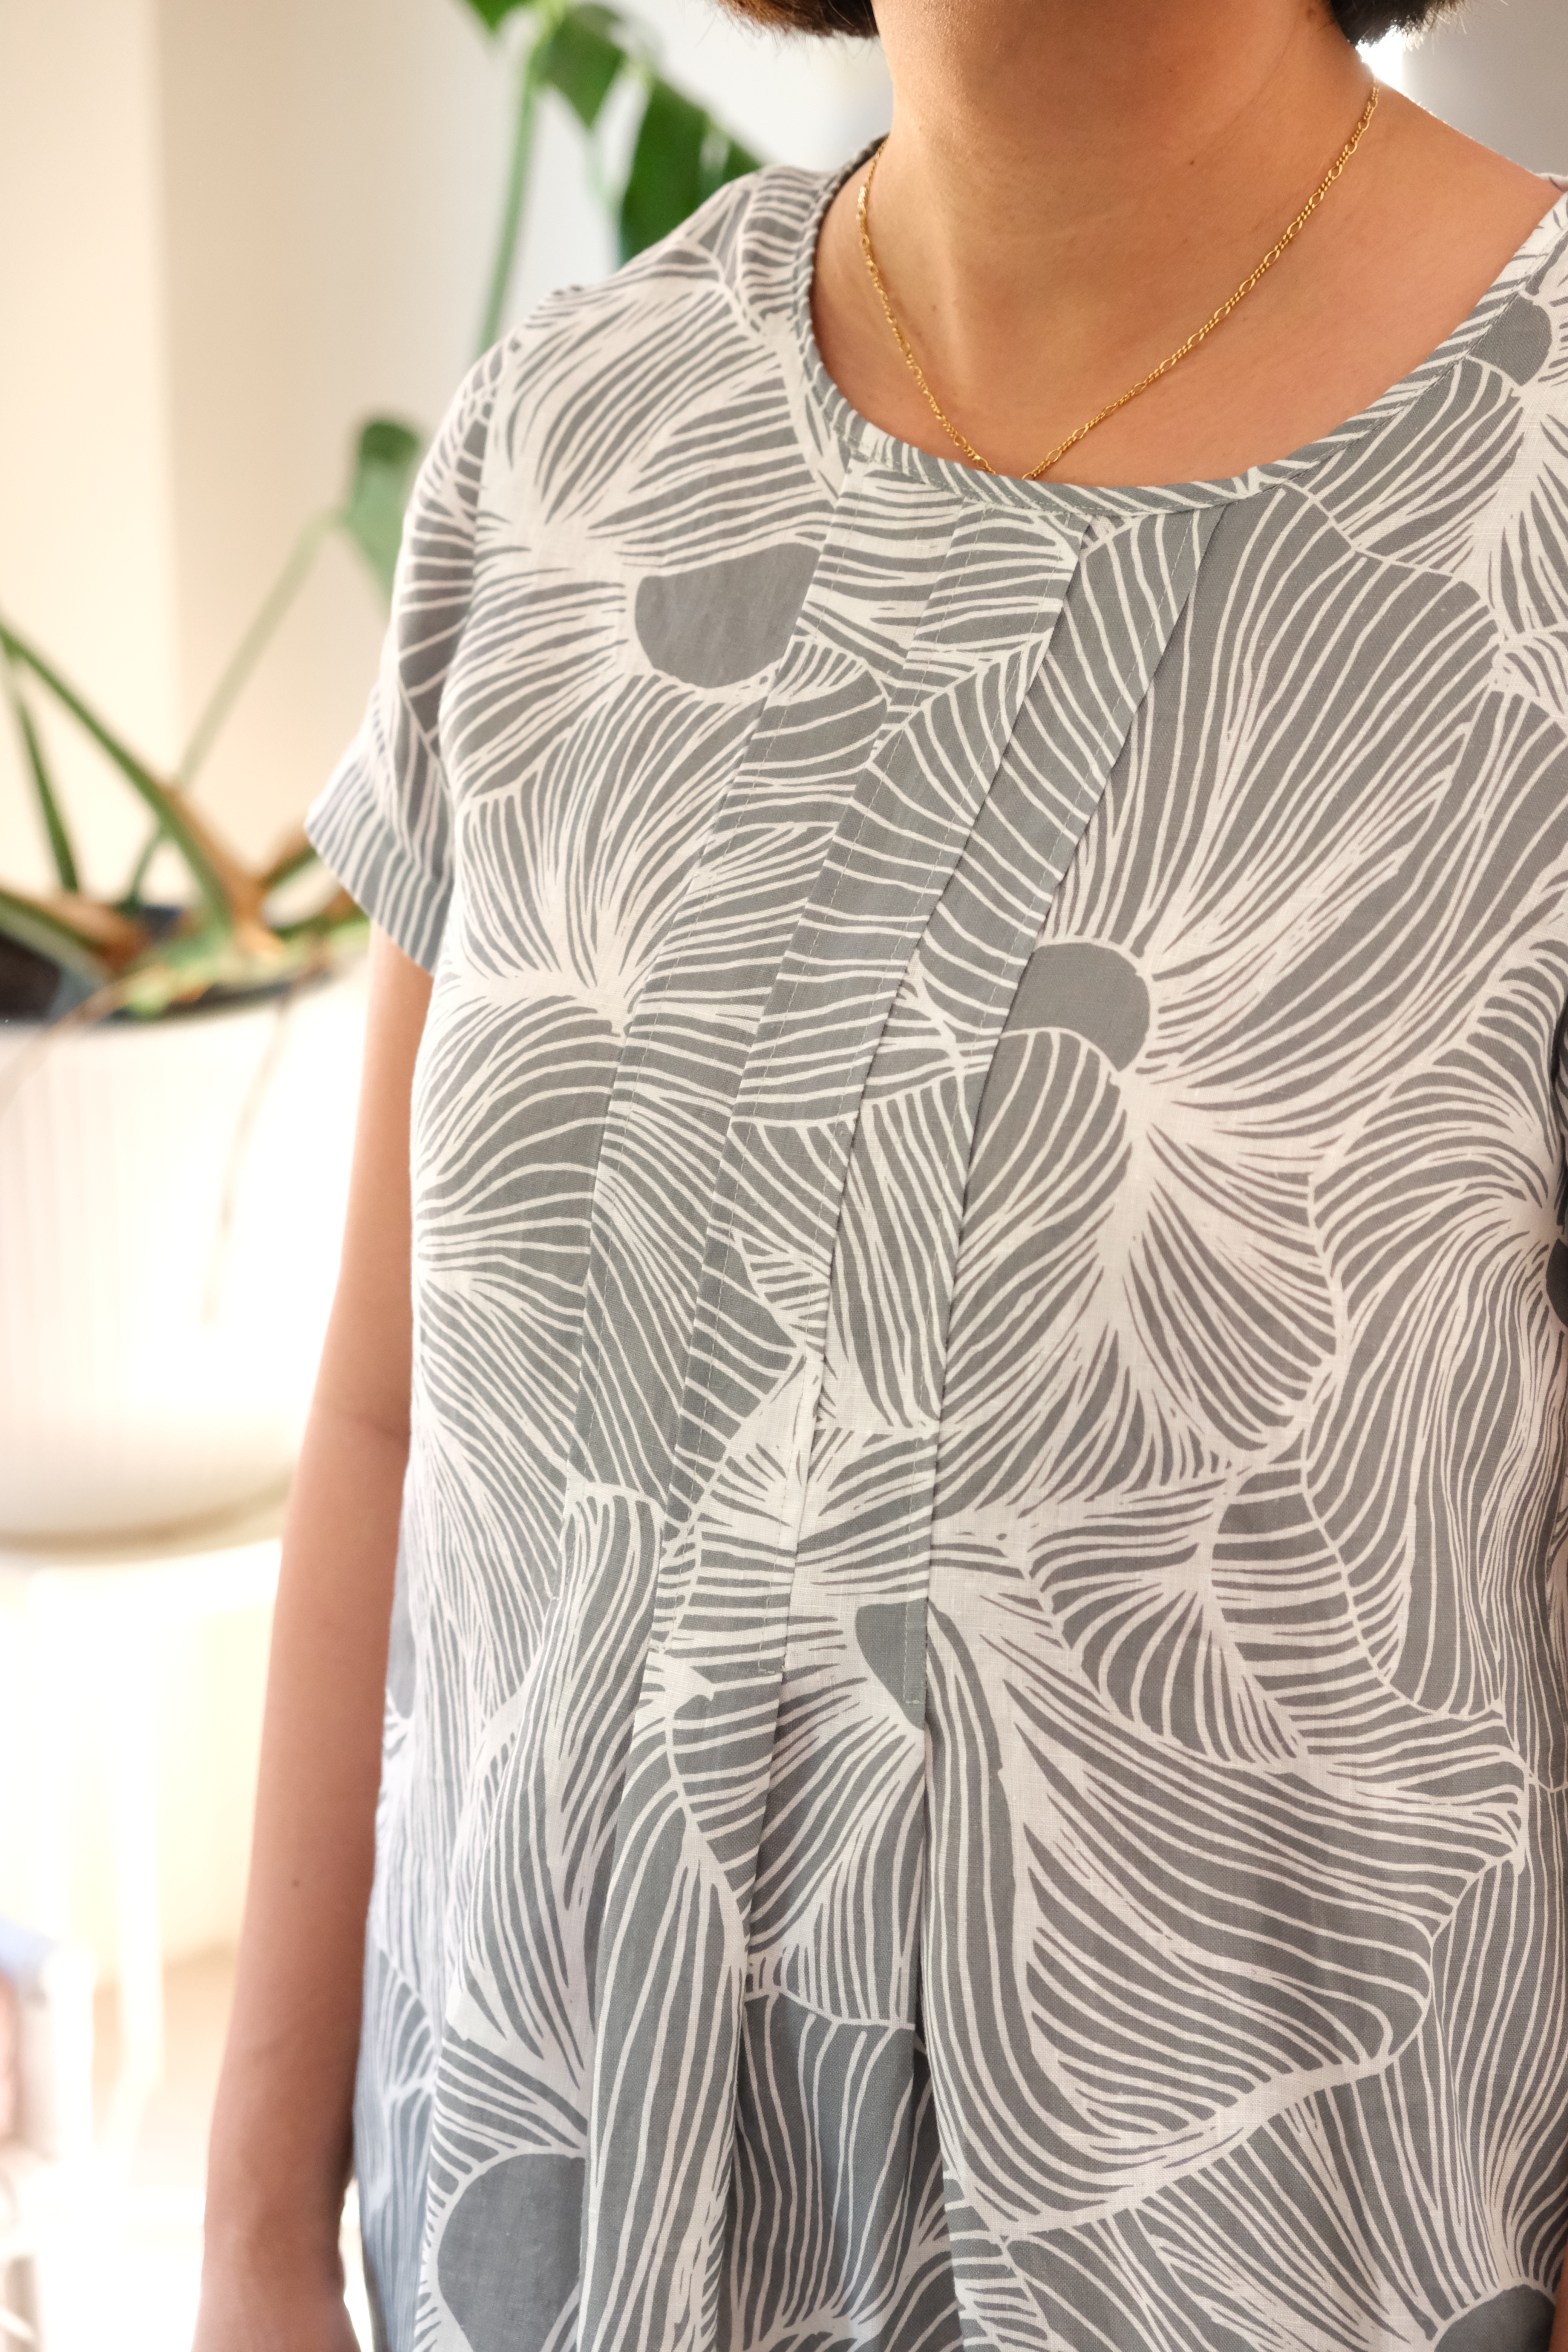
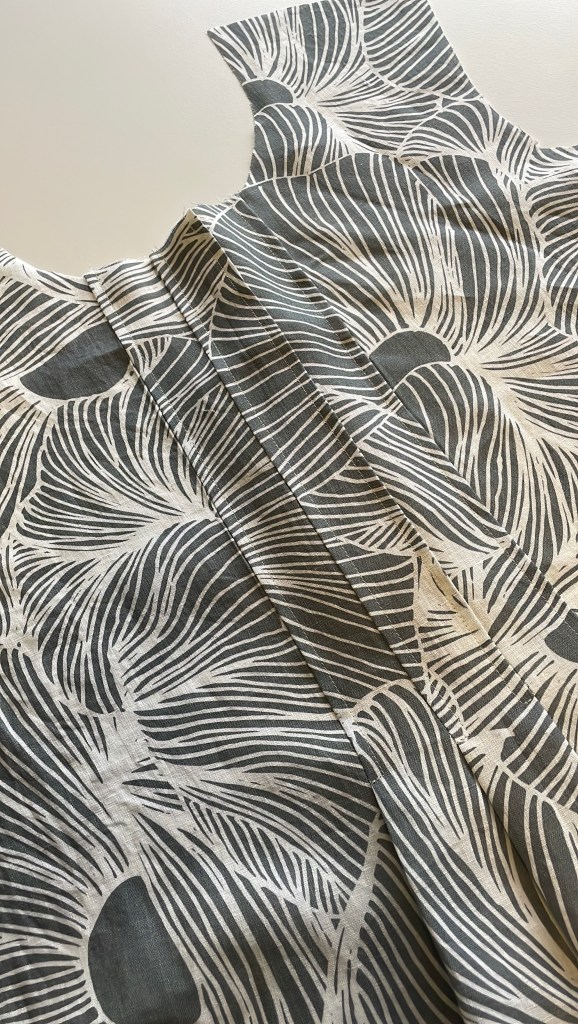
I tried making this dress about five years ago. I had just started sewing and I loved the look of the dress. Even though the pattern advises that it’s for intermediate level sewist, I jumped in and tried to sew it. I used a double gauze and instantly started making mistakes like not adding the pattern pieces to make the right length, I confused the pleat construction, I didn’t attach the bias binding or the pockets the right way. However, despite all that, I was super proud, and the Milenda Dress has ended up being a dress I’ve reached for repeatedly.
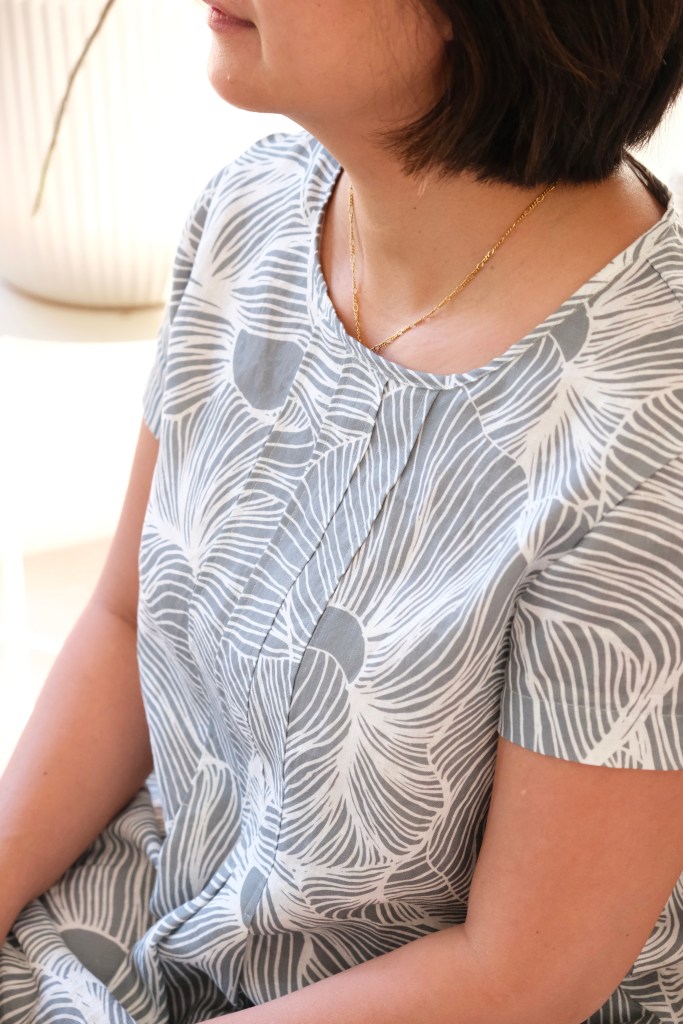
The Milenda is a classic shift dress that can be pulled over the head. The design these features pleats in the front and back which release into a skirt. These pleats are a clever feature and really help to shape the dress in a flattering way.
So happy with my pleats this time!
When this beautiful 100% linen fabric arrived from Maaidesign, I knew I had to make the Milenda Dress again. I started by giving it a cold wash and then a cool dry in my dryer. I then changed my machine needle to a universal 90/12 gage needle. Linen does wrinkle so a good press is essential before sewing. I don’t mind the wrinkles once it’s sewn but it’s good to iron it to make sure the pattern pieces remain accurate.
For my measurements of 38-inch bust, 33-inch waist and 40-inch hip, I made the size M. No modifications were needed. I was so happy that I could follow the instructions to the tee! I guess I am making progress with my sewing. On a little side note, the Tessuti instructions are excellent, but the pictures are photographed not illustrated so it’s easier to follow the instruction on the computer. Everything is logical and the construction is excellent.
Don’t you love a dress with pockets? I loved how these pockets were constructed because they sit to the front. Also, the pockets are at the perfect level and are properly deep.
Tessutti Milenda Dress
When I photographed the dress, I realised that the fabric is slightly gauzy and sheer. It’s still perfectly modest without needing lining. The linen is very lightweight; from memory it’s under 5 oz or 150 gsm and had a generous width of 150cm. I can’t wait to wear the dress when the weather starts to warm up. Linen is just so comfortable in summer. Looking at the Johanna Ralph collection, I think it’s going to be a hit with those bold, abstract prints.
Thanks for reading and happy sewing!
X Em
*Full Disclosure: The fabric was provided for preview and Instagram content. No blog post was required but I share everything on my blog and love documenting all my makes. All opinions remain my own.
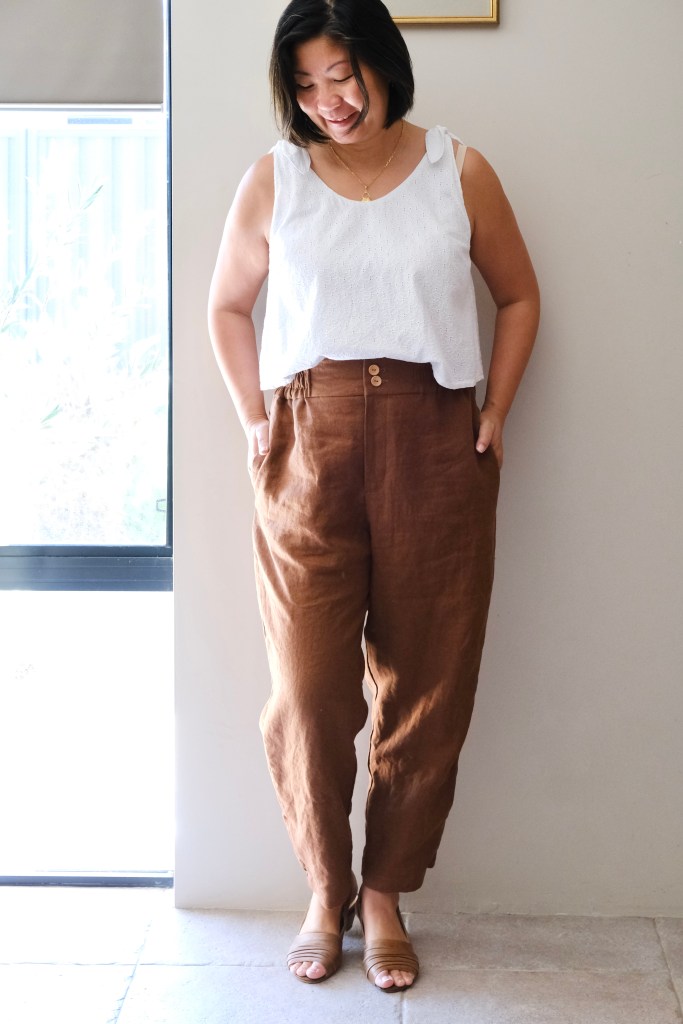
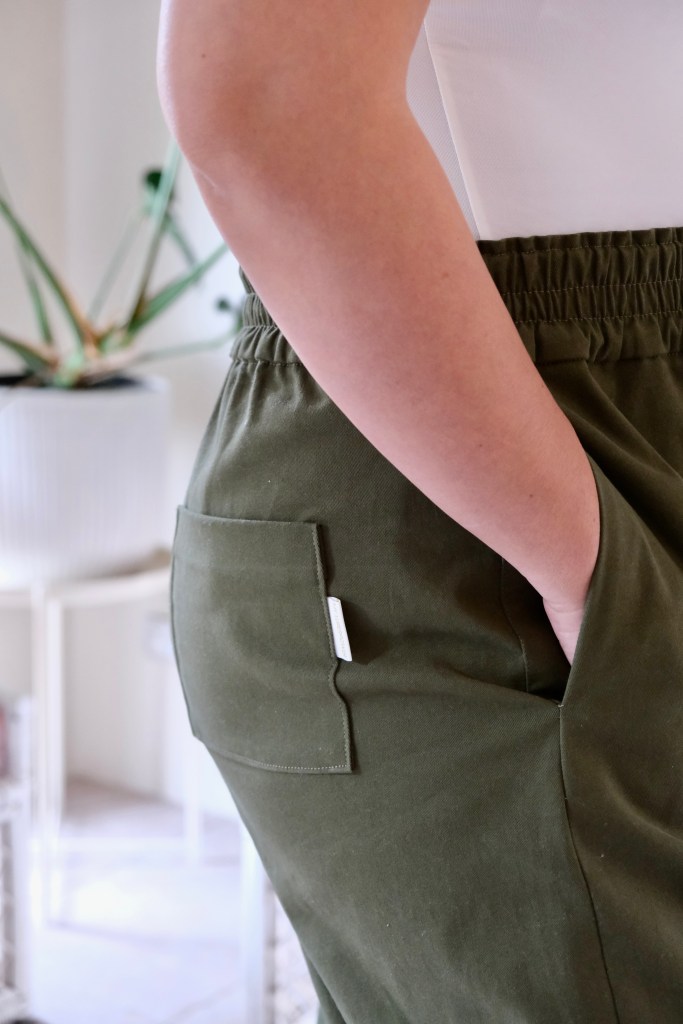
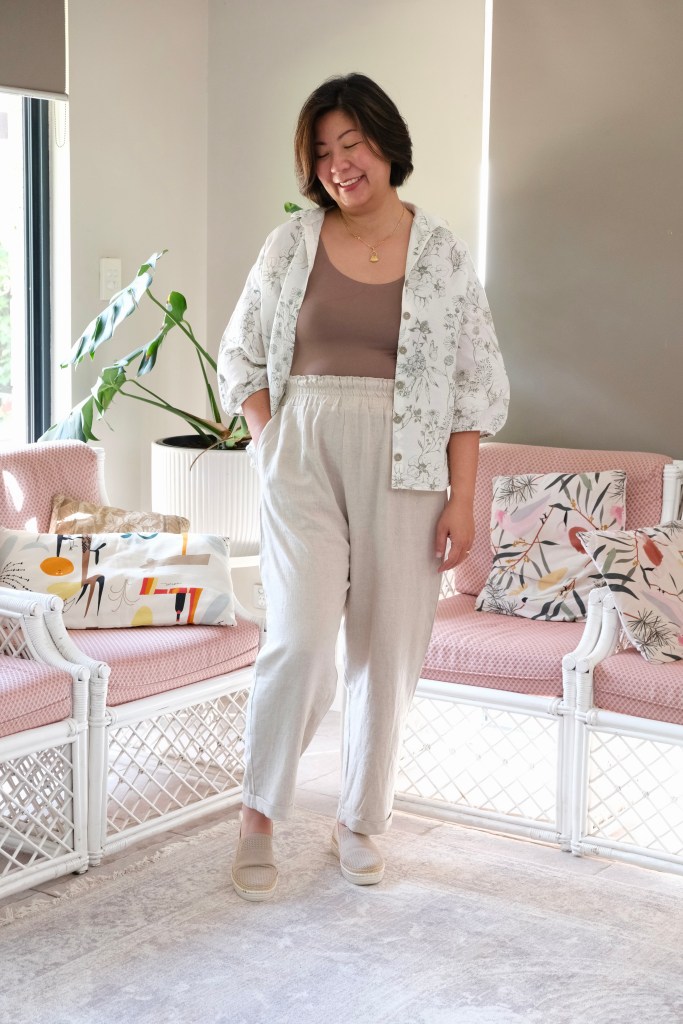
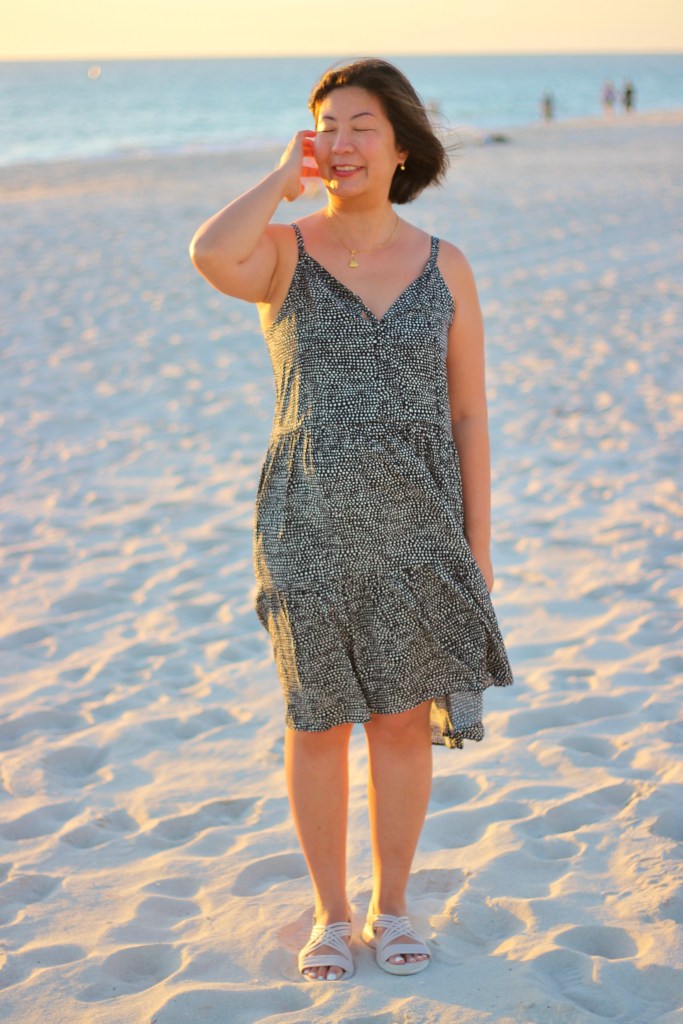
Me Made May has gone by in a flash this year! This year, I decided to record what I was wearing every day in a one take video which I shared to my Instagram Stories and saved in my Highlights. It is a very successful exercise which I use to review what I’m making every year. I realised that even though I am drawn to making dresses, my daily wear mainly consists of pants and shirts. Of all the pants that I was wearing, I found that I liked the True Bias Dani Pants for the style and the fit the best. So, for my upcoming travels, I decided to make three pairs. One in denim, one in a stretch drill and one in linen using Version D of the pattern.
First pair of Dani Pants
My very first pair which I made a couple of years ago was a linen version. I’ve worn it so much, but I felt that the linen I used was not the right weight and I can see some wear around the zip and seat area. This time, using version B again, I went for a 9oz weight denim which is lightweight enough to cope with the elasticised waistband but gave good structure to withstand the zip and button front. The buttons are jean buttons that were leftovers from making my Dawn Jeans.
Denim version of Dani Pants
This was also why I chose a khaki stretch drill for the second version. I love how soft this stretch drill feels. It was a real bargain find at my local spotlight store with only $10 per meter, the fabric only cost $30 which is pretty good for a pair of pants these days. Something I didn’t do with the stretch drill which might be a bit controversial is that I didn’t wash it before sewing. I only washed it after. I felt that the stretch in the drill, even though light, made the fabric less structured. I didn’t want to change the sizing for the pants, and I knew that I would be throwing these into the dryer with washing, so I didn’t mind if the fit was on a slight looser side to begin with. I’m not saying that it was a whole size bigger, but it was a loose size 12 and after washing and putting in the dryer, it has stiffened up to the perfect fit for me.
The final version was made with a drapey linen. This time I did wash the linen and popped it in the dryer before sewing. It really softened up the linen beautifully. I decided to make Version D which eliminates the button fly and zip. It has a full elasticated waistband. I thought that with travelling, it’s always good to have something you can pull on quickly that still looks smart. I loved adding the cuff and pockets to this.
When I first made the Dani Pants, I found the zip fly quite difficult. It’s nice to come back to a pattern after two years to find that I can now confidently install a zipper and the zip fly easily. I could understand the instructions a lot better now that I’ve had more experience sewing. Slowly and without me realising, my sewing skills have been improving. It’s a happy discovery. I feel so grateful to pattern makers like True Bias who have put so much detail and effort into their patterns which have helped self-taught sewers like me to gain these skills.
There’s nothing like a bit of last-minute sewing to add to the excitement for an upcoming trip. It’s funny how packing for a trip now includes a bit of last-minute makes. I should also mention that all my pants were made in the size 12, shortened by 2 inches for my measurements of 33-inch waist, 40-inch hips and 164cm height.
Maai Design have done it again. They have released their Artist Collection Drop 2 featuring surface artist and illustrator Myriam Van Neste famous for her bold and playful designs. I was one of the lucky to receive a 120cm sample of the “Pressed Florals” in a rayon lawn fabric for a pre-release review.
Pressed Florals by Miriam Van Neste
I’ve never sewn with rayon lawn before but what a discovery. It’s beautifully soft with a lot of drape. The colour of the print really pops and there was no fading, or colour runs when I washed my fabric in cold water. I did line-dry my fabric because that would be the normal way that I like to dry my clothes, so I didn’t experience any noticeable shrinkage of the fabric.
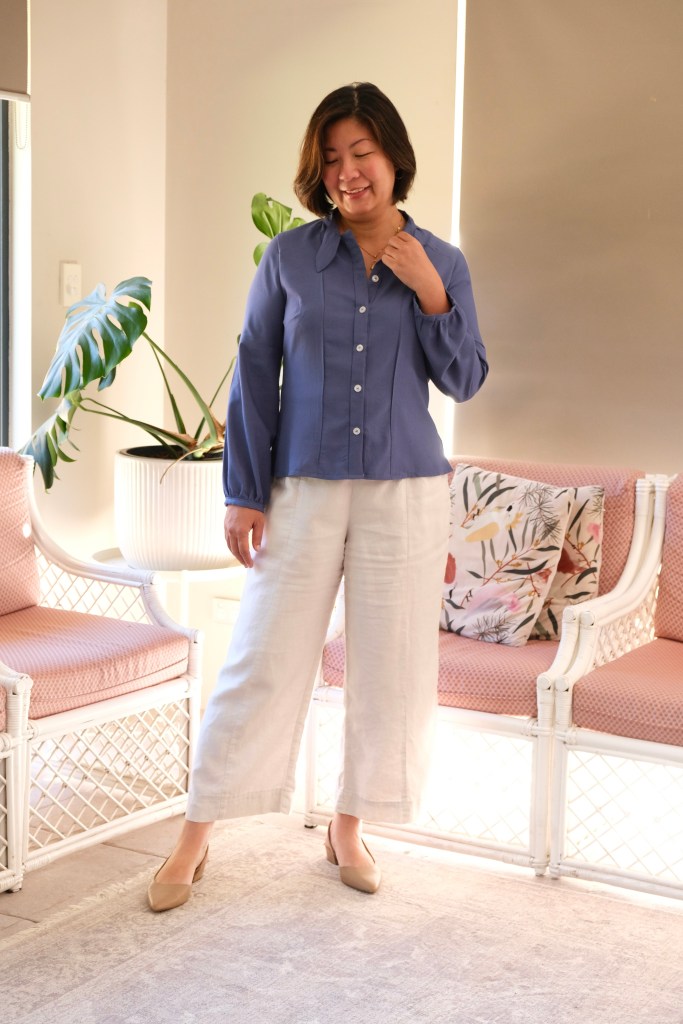
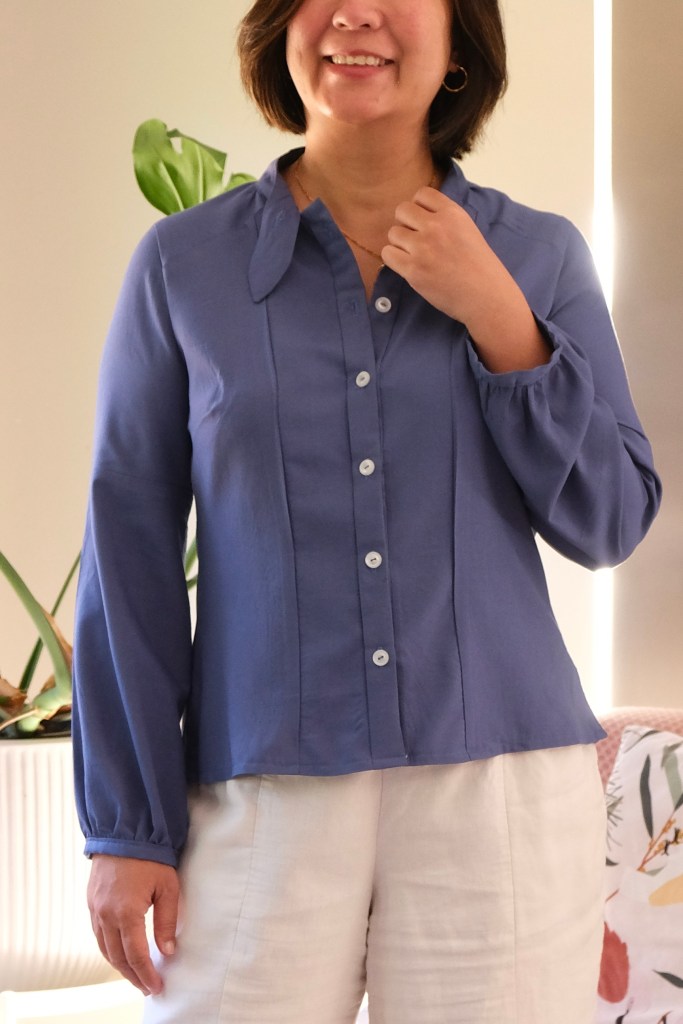
It didn’t take me long to decide to sew the Cashmerette Selwyn Top. It’s a lovely pin-tuck shirt with button placket and a ruffle that drapes over the bias lined arm openings. The top can be sewn without the ruffle, but I love how the ruffle softens the silhouette and adds a bit of feminine detail into the blouse. So, in order to add it, I had to do a bit of pattern piece Jenga. Luckily, the width of the fabric was a generous 150cm! It was a win because the fabric requirement chart recommended 1.8m for View A with fabric 140cm width. I was very pleased with my pattern piece Jenga.
Often with rayon, I find it’s best to use a rotary cutter for curves and to mark the notches before you move the fabric. I think it’s quite difficult to mark those notches accurately once it’s been moved. Also, it can help to lightly spray the fabric with starch. I skipped this step because I’m quite used to handling rayon, but I did make sure to staystitch and pinned excessively. Before sewing, I changed my machine needle to a 70/10-gauge needle.
I made the same size as I did the first time, I sewed the Selwyn Top which is the size 10 for my measurements of 38-inch bust, 33-inch waist and 40-inch hips. It’s very comfortable. I used some scrap rayon that I had to make the sleeve facings because I wasn’t able to squeeze making my own out of what fabric I had remaining.
I love the silky softness and the movement that the rayon lawn allows. I’m so glad that I managed to get these ruffles on my top.
Cashmerette Selwyn Top
Maai Design meticulously selects collections of high-quality fabric. I was very scared of buying fabric online when I first started sewing but Maai Design is one of the stores that I have repeatedly trusted and return to. I’m grateful to have found it early in my sewing.
Thanks for reading and happy sewing!
X Em
Full disclosure: I was provided this sample for a preview but no blog post was required and all opinions remain my own.
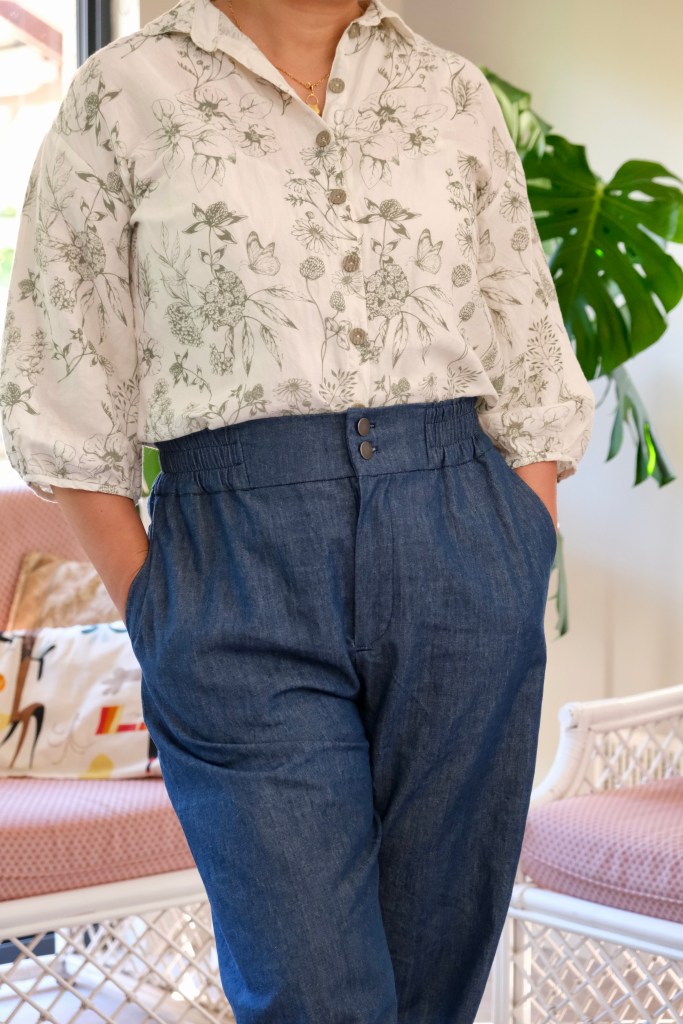
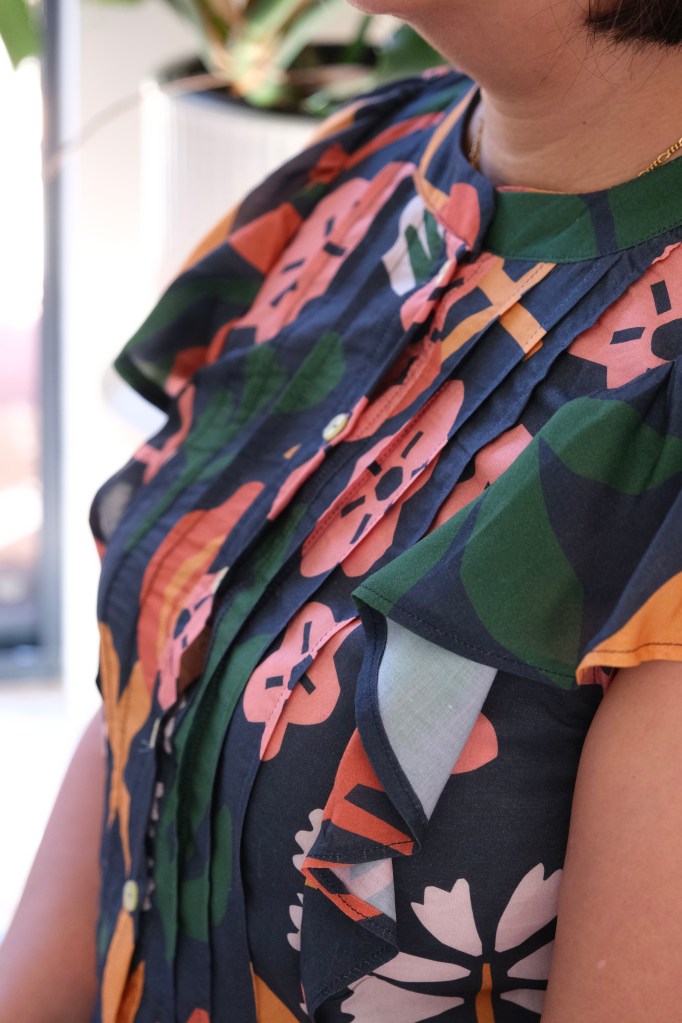
Do you start with your pattern and then buy the fabric or is it the other way around? I’m sure you’re like me where it’s a mix of both. In this case, I had bought this silky looking rayon but had no plans for it. It has beautiful drape, and I loved the colour, so I’ve had 3 meters of it sitting in my stash. Then I saw the Roma dress. I’ve noticed the recent trend for sailor’s collars so when Sewing Therapy released this pattern, I wanted to try it and thought it was a good match for this rayon.
Small Sailor’s Collar
Now, when you look at this fabric, both sides look almost identical, but one side is slightly shinier than the other. I’ve read that this is from the satin weave that can be used which leaves one side shiny and the other matte. What I have learnt from using this is to mark the wrong side at the start. I didn’t which was made more difficult when I decided to tackle a few parts of the project at night. I should have used my KATM sweary label for this one when I had to unpick pieces newly sewn with the wrong side up!
None of that swearing came from using the pattern which was made very easy by Sara’s sew along video. They are well captioned and her written instructions, although brief, are also very good for an experienced seamstress. Basically, the pattern comes as a dress or top with a choice of a big or small sailor’s collar and drop sleeves with cuffs or can be sewn with elastic instead of the cuffs.
For my measurements of 38-inch bust, 33-inch waist, 40-inch hips, I made the size 12 (L) which had a good amount of ease so even though my waist measurements would put me into a size 14, there was no need to grade. I’ve sewn a few Sewing Therapy patterns now and because her patterns tend to include that ease, I felt comfortable skipping a toile. Usually, if a sewing pattern maker is new to me, I would toile with the blouse option. I do find her patterns are true to size for me.
For me, the most difficult point of this pattern was not the collar as she indicated in her video. I found those instructions to be superb. It involved both the facing and the cuffs. The facing had to be sewn down once the collar was attached. My fabric was super slippery and so I had to deviate a bit to make it work for my fabric. I decided not to stitch the front neckline facing down because it would have spoilt the seamless look in the front. I did attach the back neckline facing but I’m still unhappy with it because it’s not symmetrical. I had basted around the back facing then followed with the top stitch, but the fabric still shifted. I will be unpicking and trying again soon.
Difficult points in my sewing
The cuffs were also tricky for me. I misunderstood the markings for the cuffs and initially overlapped them at the wrong spot. Luckily, I had only attached one when I tried it on to check. I felt the cuff was tight and when I rewatched the tutorial, I realised my mistake. I’m sure that has not happened to anyone else. The other challenge for me was placing the cuff onto the sleeve. I’m still not sure if I have the opening of the cuff in the right spot. I think I would have liked a notch somewhere to help me line it up. Then, when everything was attached and finished, I looked at the overlap in the cuffs which were now both facing the same way instead of opposites. Small detail, I know, but I will wait to see if it still bothers me down the track.
Despite these difficulties, I love my Roma Dress!
Lastly, I wanted to mention that I sewed this over a period of a couple of weeks which is not routine for me. I wanted to try spacing my sewing out a little bit more. Not sure if I was successful because I found myself making more mistakes. I tend to space things out like printing the pattern, sticking together the pattern, toiling, cutting fabric, markings but when it comes to sewing, I usually like to set aside one continuous session. I found that putting a project down, then having to find my spot again was probably not as productive and enjoyable as I thought it would be. I think I’ll have a mix of projects in the future, I do still have my Nova Coat that I have been slow sewing in the background using denim scraps and recycled jeans. So, it’s true to say that this “Roma” was not built in a day.
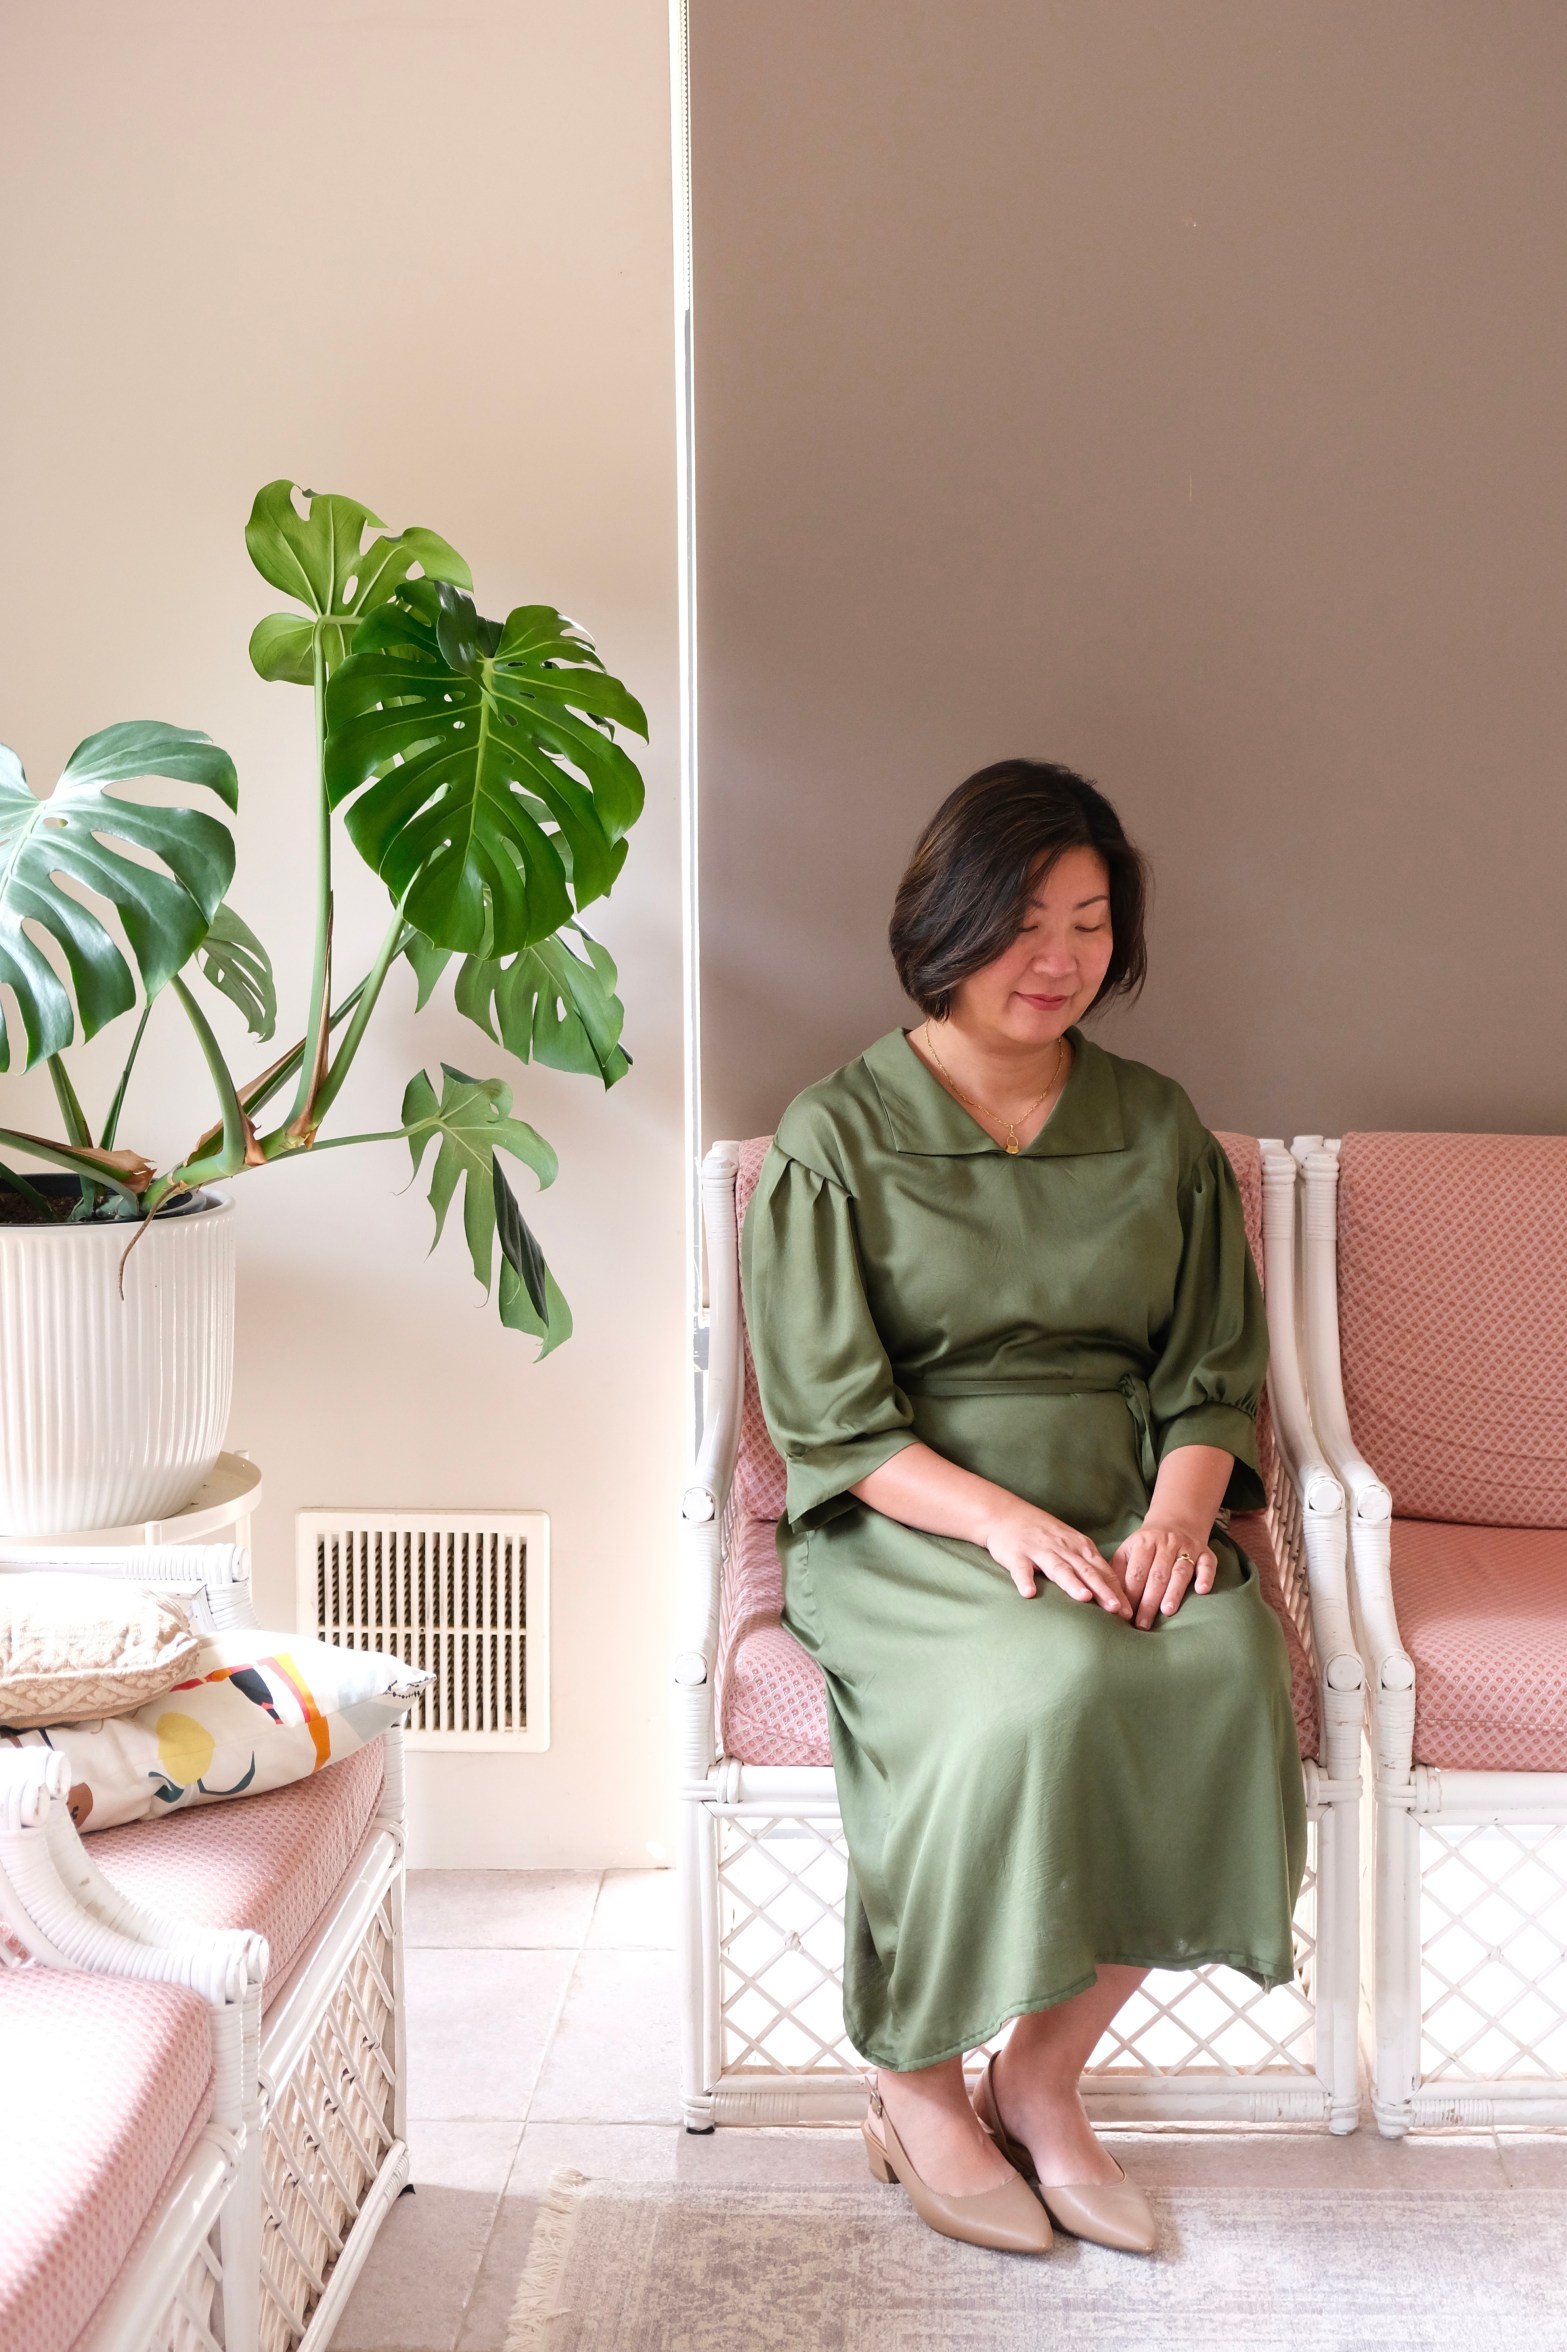
It’s been so exciting to collaborate* with True Bias this year. I have been sewing their patterns for a long time and I was thrilled to be invited to test for them. Especially since this is a dress that I would have rushed to put in my shopping cart. The Quinn dress is based on the design of the vest but taken to 4 lengths. There is the cropped length, the mid-hip length, a short dress and the midi dress. I chose to sew the midi dress. The pattern features a princess seam, V-neck, button placket, and has the vest tie in the back which lets you cinch in a little at the waist.
Button PlacketVest TieV-NeckFeatures of the Quinn Dress
I chose to sew the Size 12 for my measurement of 38-inch Full Bust, 33-inch Waist, 40-inch Hips. An upper bust measurement is included in the pattern which is important for a princess seam. There is also mention of height in the pattern. I did not need to make any adjustments. I’m 5’6” in height and liked where the dress ended on me. The pattern was true to size for me.
The feature that I’ve come to know True Bias Patterns for is their neat finishing. The dress was not lined but it used a combination of bias binding and facings. This included the hem of the dress which means that everything is perfectly clean and neat.
The pattern is for woven fabrics. I used a maroon-coloured linen-cotton. It was quite a lightweight linen which is so comfortable in summer and the hotter months. I would love to sew one in denim and make the stitching a feature of the design. Again, with the built-in facings and finishing instructions, this would be the perfect dress for some featured topstitching.
There is a vest tie on the back panels of the dress. I managed to find a vest sliding buckle, unfortunately not very pretty. I was hoping to get a different colour but with my next make, I would try a few more stores. There is also online but they always sell these things by bulk.
Testing went very smoothly, and I really enjoyed the whole process. I really enjoy the way True Bias set out their instructions which include very good illustrations. I feel like this is a short review because all the pieces fit. I did a quick toile with my marron linen in my usual way of basting all the main pieces together to check the fit. I’ve been toiling this way for a while now and find that I can save on cutting into “toiling fabric”. This comes with a quick disclaimer that I am very familiar with True Bias patterns and have worked out my sizing from past makes. This is probably why it’s good to sew a few patterns from the same pattern drafter.
True Bias Quinn Dress
Once the last button was sewn, I excitedly tried it out for a long lunch with my husband. It’s very comfortable to wear and there were no issues sitting for a lovely lunch. It’s also a way to repay my husband for all his help with the photography!
On a more personal note, I’ve really enjoyed participating in pattern tests this year. I decided that since my kids are transitioning into independent young adults, I would use my spare time to indulge in my sewing this year. Happy to still be needed but also grateful to regain a bit more time!
Thanks for reading and happy sewing!
X Em
*Pattern was gifted and paid for testing with no obligation to post. All opinions remain my own.
It’s always exciting to get onto the Sew to Grow testing team. Lindsey designs sewing patterns that are stylish and easy to wear for daily life. Among her many talents, she is also a sewing teacher so her patterns are always logically constructed and made to fit beautifully. I’ve been sewing her patterns from the start of my sewing journey and have learnt so much from them.
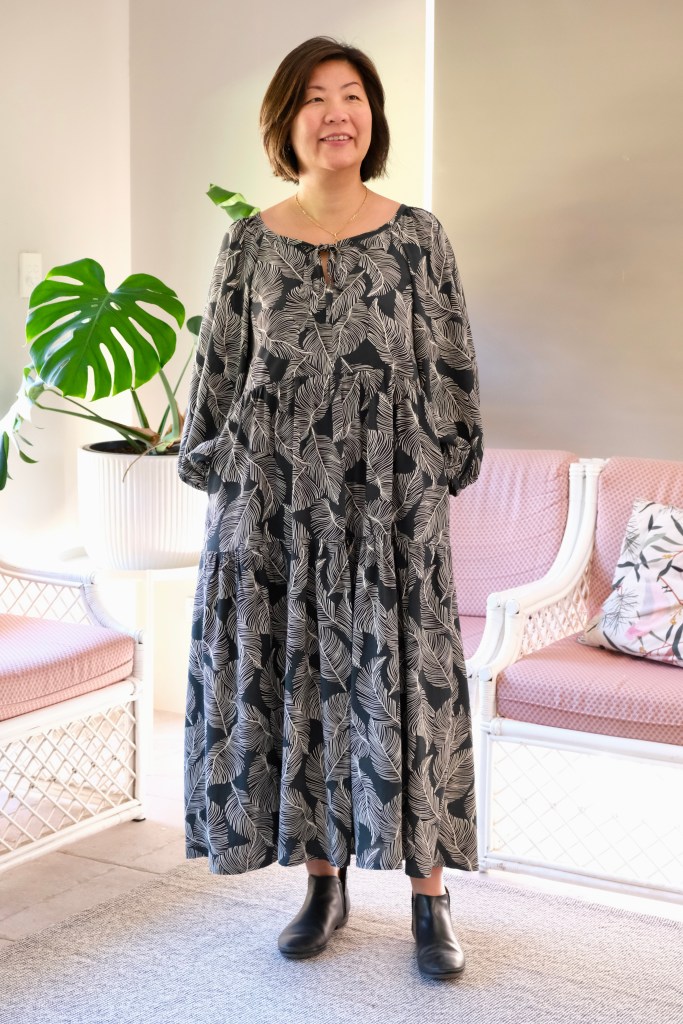
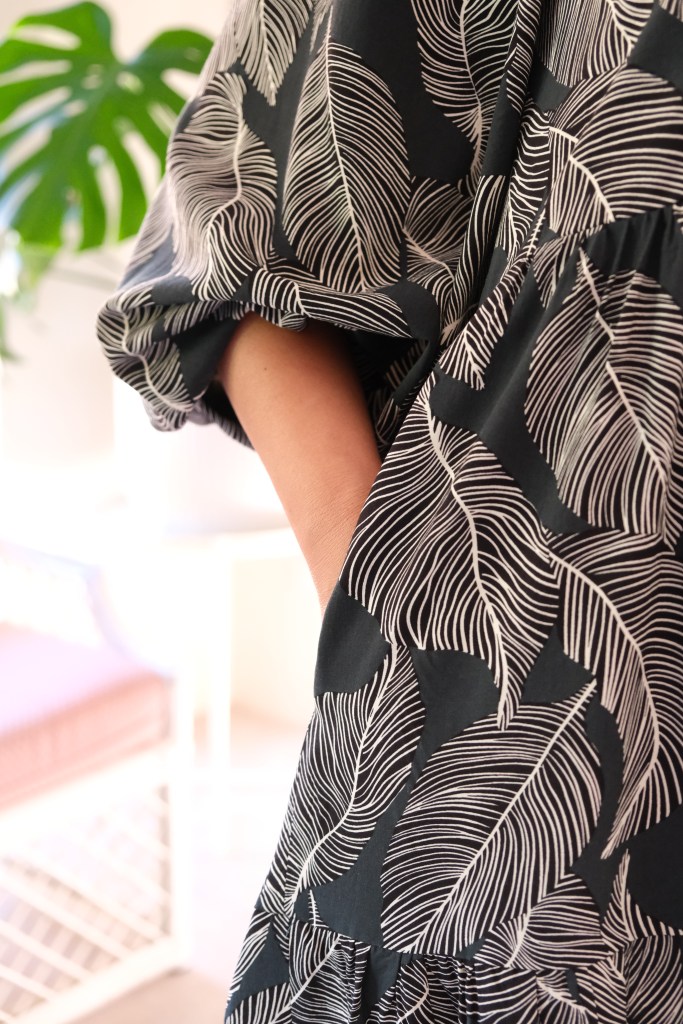
The Arcadia Dress is a versatile pattern that comes as a top and a dress. It can be sewn as a sleeveless or long-sleeved tiered dress with a front tie on a lined split V bodice. I made two versions, a sleeveless short version and a long-sleeved maxi version. I love the relaxed vibe of the pattern and it’s such a versatile pattern.
Two versions of the Arcadia Dress
I sometimes find tiered dresses to be very oversized and worry about swimming in volumes of fabric, but the Arcadia Dress is sized to fit in a flattering way. My measurements of 38-inch bust, 33-inch waist and 40-inch hips fit into the size 12 and I found the pattern true to size. No modifications were made except for my maxi version. To achieve the maxi length, I doubled the width of the bottom tier.
The sleeveless dress used about 2.5 meters of fabric and my maxi version required about 4 meters of fabric. Luckily, there was a good sale on rayon fabric at Spotlight! I decided on rayon because the pattern is made for woven fabrics, and I thought the patterns would be showcased best by something lightweight and billowy. I also generally find rayon to be so comfortable to wear in the Australian climate. I think my sleeveless version will get a lot of wear in summer, but my maxi dress will get worn all year round.
Maxi version and did I mention it has pockets!
There are so many positives of the pattern. I’m often pulling up straps with my sloping shoulders so I’m always trying to modify straps to sit on my shoulders. Well, I think I’ve found the perfect strap design because I haven’t had to worry about that with my Arcadia Dress. My straps on the sleeveless version stay put because the straps join onto the neckline with a long length of bias binding, and they seem to sit perfectly without any chance or length for them to slip off the shoulder.
Short, sleeveless version and yes, pockets!
Another nice feature is the v-opening with the ties which eliminates need for zip or button instalments. It’s a great dress to slip over the head and go. The bodice is lined too which gives the dress a beautiful quality finish. It’s these little details that make sewing your own clothes so worthwhile.
I’ve loved seeing the other tester versions emerge and there’s been a few tops that have been made. I’d love to come back to this pattern in the future to make one. This will be added to my TNT (tried and true) patterns. Lindsey was such a pleasure to test for. It was nice help her bring this pattern to life.