This make was inspired purely by my much anticipated annual leave. I know that the lounge set trend came about because of people working from home but being a healthcare worker rules that out for me. So, all I’ve thought about was a couple of weeks of sitting home lounging, eating, napping, reading and lots of sewing. The weather has also helped as temperatures have dropped and rains have settled in.
I chose to sew the Comfi Lounge Set as it’s a Pattern Scout Pattern and from past experience, all her patterns have been pure joy to sew. I do love a challenge when I sew, like doing a good puzzle, but in this case, I just wanted a relaxing, uncomplicated sew. It definitely turned out to be exactly that! A very easy, relaxing sew and it does exactly what it says on the tin. The guesswork for sizing and the choice of fabric is all taken care of.
My husband is an avid supporter of my sewing hobby. He often comes along fabric shopping with me and was the one that spotted this pineapple print cotton jersey fabric.
I cut out and brought along the stretch ruler that Pattern Scout provided in the pattern instructions which made it so easy to pick the fabric especially if you’re new to knit fabrics as I am. I used this medium weight knit for the Comfi Lounge Pants and as a surprise for my husband, I also sewed up the pineapple print jersey as a sleep shirt for him (this is not included in the pattern, his shirt was self-drafted). For the Comfi Lounge Tee, I’ve sewn up the basic short sleeved tee version and I’ve used a lightweight stretchy white cotton spandex fabric.
Instructions were great as usual and the size 12 was a perfect fit for my measurements. All seams were sewn up on my overlocker and the hems and sleeves were finished with twin needles. I’ve seen some beautiful versions of this pattern on Instagram and it’s definitely one that I’ll revisit. The next time I sew this, I’d love to play around with fabric choice.
On a side note, sewing this has been such a joy and in general, sewing is such a joyful pastime for me. It has also been fun (and funny) to document these makes along the way. I hope joy and creativity is something that everyone can make time for in their lives. Sewing and having a hobby is something that really contributes to my wellbeing. Hopefully, whatever you’re facing or doing, I hope you’re able to find some joy in it.
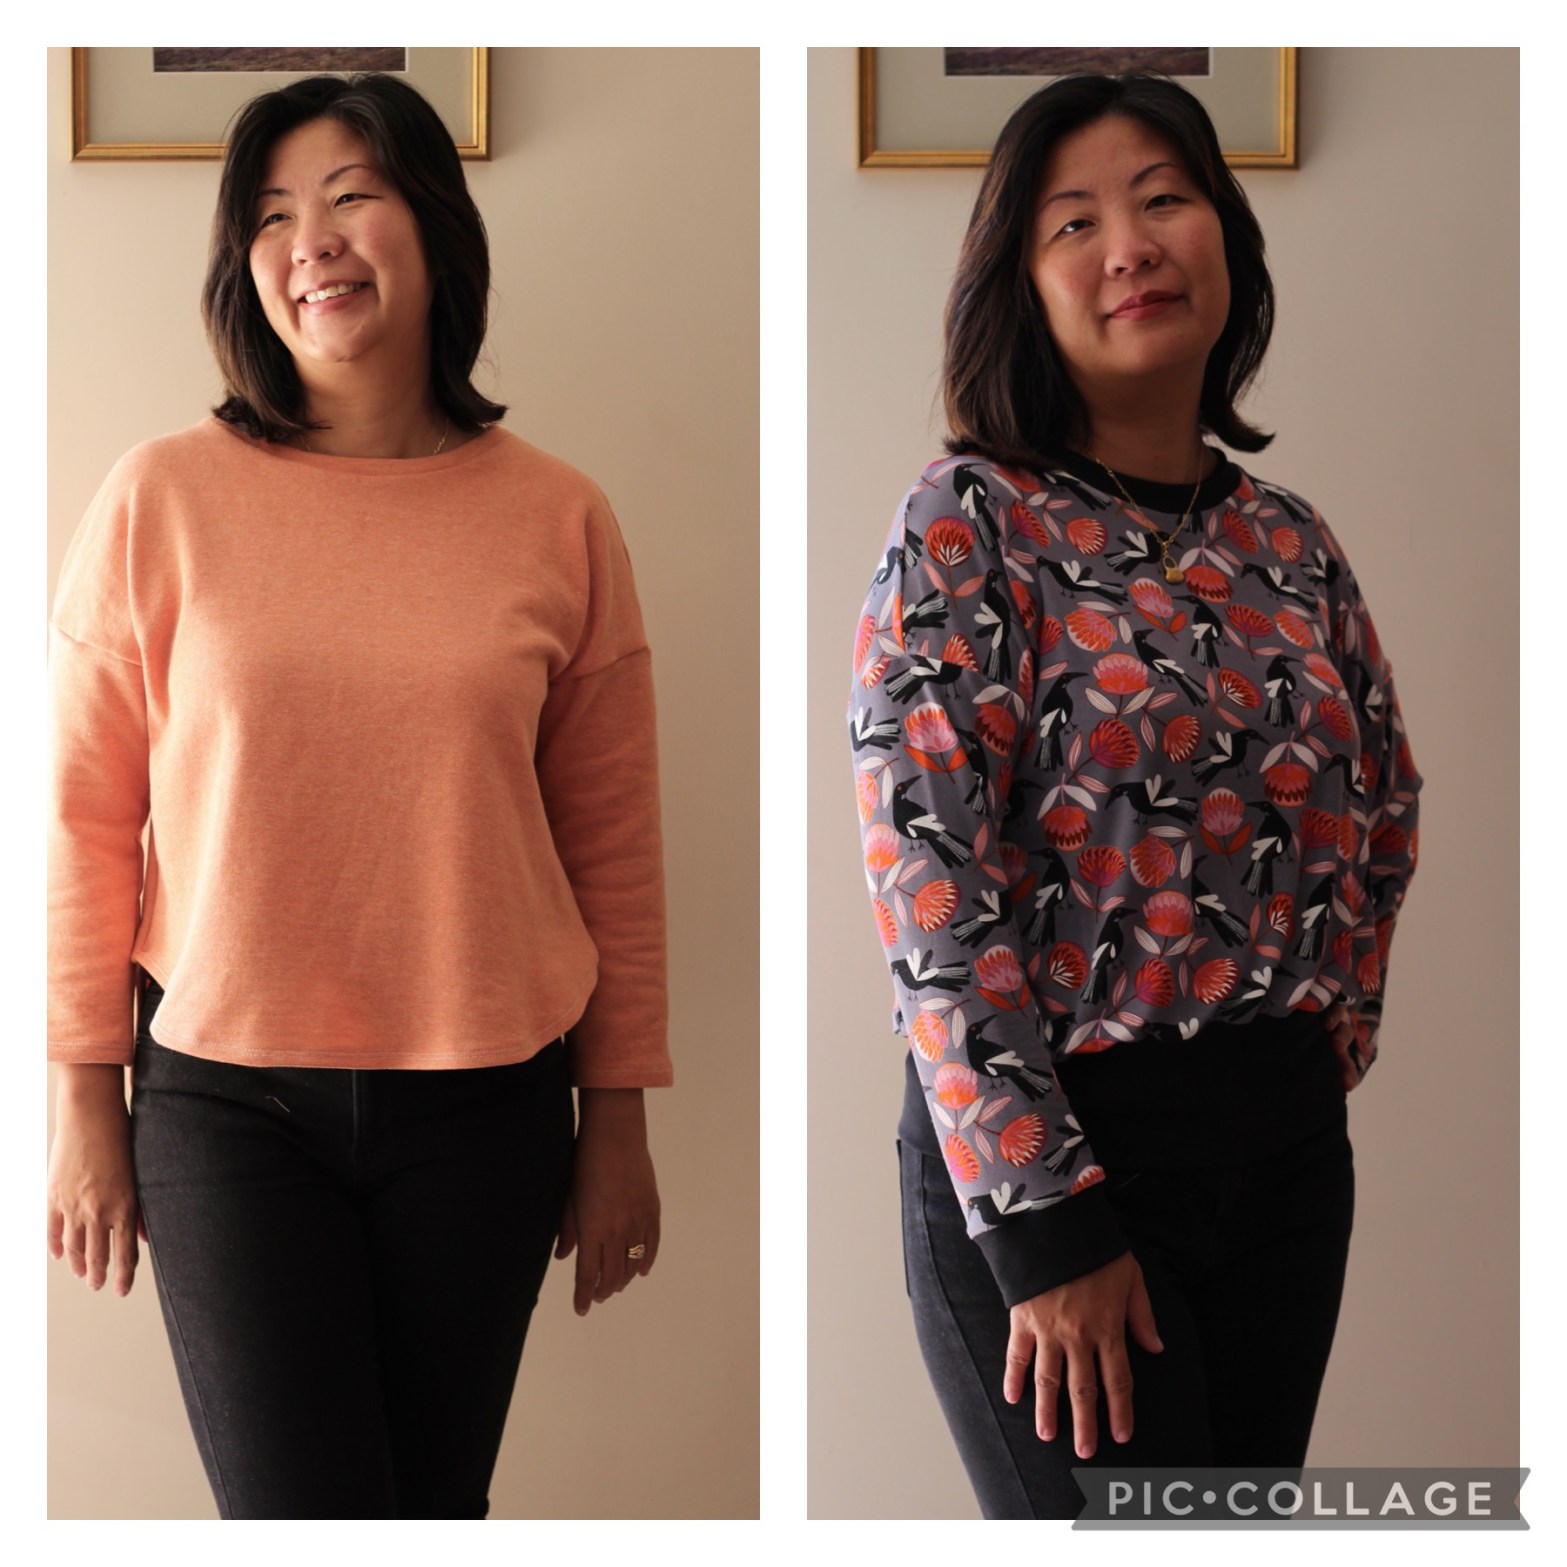
The Jarrah is a pattern by a beloved local Perth Designer Megan Nielsen and comes with so many options due to the fact that it’s a modular pattern. This allows you to mix and match the different bodice options with different neck band and sleeve options. This is such a feature with Megan Nielsen’s patterns as she offers many variations making her patterns such good value. I’ve now sewn the Jarrah pattern a few times producing a different look each time. The Jarrah is such a comfortable loose-fitting sweater. I also love how the look of the Jarrah changes depending on the fabric choice so I decided to explore this by making two versions. In the first version, using a fleece lined knit and a rayon spandex with the second.
Both were sewn up in the Size 12 without any adjustments as these were the closest to my measurements. There is a lot of ease in the pattern so you could look at the finished measurements and size down for a narrower fit but I personally liked the generous give in the fit as it feels so comfortable and great for lounging in. For both versions, I had 1.5 meters of fabric which turned out very well. I did try to see if I could use less but had to take into account the direction of the stretch in the first version and the pattern placement in the second version. With the second version, I also needed some black ribbing. You don’t need much, about half a meter should be plenty.
The choice of the fleece lined knit was just right for a sweatshirt style sweater. The fleece I chose is smooth on the outer side and has a loose nap on the underside which is just so soft and plush. It will be so warm and soft to wear against the skin. The peach is a delicious pop of colour that I just couldn’t resist! Testing the stretch of the fleece, it has a tight stretch one way and is quite a stable knit. I made View B with the high-low hemline. It has an interesting curve along the hemline and is the longest option so very good to style with jeans or even activewear.
The peach is a beautiful colour but it was difficult to find any ribbing to go with the colour so I had to make my own neckband. I did this by cutting a longer than needed strip of the same fabric along the stretch of the fabric. You could also cut along the bias to make it stretchier, however, I felt that it had enough stretch without doing that. I then measured the band against the neckline and subtracted about 20% in the neckband so it could give some tension to the neckline and sit flush when worn.
To finish the cuffs and hem, I used a twin needle. The cuffs were easy to sew up but it was a bit trickier with the curved hemline. I found it hard to pin the thick fabric especially going around curves so I used some quilter’s tape. Also, a word of warning when you first start sewing with twin needles, go slowly! I was chugging along full speed and didn’t notice the thread getting tangled and broke the needle. Luckily the sharp part was still attached to the thread. It really made me consider getting some safety goggles for my sewing.
The second sweater I made was with the Jocelyn Proust Magpie Printed Rayon Spandex Fabric. This is currently exclusive to Spotlight Stores. Jocelyn Proust designs are so recognizable for the Australiana flora and fauna featured in her designs. I love the unique call of the Magpie bird so I fell in love with this design straight away.
The rayon spandex knit is a very soft drapey fabric and has amazing stretch recovery. It has quite a luxurious feel and although I’m making it for my winter wardrobe, I think this fabric is also quite good for summer. The look I wanted was a long-sleeved cropped blouse sweater so I used View A. Cropped sweaters were all the rage in the 80s so I thought it would be fun to recreate that look. I used black ribbing for the neckline and cuffs and to recreate the cropped look without exposing my belly button. I doubled the height of the hem cuff and shortened the width so it would cinch in the fabric at the waist.
This time, everything was sewn up using only the overlocker. It was incredibly fast doing it this way. I worried about the strength of the seams but after testing a bit of off-cut fabric I felt that the stitches held very well. However, I’m very inexperienced with knit fabric so please don’t take my word for it. Personally, I felt that for the speed and convenience, I was happy to take the risk of sewing up with the overlocker.
The Jarrah is such a versatile pattern and it was fun playing around with all the options. I made my first Jarrah a year ago and I know it will be one of my “tried and true” patterns. It has also been an interesting exercise coming back to a pattern that I made at the start of my sewing journey. I feel that I’ve made huge progress and the finishes, although not perfect, are getting so much better.
Facing lockdown again, there has to be an upside and that upside is time. Time to indulge in a bit of sewing and to do something I’ve never attempted before. A mash up of two sewing patterns and to start a new hobby … blogging.
Patternscout and Marshastyle are two seriously talented independent sewing pattern makers. I’ve sewn quite a few of the Patternscout patterns, they are beautifully drafted and as a beginner, I find the instructions easy to follow and I’ve just learnt so much by sewing her patterns. The sizing is also always a great fit for me. I came across the Leila Dress by Marshastyle last year when I had just started out on my sewing journey. What’s not to love with the beautiful boho look of this dress? The statement sleeves are so unique and so was the tiered gathered skirt. The combination was just too hard to resist!
When I sewed the Leila Dress, I made a blouse hack to try out the bodice and discovered that the v- neck neckline was a bit too low for me. When I wear it, I usually have a cami top underneath so I found myself not reaching for this in summer when Perth hits 40 degrees celsius. As a result, I didn’t sew up the dress. I knew I would come back to it when my skill level improved and in fact, Marshastyle did a blogpost on how to modify the neckline to move it higher.
Fast forward to the start of 2021, I found the Hana Dress Pattern from Patternscout. This is a lovely shift dress and she has given two options for the dress. One is a simple pull over the head shift dress and the other is made with a button placket starting from the neckline all the way down to the hemline. I have reached for these over and over again. I think what I love about the Hana Dress Pattern how the bodice fits me. The neckline is especially flattering on me which gave me the inspiration to try this mash up.
When I came across this beautifully spring patterned Japanese cotton lawn, I immediately thought of the Leila Dress again. The fabric is so soft and lightweight. I haven’t had much experience sewing with cotton lawn but it would be the perfect warm weather fabric. I decided that I would use a muslin to line the dress as the fabric was quite sheer due to being so lightweight. The muslin also provided me with the chance to test the fit without cutting into that beautiful Japanese cotton lawn. The original pattern is not lined but lining a dress can be thought of as just an extension of the facing. From the Hana Dress, I used the bodice pattern pieces (front and back) measuring about 6 inches from the bottom of the sleeve hole (armscye) and cut straight across. From the Leila Dress, the tiered skirt was cut out but the sleeves were left off for the muslin.
From there, it was a simple matter of trying on the muslin for fit and then using the same pattern pieces, now including the sleeve pieces, for the shell of the dress. The lining is attached to the shell via the neckline and the arm holes (armscye) and there we have it! A mash up of the Hana and Leila Dress. If you love the Leila Dress as much I do then check it out at www.marshastyle.com and enjoy her fabulous blog.