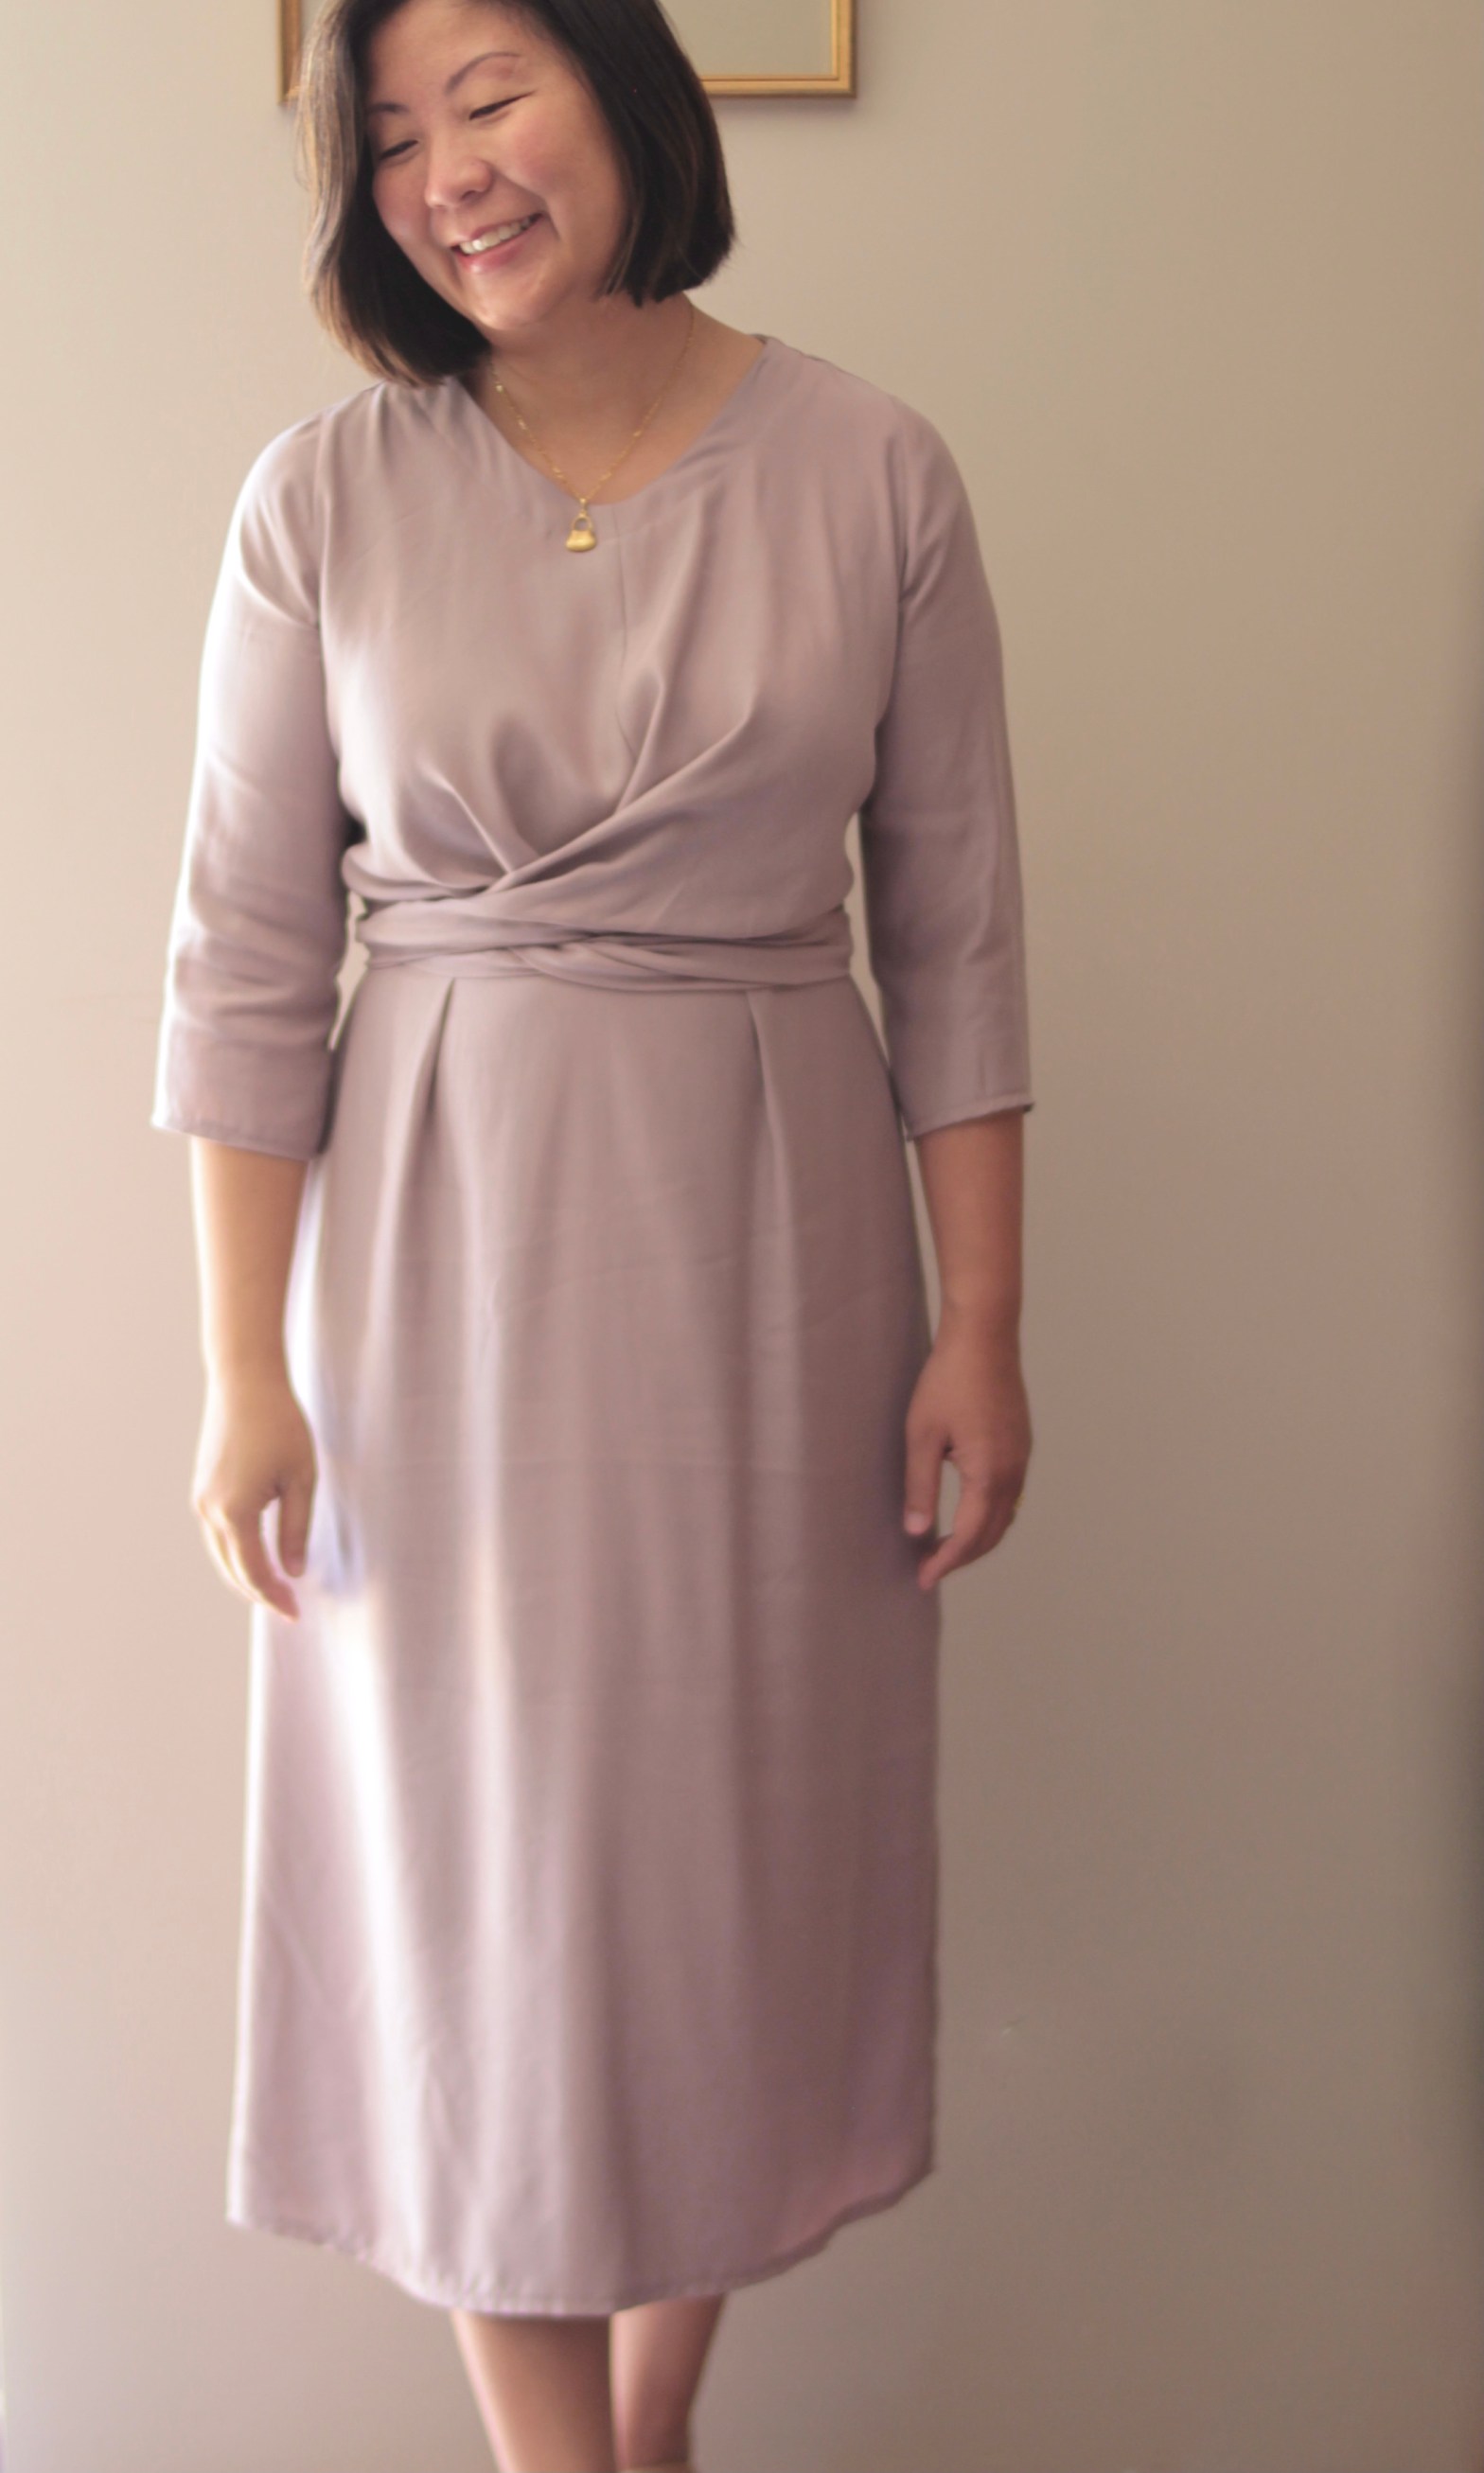
Fern Top and Dress Hack

September brings with it the promise of sunshine and finer weather. So, naturally, I’m starting to think about a summer wardrobe. I do often wonder if I should start working on my summer wardrobe in winter and sew up my cold weather wardrobe in summer. Anyway, I had always meant to sew up another Fern Top from Pattern Scout Studios. I then saw a mention of a dress hack so I decided to go ahead and do this!

The original pattern is a pretty top that has a central panel with a round collar which the dolman sleeve pieces attach to. Then Pattern Scout released the square neck extension pack which was what really sold me. I really love a square neckline! So, my first version of this pattern was the square neckline version of the top. 

This time I’ve sewed the square neckline again but decided to use the free tutorial for the flutter sleeves. So, most of the hard work for this hack was actually done! I just added the skirt by using two rectangular pieces and gathering the top of the skirt and attaching this to where the “skirt” of the top would’ve attached to.

I should also mention that I had fully lined my dress with muslin. I used a divinely floaty, sheer, lightweight “seaweed stripe” linen that I was lucky enough to score at the in-store sale at Megan Nielsen’s shop in June. I didn’t know at the time what I was going to make out of the fabric but it was too good to pass up and I’m only just starting to feel confident enough to invest in my fabrics. I bought two meters of this linen which was just right for this make. So, getting back to the sheerness of the fabric, it’s beautiful and light but quite see-through so for modesty’s sake and so my family don’t disown me in public, the muslin was a perfect pick to line the dress with.

This dress is so comfortable to wear. It’s not quite warm enough yet but the baby-doll style is great for those sticky and humid summer days. Hopefully this will inspire someone to give it a go! The Fern Top is great as-is but such a wonderful bonus with so many options to customise it.

Thanks for reading and happy sewing!

X Em

Pietra Pants

Just for something different, I thought I would write about my sewing process. I first came across the Pietra Pants by Closetcore Patterns last year and hadn’t really tackled sewing any trousers. Sewing pants is intimidating because of some of the fit issues that I’d read about but it was recommended to me because it has a fitted flat front look but fit issues are less of an issue because of the half elasticised waist. This is Version A and is the cropped version.

So, the sew starts with the interesting pocket construction. When I sewed this last year, I felt like it was a bit of a puzzle or origami but seemed straight forward in this sew. This is about the fourth time I’ve made this pattern so I should’ve worked it out by now.

Once the pockets are attached then it’s a simple matter of attaching the two front panels together.

This is then added to the front waistband which is made up of three pieces.

We now then move onto the back panels and sew them together and then attach this to the back waistband. At this stage, I was a bit panicked thinking that I had chosen to sew the wrong size as it looked rather large but just remembered that it is elasticised so most of the volume will disappear!

The next part is to attach the front panels to the back panel. I’ve taken a few more pictures of the waistband here because when I first sewed this, I had to read the instructions about ten times. I’m still not sure I have it exactly correct but it worked out so I’m happy. Also, when you attach the elastic on, just remember that to check that you haven’t accidentally flipped it causing a twist in the elastic.

The elastic is then encased in the waistband with some blind stitching. This used to freak me out because when I first started sewing I had a very basic machine without any speed control. So, I would line up the seam and hang on and pray for a straight line. Now, I’m blessed with a new machine my husband bought me for my birthday (that I dropped about a hundred hints for) which comes with speed control so I just take it very slow here. To help get a neat finish I also hand baste the waistband.

Finally, before hemming the pants, I sew up the elastic as pictured. Definitely not something to skip because it helps to shape the back of the pants. 

So excited to have this in my Spring/Summer wardrobe! I’ve paired it here with my Frankie Tankie. It’s going to be a great staple especially in this neutral colour.

Thanks for reading and happy sewing!

X Em

Sandeep Dress

Lately, my sewing has had to take a backseat to other commitments. Sewing has become my go to activity for a bit of “me-time” so in the face of a busy month, I decided to pick a pattern that I could sew a little at a time but also something a bit different and challenging. By Hand London is well known for their beautiful dresses. I recommend it to anyone who needs a special occasion dress! From BHL, the Sandeep Dress,“ has a close fitting bodice with V shaped darts, raglan flutter sleeves and a square faced neckline. Two asymmetric circle skirts are joined to a straight underskirt at the waist and mid thigh …”. For me, this pattern falls into the country chic, prairie chic or cottage core aesthetic. 

Okay, this pattern uses a lot of fabric. I ended up using about 5 meters! So, needless to say, a toile was essential. I decided to toile the bodice. My measurements of 37 Bust, 33 Waist and 38 Hip put me in the Size 14 (UK) range. The bodice fit well but the raglan flutter sleeves needed a slight adjustment. I brought the front sleeve seams in by 1 cm and that made it sit well without the sleeves falling off my shoulders. I love all the tips given in the pattern on adjustment and sizing. The BHL website also has great free resources. Despite these tips, I still managed to make a big rookie mistake which was that I didn’t realise I needed to iron the rayon crepe fabric before sewing! Also, another mistake was that I’d made the toile in a different fabric. I used a cotton for a toile which was stiff so initially I thought my sizing was a UK size 16. This resulted in a bodice that was too big so I had to restart the dress (a couple of weeks lapsed before the restart as I tried to figure out how to fix it and realised that restarting was the only way to move on).

I’m thrilled with the dress! It was worth all the effort and I really enjoyed taking it slow with my sewing and working on all the details. I love styling the dress with these ankle boots. It’s a little bit of a juxtaposition being paired with such a feminine dress. 

Thanks so much for reading and happy sewing!

X Em

Ogden Cami

We’ve just seen a close to the end of Ogden Cami Month. It’s been so inspiring to follow along the True Bias blog. This is such a well-loved pattern in the sewing community. There is a plethora of clever hacks for this pattern. From the True Bias website, the Ogden Cami is described as, “The Ogden Cami is a simple blouse that can either be worn on its own or as a layering piece under blazers and cardigans. It has a soft V neck at both center front and center back necklines, and delicate spaghetti straps. The neckline and armholes are finished with a partial lining for a beautiful, high end finish.”

I’ve loved wearing the cami as a layering piece, but I’ve also loved it as a stand-alone piece on those really hot, sticky humid days. I’ve made three of the Ogden Camis with linen which is so breathable and such a great fabric for those days. I’ve also hacked the Ogden into a summer dress using very lightweight rayon for both.

The sizing was spot on for me. There were no adjustments needed which was great! I sewed up the Size 8 and my measurements are B37:W33:H38. When deciding on sizing, I usually look at the sizing chart and in addition to that, the finished garment sizing. It’s also handy to consider the fabric you’re sewing with. I could have possibly sewn up a size if I had chosen a very stable fabric but I found that linen “grows” so you can end up with a slight increase in the “give” of the fabric. On the finished garment chart, the sizing range is from bust size 33 inch to 59.5 inch but be aware the sizing is divided to two ranges.

It’s definitely great core item for your closet and it’s a pattern that keeps on giving! After this Ogden Month, I’m even more inspired for a few more creative hacks for next year.

Thanks for reading and happy sewing!

X Em

Hana Dress in Ankara Fabric

Last year, I had been keenly following Ankara Appreciation Week on Instagram which was hosted by Lena King @thatlenaking and Juliet Uzor @julietuzor_  so, when it came around again I was keen to sew something in this beautiful fabric.

Close up of my Ankara Fabric

Briefly, Ankara Fabric is a wax print cotton fabric which is deeply cultural to Africa. It is called by different names depending on where it comes from so Ankara mainly refers to the wax fabric from West Africa. The prints and the patterns themselves can have symbolic meanings. I bought my fabric from Mapalo Store and when I asked to buy some Ankara fabric I discovered a fellow sewing enthusiast! Her family owns the store and she was so kind in telling me about the fabric. We eventually ended up on her Pinterest looking at some ideas on what I could do with the fabric I had chosen. The main point that stuck in my mind was that with Ankara Fabric, it’s the pattern which determines what you sew up. Pattern matching is crucial to making the most of the fabric. Sewing is such a universal language! I was so touched that she took the time to give me some tips on how to sew up the fabric and now that I have a little experience, I’ll definitely be going back for more fabric to sew up.

Keeping those handy tips in mind, I ended up choosing the Hana Tank Dress by Pattern Scout. The Hana Dress has simple lines so I felt it would let the fabric “shine”. It’s also a dress that I loved wearing in summer and was one that I wanted to sew a few more of for the coming summer. I sewed the size 12 and the only modification I made was to lengthen the dress.

The Ankara Fabric I chose had these cascading repeating blue eyelet pattern on a red background. The blue eyelets actually remind me of peacock feathers. Cutting the fabric was a challenge as I initially thought the pattern was mirrored exactly symmetrically but it wasn’t. Once I realised this, I found a central point of the fabric to coincide with the waist and centre front of the dress. I also made sure the length accommodated to the cascading “feathers” to end with a band of red background around the base of the dress.

Choosing the centre point

The Ankara cloth is such a great fabric to sew. It behaves very well so it’s an easy fabric to sew. It is light but still has structure to it. It’s a very bright fabric so it surprised me when I found it hard to tell the right side from wrong side! Have a look at all the great makes on Instagram under the hashtag #sewankarafabric21

Thanks for reading and happy sewing!

X Em

Frankie Tankie Dress Hack

It’s winter in Perth but I just couldn’t wait to sew up the Frankie Tankie which is a pattern by Vanessa Hansen Studio. Vanessa worked for many years in the London fashion industry and she has posted some of the designs she has been involved in on her Instagram Page. She is extremely talented and her patterns are one of a kind. 

The Frankie Tankie is so cute with the tied strap detail. I’ve made the hacked shift dress version but I can see myself making this pattern a few more times! It’s just one of those patterns that will be easy to refresh and reinvent. Vanessa has acknowledged this by giving instructions for not one but TWO dress hack versions! This is such a cool inclusion in a pattern. 

Cute Shoulder Tie Detail

The pattern is beginner friendly. She has very detailed instructions with lots of explanations. It feels like she is holding your hand through the sew with easy-to-follow tips along the way and includes a bit of humour which makes it fun to follow. It felt like she looked into my brain when one of the steps said, “… do not use your scissors to push even if it is tempting”.

My dress version was simple to do. I’ve just increased the length of the tank by 15 inches. The lengthen and shorten lines are included on the pattern pieces which makes it easy to do this. In fact, there is quite a lot of detail for different options which I enjoy. Choices are given for if you want to use a facing, a lining or to make it double sided.

Sizing was spot on. I made the UK 12 B Cup. My measurements are 37 inch bust, 33 inch waist, 38 inch hip. No modifications were needed. Size range for garment measurements are from 34 ¾ inch to 41 ¾ inch full bust, 38 ¼ inch to 45 1/8 inch waist. The pattern is drafted for three different sewing cup sizes A, B and DD.

I really can’t wait to sew this again. I used a light denim fabric with a ditzy daisy print to make this version of the Frankie Tankie dress. I’d love to make another with an even lighter drapey woven like cotton lawn, silk or rayon. The options are endless. Definitely one that I’ll enjoy wearing on a hot summer day.

Thanks for reading and happy sewing!

X Em